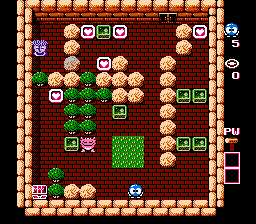
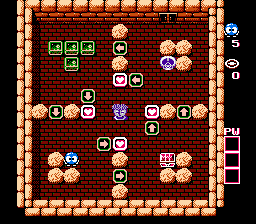
Collect the Heart Frame below the Medusa, taking care not to step into its line of sight.
Collect the three Heart Frames that lie near the top of the room, above the Gol.
Walk to the right wall. Push the lower right Emerald Frame up two spaces. Then move one space to the left and push the upper left Emerald Frame up two spaces. Pick up the last Heart Frame, and you will earn the Hammer power.
On your way back down, push the lowest Emerald Frame down two spaces, left three spaces, up one space, and slide it below the Gol so it can't burn you with a fireball.
Then walk up and stand to the left of the Emerald Frame above you. Push it left to the column of boulders, then push it up four spaces so that it stops one space shy of the wall above. Then walk around to its right side and push it left one space.
Walk to the left and use the hammer on the lowest of three boulders to the left of the Medusa. Walk up and push the Emerald Frame along the top wall all the way to the right. Then come down one space, and push the Emerald Frame on your left all the way to the left. Push it down one space, and then slide it in below the Medusa.
Collect the key.
Floor 8-2
Strategy
★★
Agility
★
Solution
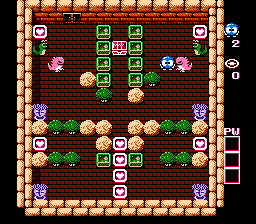
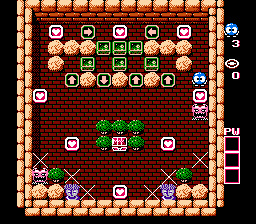
Collect the Heart Frame in the upper right corner. Staying on the right side of the room, push the Emerald Frame above and below the chest one space to the left. Then push the middle frame down.
Standing on the chest, push the Emerald Frame down three spaces. Then return to the chest and push the frame on your left two spaces to the left, then down to the trees below. Push the two frames on either side of you over to the Medusas. Collect the Heart Frame in the upper left corner.
Come to the center and collect the top three Heart Frames, but leave the last one since the Medusas will kill you if you take it. Do head down the alleys to the left and right to collect both Heart Frames between the Medusas.
Stand between the two lower Emerald Frames, and push them both one space away from the middle. Walk up to the chest, and push of the Emerald Frame on either side of the chest into the middle and then down to the Heart Frame below. Then push it to one side and then down. Then come back to the chest and do the same thing with the other Emerald Frame and deposit it on the opposite side of the Heart Frame.
Now you can collect the Heart Frame and head back up to get the key. Run straight up the center, and you should be able to avoid the Gols' fireballs.
Floor 8-3
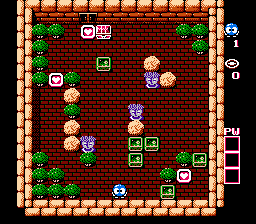
Solution of floor 8-3.
Strategy
★★★
Agility
★
Solution
Push the lowest Emerald Frame up one space, but leave the lowest Heart Frame alone for now.
Collect the two other Heart Frames on the left. Then stand below the lower Emerald Frame on the left, and push it up three spaces.
Walk over to the Emerlad Frame on the right, and push it up one space below another frame. Then come back to the frame in the middle and push it up exactly two and a half spaces so that it stops halfway between the boulder and the Medusa above.
Come back to the left side of the Emerald Frame you previously pushed up, and push it left one space. Then push the highest Emerald Frame up exactly two and a half spaces, so that it sits in between both the top Medusa on the right and the treasure chest on the left.
Head down and collect the last Heart Frame. The Gols will wake up, but you should be able to move quickly enough up the screen and between the two Emerald Frames at the top to reach the key before they can hurt you with their fireballs.
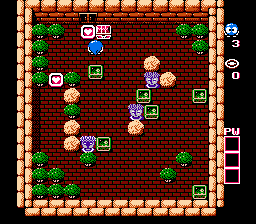
Floor 8-4
Strategy
★★
Agility
★
Solution
Walk counter-clockwise around the outer edge of the room until you reach the upper left corner populated by the four Emerald Frames.
Push two of the frames above and to the left of the Medusa. Collect the Heart Frames above the Medusa first, and then to the left of the Medusa.
Walk back around the outer edge of the room and return to the Emerald Frames. Push one frame over to the left arrow tile between the Medusa and the Skull. Push the last frame down through the down arrow tile closest to the Medusa until it is even with the right arrow tile. Then walk below it, push it back up one space, and slide it below the Medusa. Do not pick up the bottom Heart Frame yet.
Walk arounf the outer edge until you are close to the Skull, and push the Emerald Frame down to the right of the Medusa. Collect the right Heart Frame, and then walk around the Medusa to collect the bottom Heart Frame. You should have plenty of time to reach the key before the Skull has a chance to get close to you.
Floor 8-5
Strategy
★★
Agility
★
Solution
This stage is easier than it first appears. Start by running up to the top, and collecting two of the Heart Frames along the top wall. Stand above the Emerald Frame that lies directly above the only down arrow tile and push it through to the trees.
Very carefully push this Emerald Frame to the left, watching out when the right Don Medusa rises high enough to see you (walk up to get out of its line of sight before continuing.) Push the frame all the way to the wall, collect the left Heart Frame, and push the Emerald Frame down, trapping the left Don Medusa in. Again, remember to watch out for the right Don Medusa as you do this.
Walk back up to the top, collect the last Heart Frame along the top, and walk to the right. Stand above the right Emerald Frame near the top, and push it down until it's sitting on top of the up arrow tile. Then push the Emerald Frame to your left over one space so that it's above the down arrow. Walk around and push this Frame down to the trees below.
Push this frame all the way over to the right, collect the nearby Heart Frame, and then push the Emerald Frame all the way down, trapping the right Don Medusa.
Walk up through the right up arrow tile, and push the nearby Emerald Frame to the left until it's above the down arrow tile. Push it down to the trees, left one space, and then down until it is one space above the Medusa (in the same row as the trapped Don Medusas.)
Walk back up and push the center Emerald Frame near the top through the down arrow tile, down to the trees, to the right three spaces, and then down to the same row as the previous Emerald Frame. With both frames in place, you can push them outward until each one lies above either Medusa.
Walk up through the left up arrow tile, push the Emerald Frame to the right two spaces, and then back to the left one space. Push it down through the arrow tile, left one space, and then all the way down to the bottom wall.
Push the Emerald Frame resting on the up arrow tile up one space. Then walk back down and come up through the right up arrow tile, and push the frame above the down arrow tile. Push it down to the trees, over to the right three spaces, and down to the wall below. You should now be able to collect all of the remaining Heart Frames and the key without being seen by any of the Medusas or Don Medusas.
The 'X's on the map indicate the final positions of the emerald framers.