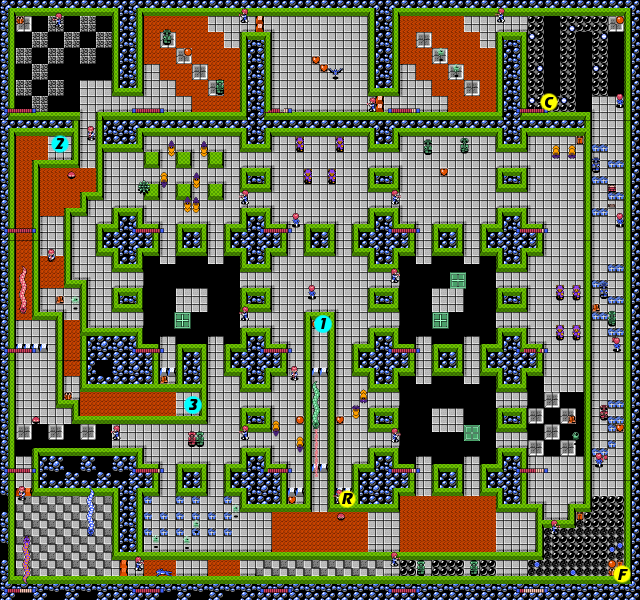
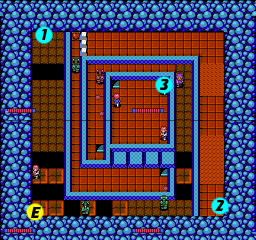
Maps[edit]


Walkthrough[edit]
The first level is composed of a 5 × 5 grid of single rooms. The path to each crystal diamond is guarded by at least one fire breathing Gerudo Anaconda, and two of them in one case. You are free to collect the crystals in any order that you choose. However, the difficulty of the double Anaconda room should be taken into consideration. There are two strategies for this fight. You could save that room for last, when you have presumably accumlated some power-ups, such as the hidden Energy Tank and hidden Fire Rate Up, as well as some Astro Wear to absorb the damage. The problem with this strategy is that if you die, you will have to start the level over from the very beginning. As a result, an alternate method is to take the 30 seconds that it takes to walk from the start to the double Anaconda room, and try to defeat them before anything else. That way, if you die, all you have to do is spend another 30 seconds walking back to that room and trying again. The choice is yours. This walkthrough will present one possible method, which saves those two snakes for last.
If you find yourself falling into a gap or a hole, you will arrive in the center room of the underground which spans three rooms across. In the left room, you will find Astro Wear, while in the right room, you will find Astro Pants. It's not a bad idea to gather both as long as you're down there, but be sure to collect the Astro Pants first.
First Crystal[edit]
You begin in the very center room of the grid. From the start, if you take the right south exit, you'll be in a room that is divided by the presence of an Anaconda in the middle corridor. You will attack this one first, but beforehand, continue down to the right south exit below. Here you will be trapped in a small alcove in the top right portion of the room, at the mercy of an octopi's bubbles. Shoot the right tile below the blocks which appear to discover the Fire Rate Up enhancement. Collect it, and destroy one of the blocks that prevent you from returning to the room above.
Return to the starting location, and travel back down the left south exit. Fight the Surumeria and collect the Cosmo Ball, then take either west exit. Fight the two Imanokku robots and continue through either south exit. Fight the Jeribu-kas that float around and watch out for the holes which appear in the ground. Falling in these will drop you in the underground. Continue through the top east exit. In the next room (where you collected the Fire Rate Up) bounce your way across the lava pit and watch out for the Octopi. Travel through the north exit. You will now be face to face with an Anaconda in a very narrow corridor. This means there is very little room for you to avoid getting struck by the snake's flame, but likewise, he cannot avoid your fire particularly well. Don't worry about defending yourself, simply fire up as rapidly as possible. If the snake does breath fire, try to move out of the way if possible, and resume firing immediately. Once the snake is destroyed, collect the flashing apple it leaves behind and head up to the north to find a Cosmo Ball and a staircase. Take the stairs to the dungeon level.
The dunegon is a smaller collection of four rooms, 2 × 2. Every staircase in the main map leads down to one of these rooms. You will arrive in the upper left corner. Begin making your way down to the room below. In the next room, be sure to shoot at the tiles in the lower left corner. You will find the first hidden Energy Tank here. Continue following the path around, jump over the gaps, and destroying any Imanokku robots that you see before advancing. Eventually, you will reach another staircase. Descend down the stairs to find the first Crystal Diamond Guard dome. Don't touch it, but shoot at it until it is destroyed. Then collect the crystal. When you're done, return all the way back to where you fought the first anaconda.
Second Crystal[edit]
From the first Anaconda, return south to the lava room, return west to the room with the Jeribu-kas, and back up to the pair of Imanokku robots. Then head west. Carefully jump over the gaps and fight the Octopi when it rises out of the ground. Head north from here and you will arrive at the second Anaconda. This fight is fairly similar to the first one, only you can easily duck out of the way when the snake is breathing fire. Fight the snake but preserve your hit points. You'll take a lot of damage crossing the lava unless you've collected a lot of Astro Pants. After destroying the snake, collect the flashing apple, and remember to hop constantly as you cross the lava to minimize the damage you take. In the room to the north, you will find the staircase that leads down to the dungeon.
You will arrive in the lower right corner. Jump as far over the lava pits as you can and reach the north exit. Again, jump over the lava pits. Beware as you approach the top, as wolves will appear out of nowhere and race towards the right wall. After all three appear and disappear, head west. Watch out for the robot that fires below you since you cannot attack it (unless you use Cosmo Balls, but this isn't necessary.) Shoot out the blocks that prevent you from taking the next corridor south and destroy the other robot that is in your way. Take the path down and around to the next stairwell. Descend down the steps to find the second Crystal Diamond Guard dome. Shoot the dome and collect the second crystal, then make your way back to the second Anaconda snake's room.
Third Crystal[edit]
From the second Anaconda, return to the room below with the lone Octopi. Destroy it, and continue south to the room below. Here is the dreaded double Anaconda room. The two snakes roam left and right along the top and bottom of the room. The top snake always fires down and the bottom snake always fires up. Try to focus on one snake at a time, shooting their heads from the side as opposed to trying to fight them head to head as you did with the other two. If you run out of room, jump over to the other side. Always get out of the way if one of them starts to breath fire. They have a tendency to reverse direction immediately after breathing fire, but not always. If you survive the ordeal, collect the flashing apple they leave behind, and continue on to the low east exit.
You'll have to pass through three thin corridors. The first one has a wolf and some lava pits. The second one has another wolf and some blocks which appear as you get close. The third has two robots and a collect of destroyable blocks. Always shoot all of these blocks as it's an easy way to discover hidden items. When you make it to the room in the lower right corner of the map, you will see a set of four blue flash bombs trapped in the corner. Remove as many blocks as you can before freeing the flash bombs so that they don't get in your way. Be sure to shoot the tile in the lower right corner to reveal the Range Increase power-up, which will be very helpful.
Next, you must travel north through another three narrow corridors. All of the contain robots, and the top one contains the rising and falling Vega walls. They are more of a nuisance than a threat, so jump over them. In the upper right room, you must cross over a path covered with breakable blocks. The Cosmo Ball in the corner may look tempting, but the real prize is the Cannon Shot enhancement in the lower segment of the path. This will enhance your weapon to the second level, and you won't find another Cannon Shot until stage 4, so try not to miss this one. Don't be fooled into thinking you are obligated to travel along the whole path. You can shoot out blocks across the gap and leap over to make your own short cuts.
From that room, you must now travel west through three large rooms. The first has a pair of Jeribu-kas surrounded by lava. The second traps you in with a Radon and two Love Point hearts. Destroy the bat and collect the hearts before moving on. The third room is like the first, but with two robots. When you reach the room in the upper left corner, you will find no enemies, and a nearby exit. However, there is an item hidden in the upper left corner if you take the time to examine the far-off platform. From this room, head south and avoid or defeat the Octopi in the lava. Head south again and beware of the Power Shoes items; all eight tiles around it will eventually disappear. If you collect it, collect it quickly. Head south again, collect the Astro Wear, and finally head east to reach the staircase that leads to the dungeon.
The stairs lead to the inner-most chamber of the upper right room. You will actually find yourself unable to explore any other part of the dungeon from here except the staircase off to your left. These stairs lead to the third and final Crystal Diamond Guard dome. Shoot at it to destroy it, and collect the diamond. This will summon your interdimensional transport which will pick you up, and whisk you off to the next stage.


