Controls

- Joystick: Use the 8-way joystick to change the direction of the Star Fighter. It is always moving, and its speed increases as the game progresses.
- Firing Button: Use this button to make the Star Fighter fire shots at the enemies. It is capable of firing to both its front and rear.
- 1 or 2 Players: Push these buttons to begin a one or two player game.
Characters
Star Fighter
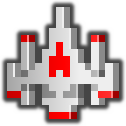
This is the prototype Star Fighter that the Federal Council has developed for the purpose of destroying the Bosconian enemy bases. The Star Fighter is equipped with two guns, one facing forward and the other facing behind. They fire simultaneously. The Star Fighter can travel in eight different directions, and it has a special propulsion drive that negates momentum so it can stop on a dime and instantly turn 180 degrees if the pilot chooses to do so. At the start of every stage and each new life, the Star Fighter starts out a little slowly and takes a short while to accelerate to full speed. Once at full speed, you can never slow down, so be prepared to maneuver out of the way of obstacles, which do not appear on the radar.
Note: If you watch the Star Fighter explosion carefully, you will see the original Galaxip explosion from Galaxian.
I-Types
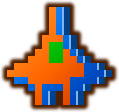
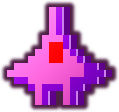
The I-Type fighters (referred to by the Bosconian as Eich Missiles) are the most direct fighters in the game. They try to collide with your ship as quickly as possible. They can't turn nearly as fast as the Star Fighter can, so they must arc around in order to catch you. The I-Type on the left is a formation leader. Formations will leave from enemy bases in squadrons of five. If the formation leader is destroyed before the others, the rest of the squad will disperse. If the entire squad is defeated, the player is awarded a bonus.
P-Types


The P-Type fighters (known as Ploor Missiles to the Bosconian) are a slightly trickier than the I-Types. P-Types don't attack you as directly as I-Types will because they know better than to end up behind your ship where you are just as likely to shoot them from. Instead, they travel in sweeping arc, preferring to attempt to ram your ship of the side where you can't fire from. The P-Type on the right is a formation leader, and follows the same principles as the I-Type formation leaders.
E-Types
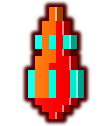
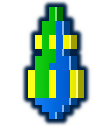
E-Type missiles, (also called Eddore Missiles by the Bosconian) are typically missiles fired directly from the core of the Enemy Bases. E-Types that are fired from a base do not turn, they only fly straight, but they are extremely fast, and very dangerous if you do not anticipate their launch from the base. E-Types can also create formations, and those found in formations do turn. The E-Type on the right serves at the formation leader and the formation will scatter if the E-Type leader is destroyed.
Spy Ship

Identifying and destroying Spy Ships is especially important. If Spy Ship sees you (which occurs whenever you see a Spy Ship), and manages to get away, you will typically end up in a red-alert scenario, with massive amounts of P-Types and I-Types coming after you. If you miss a Spy Ship the first time that you notice it, don't worry. It will typically pull a 180 and do another run or two past you. Do not let it get away during this time. The only other thing that can prevent a red-alert beside you shooting the Spy Ship, is if the Spy Ship inadvertently collides with an Asteroid or a Mine.
Obstacles

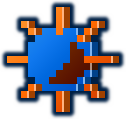
These inanimate objects are stationary throughout space. They simply serve as obstacles in your way as you fly around. They are equally deadly to you and the enemy. Contact with either is fatal. Cosmo-Mines only serve as a slightly greater danger because they explode when hit. Whether the explosion is caused by a shot or a collision, the explosion (about twice the size of your ship) can kill you if you get caught in it. Once destroyed, they do not repopulate the space they were in until the next stage, so you can clear a good swath of space, and it will remain cleared.
Enemy Base
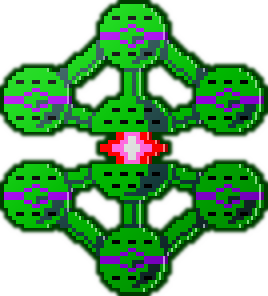
This is the feared enemy base that was, until recently, an impenetrable fortress to the Federal Council. But recent plans obtained from a brave spy have indicated two structural weaknesses previously unknown to the Council. The Star Fighter has been equipped with a special energy based weapon designed to exploit these weaknesses, such as the vulnerability of the six orbs that serve as cannons on the base to certain wavelengths of laser, and the susceptibility of the energy core to overloading through impulse beams. After the Bosconian army becomes alerted to your presence, they will begin to secure the core with armor plating in stage 2, and they will begin firing missiles from the core in stage 3. But in order to fire the missiles, the armor must rise to allow the missile to exit. This is your opportunity to strike. A Base can be destroyed with one clean shot to the core, or by destroying all six orbs on the outer edge.
Scoring
| Asteroid | 10 |
| Cosmo Mine | 20 |
| I-Type (Leader) | 50 (100) |
| P-Type (Leader) | 60 (120) |
| E-Type (Leader) | 70 (140) |
| Spy Ships | 200, 400, or 800 |
| Enemy Base Orb | 200 |
| Enemy Base | 1500 |
| Complete Enemy Formation | 500 (I), 1000 (P), or 1500(E) |
