Spree River

|
Legend:
Skull: Ambush |


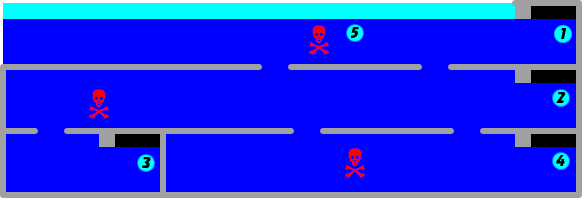
You begin this act scuba diving through the Spree River. The river itself is composed of three levels. In these three levels, there are four entrances to two buildings. One building is optional, while the other contains your goal. You needn't concern yourself with oxygen, but you do need to concern yourself with the threats that occupy the water. Enemy divers will swim along behind you and shoot you with their harpoons. Mines float in the water, waiting for you to get too close before exploding. Coral reaches up from the rock floors. Deeper down, sharks and octopuses swim around looking for their next meal. Naturally, there are locations where ambushes will occur as well. You'll have to confront enemy divers who swim in and out of the scene.
Optional building


The optional building is the easier of the two to access. You can access it by swimming to the far right side of the top and middle levels of water. If you access location 1, you will arrive in the lower left corner of the map. If you access location 2, you will arrive in the lower right corner. Regardless of which entrance you arrive through, you must step forward and open the door by pressing ![]() . Similarly, if you ever encounter a wall that suddenly slides down and prevents you from going any further, you must press
. Similarly, if you ever encounter a wall that suddenly slides down and prevents you from going any further, you must press ![]() to lob a grenade at it, and blast a hole in the wall. You can hold a maximum of three grenades at any one time. Defeating an enemy will always provide you with one grenade. And you will always encounter an enemy at specific locations, you can you kill an enemy, walk a step away, and return to kill another enemy until your collection of grenades is full.
to lob a grenade at it, and blast a hole in the wall. You can hold a maximum of three grenades at any one time. Defeating an enemy will always provide you with one grenade. And you will always encounter an enemy at specific locations, you can you kill an enemy, walk a step away, and return to kill another enemy until your collection of grenades is full.

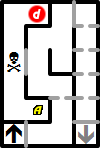
Other than collecting items, there is little reason to explore this building. There are four items that you can find. The first is a pair of infrared goggles. These allow you to see where the invisible laser beam gates are, although you can just as easily identify them by the line of holes in the ceiling from which the lasers are fired. Unfortunately, they don't stick with you once you leave a building, so they are only good for the building you find them in. Right nearby the goggles is a stockpile of ammunition. If you happen to lose a lot of health from enemy fire or the laser beam gates, you'll want to head over to location c where you will find a health drink that restores your health.
If you stand over the yellow A, you'll trigger a trap door that will drop you to the basement level. While you're down there, you can collect another stockpile of ammunition. However, no matter how hard you try to investigate the corridor on the right side of the basement, you'll never succeed in reaching the door at the end because there are four falling walls and you can only ever carry three grenades. Even if you did get past the doors, there is nothing of note on the second basement. Instead, head to the ladder in the lower left corner and climb back up to the first floor. Make your way out through either exit and return to the water.
Goal building
Getting to the goal building is a much more difficult prospect. When you reach the entrances found at either end of the bottom level of water, you will still have to travel a bit before you are truly inside the building. While both entrances at locations 3 and 4 look to be an equal distance to reach, location 3 will force you to cover more dangerous ground than location 4, so you are encouraged to swim to the right side of the third water level. It's even possible to bypass all of the ambushes if you take the first passage between the top and middle water levels, and the second passage between the middle and bottom water levels.

|
Legend:
|

The subterranean interior below the Spree River is an especially treacherous place to travel through. Heat seeking missiles fly down from the ceiling. Laser defense systems fire extremely damaging beams at you. And agents riding hovering platforms fire small missiles as well. Your best bet is to avoid as much as possible and make your way to location 6 in the lower left corner. If you happen to fall into the water in the middle of the lower level, you will be returned to the highest water level and be forced to make your way back. Be sure to jump the gaps over the water very carefully to avoid that fate. You will have to face at least one laser system while crossing over the water, so decide whether you want to shoot it and destroy it to recover some health, or simply jump over it and avoid it entirely. Make your way to the door at location 6 and push ![]() .
.

When you enter, you will meet Oz Windham, who was investigating the helicopter incident. He informs you that the enemy is headed to Greece, and that you can escape through this building. When you start out, you will be facing a dead-end. You will have no choice but to step forward and trigger the trap door at location B. A thorough investigation of the basement will reveal nothing of interest except a single enemy guarding the ladder back up to the first floor.


When you climb up to the first floor, you must carefully navigate your way around the southern portion of the floor, so as to avoid the other two trap doors that will return you to the basement and force you to retrace your steps. Head for the falling wall in the upper right corner of the floor, then wind your way around to the northern corridor where an enemy awaits. Take him out and follow the path down and around to the left side of the building, and ultimate to the exit. As soon as you climb up the final ladder at location 7, you will have concluded Act 3 and begin Act 4..