More bad news[edit]
After being unable to revive Nei, you head back to the Central Tower in Paseo. Your commander informs you that, due to the conflict and subsequent explosion at Climatrol, Mother Brain considers your team criminals, and will send all manner of robots to terminate you.
Undaunted, you attempt to proceed with your mission. With Climatrol out of control and pouring water everywhere, it could threaten the existence of all life on Mota. The only way to prevent catastrophe is to open all four dams around the center lake, and allow the excess water to drain into the sea. But each dam is locked. If you speak to the librarian in the Central Tower, and ask her about the dams, she will tell you that each dam is unlocked by a card, and the cards are contained in a Control Tower. However, there are control towers in every town on Mota, so you need to find the correct tower in order to retrieve the cards.
Once you step outside Paseo and explore the outside, the affect of stopping Neifirst's biomonster generation, along with Mother Brain's criminal designation becomes immediately clear: Every combat encounter will only consist a various types of robots, as no more biomonsters appear. Don't forget that Kain happens to be an expert when it comes to damaging robots. If you had Hugh in your party (who specialized in biomonsters), it's a good time to swap him with Kain.
You'll need to search for the right control tower in order to find the access cards to the dam. While there are a number of them across Mota, only Piata contains a trio of towers that are off to the side of the town. Even getting to them is tricky, as you have to walk to the top of the town, and then to the left, and hug the edge of the town so that game doesn't think you're leaving Piata. When you reach the three towers, examine the middle one, and you will be grated access to the interior of the tower.
Regrouping with the right party[edit]
Now that you've lost Nei, you need to figure out what group you want to bring with you. Rolf is required, you can never replace him. Looking at the rest of your roster, you have:
- Rudo: Rudo is your pure damage dealer. Depending on what weapon you equip him with, he can either deal a lot of damage to one enemy, or deal less damage to multiple enemies. He also has a ton of health, making him a lot more resilient in battle. He's always a good choice.
- Amy: Amy is the best healer in the game. With an abundance of spells and tech points, she reduces your reliance on Diamates, Trimates, and Star Mists. Apart from Rolf, she's the only person who can revive a member from death. She also gains access to a wide array of offensive magic over time. However, she is Rudo's opposite in that she can't deal a lot of weapon damage, nor does she have a lot of health, so keeping her alive can be difficult, even when she's in the back of the party.
- Hugh: Hugh's specialty is biological creatures. Most of his spells are designed to do damage to, or cause negative statuses on, biomonsters. In the phase of the game that you're about to enter, the biomonsters are going to be replaced entirely by robots for some time, greatly reducing Hugh's usefulness.
- Anna: After Rudo and Rolf, Anna is the next best combatant in the game. Her Slasher weapons, though not particularly strong at first, are near guaranteed to hit every enemy in a group. Equipping her with two Slashers allows her to put a pretty good dent in the enemies you face.
- Kain: Kain is Hugh's equivalent when it comes to robots, as opposed to biomonsters. Most of his techniques are uniquely capable of hurting and damaging mechanical enemies. That is great, except for the fact that there will come a time when you face substantially less robots, and he won't be as useful. After that, he's a weaker Rudo.
- Shir: Shir is not as useful as the rest of the team in combat. The only attribute that Shir excels at is Agility, making her one of the first, if not the first, to act in battle. This can be useful if you want to make sure that you successfully heal someone before they get attacked. Other than that, all of Shir's usefulness lies in her ability to potentially steal items from shops, which you can attempt entirely in Paseo.
Control Tower[edit]
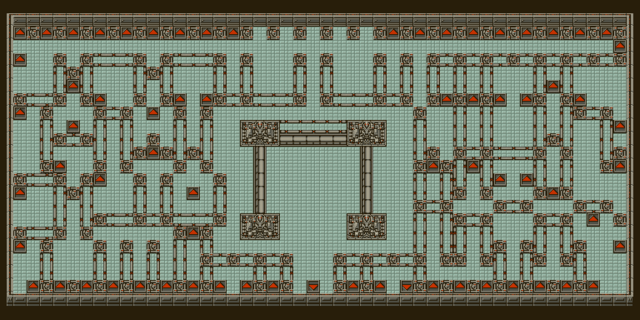
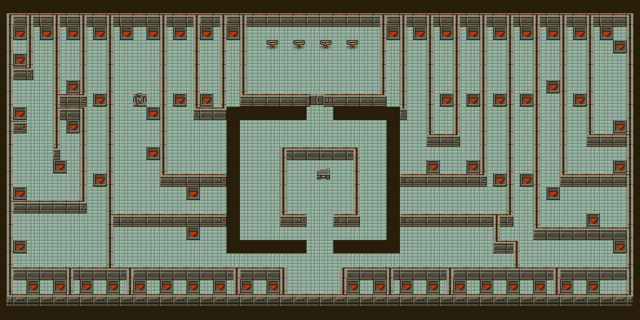
There are no treasure chests to collect in the Control Tower. Just a mind-numbing number of chutes that you must use to navigate between the two floors. Along the tops and the bottoms of each floor, the chutes are packed so closely together, that you may hardly stay on one floor for more than a few seconds before cycling back and forth between each floor. Make sure you bring along which ever party member was taught the Musik technique as its use is very much needed here.
Floor 1[edit]
Floor 2[edit]
Your goal is to reach the center of the second floor. In order to do so, you must pick a path that begins on from the top of the first floor, and allows you to traverse from the top of the second floor to the bottom of it, before access the row of chutes along the bottom. Both sides enable you to do this, but unfortunately the chute that gets you to the middle is only accessible from the left side. The top chute which is fourth from the left enables you to reach the lower portion of the second floor, and take a chute back down to the first floor. Once you begin using the chutes at the bottom, you begin to alternate which floor you're on very quickly as you make your way to the center of the tower. Be sure not to miss the one chute that brings you into the center.
Once you make it to the center, you'll find a keyboard. In order to operate it correctly, you need the Musik technique taught to you by the musician in Oputa. Select the member of your team who knows Musik and use it. This will cause the door above the keyboard to unlock. Access the area up above and you'll find four machines. Examine each machine, and they will each give you a different colored card, one for each dam in Mota.

