You can only have one Special Weapon at a time. Collecting the same weapon upgrade multiple times will usually upgrade the weapon. If you collect a different upgrade you will switch to that weapon and drop back to level 0.
Similar to when you collect a Power Chip, the Zanac flashes to indicate temporary invulnerability whenever you collect a Special Weapon bonus. Special Weapon upgrades either appear in Weapon Distros on the ground or are dropped by Cargos.
When you use your Special Weapon to shoot at the rare Eye Eye statue, any counters will get reset to maximum and you will automatically be upgraded to the weapon's most powerful level as well as racking up some points. Obviously, this only works with weapons that can hit targets on the ground.
Tile 0 - All Range Weapon

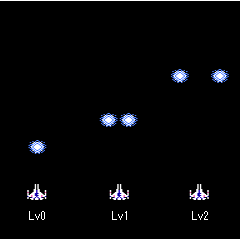
Description: This is your default weapon when you start the game or after you die. It is actually reasonably powerful, especially because it is the only weapon you can fire behind you or directly to the left or right. You are also able to fire diagonally.
Level Description 0 You fire a single bolt of energy forward or in the direction you are steering. 1 You will fire twin bolts of energy. 2 The width between the twin bolts will increase. 3 No change. 4 No change, but the weapon can be used to destroy bullets.
This weapon works against ground and air targets, but it will not destroy bullets unless it is leveled up four times. Weapon 0 is very useful in stages with long stretches of Degid attacks. However, its weaknesses are blocker enemies (like Eggs, T-Cells, Mortars etc.) sine they can block the way to other enemies.
Tile 1 - Straight Crusher

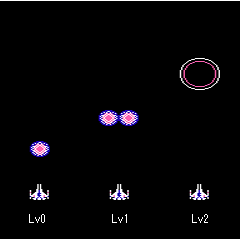
Description: A ball of energy shoots straight forward from your ship until it leaves the screen. You can only have one ball of energy on the screen at any time. A counter displays the number of shots you have left. Each time you collect Tile 1 the counter will refill.
Level Description 0 You release a ball the same size as the single bolt of Special Weapon 0. 1 You will release twin bolts of energy. 2 You will release one large ball twice the size of the original bolt. 3 No change. Just additional stock 4 No change. Just additional stock. 5 Large ball moves much slower now, but rotates in similar fashion as Weapon 3. (not pictured)
In general, this is a poor weapon except at level 3-5. Even then, Tile 7 is still much better. It will destroy just about anything, even CHIPs.
This weapon works against both ground and air targets, even bullets.
Tile 2 - Field Shutter

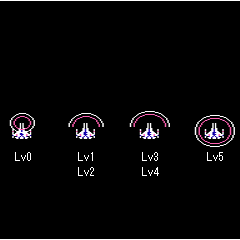
Description: A shield protects a portion of your ship from all attack. Cannot be shut off and is powerless against targets on the ground. A counter will indicate how many more hits the shield can take, but the lower the counter the less of your ship is protected. Conversely, collecting more Tile 2 upgrades will increase the counter and area protected.
Level Description 0 A shield will be appear that can sustain 50 hits. 1 An enhanced shield will appear and absorb 80 hits. 2 The shield will absorb 100 hits. 3 An enhanced shield will appear and absorb 120 hits. 4 The shield will absorb 140 hits. 5 A full shield will appear all around Zanac for a full 80 seconds.
For some reason, the System really, really hates Tile 2. Collecting it will make aggression levels shoot upwards and you can expect to be assaulted by Degids after picking up even a single one. Because of this and the fact that it leaves you with the Conventional Weapon as your only offensive weapon, it is mostly useless and should be ignored in favor of other weapons.
For those who want to upgrade this weapon to maximum, this is how formula works:
- Picking up Field Shutter for the first time unleashes a squadron of Degids (in 1st area). You should either move to one side of the screen and shoot halves before they reach you or moving to the leftmost or rightmost edge of the screen. Initial Degid attack stops rather quickly. Sometimes picking it up for the first time causes 2 red Golgos to appear instead.
- Picking up another weapon 2 causes two red Golgos to appear (if they didn't appear in the first time). It's best to get close to them to eradicate them. This may sacrifice your shield's power a bit, but gets rid of them quickly.
- When collecting another weapon 2, Sig activity will increase and now appear frequently and in bunches. Sig attack lasts much longer than previous two.
- Soon after Sigs, Mortars show up who won't leave you alone until Weapon 2 is maximized.
- Maximized weapon spawns a several Valkyres. Also, when continuing picking up that weapon a lot, they start spawning too.
The Field Shutter does destroy bullets. It is useless against targets on the ground, however, including bases. You can get this weapon to maximum only once per game. Picking up another weapon 2 tile causes it to revert to level 4.
Tile 3 - Circular

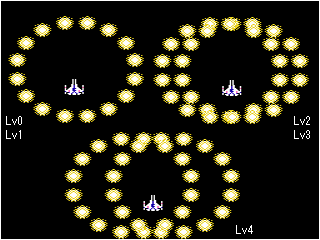
Description: A ball of energy circulates around your ship, destroying everything it touches but leaving everywhere else vulnerable. A counter ticks down each second the weapon is running until it runs out and returns you to Tile 0. Collecting another Tile 3 will upgrade the counter and potentially upgrade to a double version of the same weapon. You can't deactivate this weapon, but it can be deactivated when it bounces off a capital ship.
Level Description 0 One orb will circle around the ship. 1 No change, just an increase in time. 2 Two orbs will circle around the ship. 3 No change, just an increase in time. 4 Two orbs will circle around the ship at a wider range.
This is only marginally better than Tile 2, but eventually a ship or bullet will sneak past your perimeter and destroy you making it a less than desirable weapon. However, it is invaluable against Degids due to their relatively slow speed but being able to attack from sides.
The Circular is powerless against objects on the ground, but will destroy anything in the air including bullets.
Tile 4 - Vibrator

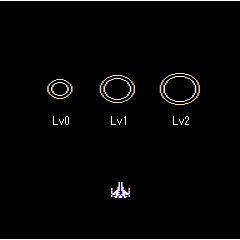
Description: When you activate Tile 4 a ball of energy about the size of your ship travels forward a fixed distance, then begins oscillating horizontally across a portion of the screen. A counter displays the number of hits it can take before disappearing. You get 60 hits each time you fire Tile 4; each hit makes the field of energy a little smaller, much like Tile 2.
Level Description 0 A small orb will vibrate in front of the ship. 1 A medium orb will vibrate in front of the ship. 2 A large orb will vibrate in front of the ship.
Unfortunately, while the weapon is active you cannot move it or fire another one. This means that only a fixed portion of the screen is protected from incoming enemies for any portion of time and it can do nothing against enemies that attack from the side or the rear of your ship. You just have to dodge and use Conventional Weapons on the rest. When your 60 seconds are up you can put the Vibrator in a more useful part of the screen but you will probably get killed first.
It does work against bullets and objects on the ground. Vibrator is moderately useful when attacking fortresses, capable of eliminating a large number of cores at a time.
Tile 5 - Rewinder

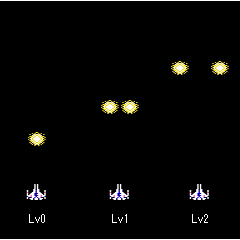
Description: The Rewinder shoots a ball of energy upwards from your ship a fixed distance, then the ball falls back until it hits the Zanac at which point you can fire again. It moves with your ship as you steer left and right but is always directly in front of it.
Level Description 0 You release a ball the same size as the single bolt of Special Weapon 0. 1 You will release twin bolts of energy. 2 The width between the twin bolts will increase.
Tile 5 will destroy bullets and Ground Targets. It is marginally useful against bases but is otherwise likely to leave you vulnerable unless you can upgrade to its maximum level. As a reward for sticking with this difficult weapon, it will evolve to a new weapon if you collect three more Tile 5s after reaching Level 2.
Tile 5 - Laser
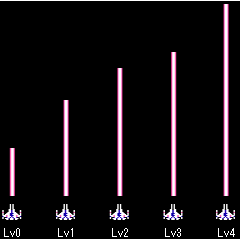
The laser is a concentrated blast of energy that will crash through every enemy uninterrupted. With each additional Tile 5 that you collect, the length of the laser will increase, up to a maximum of four times.
Level Description 0 Collect three more Tile 5s after reaching the Level 2 Rewinder to fire the laser. 1 The length of the laser increases. 2 The length of the laser increases. 3 The length of the laser increases. 4 The laser reaches its maximum length.
The laser can destroy bullets and ground targets, and won't even ricochet off of large enemies. It can even destroy egg husks with relative ease. However, it can only be fired straight, so it's best to use with Super Guns for added side protection.
Tile 6 - Plasma Flash

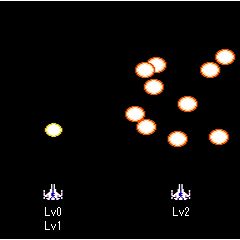
Description: A single ball of energy travels from your ship. When it contacts an aerial enemy the entire screen is cleared of everything other than Special Weapon upgrades, just like when you touch an Enemy Eraser. A counter displays the number of shots remaining before you revert to Tile 0. Collecting each additional Tile 6 will reset your counter.
It does not affect targets on the ground at all. Tile 6 is useful to get through the occasional patch of dense enemy craft, but you might be better off sticking to another Special Weapon and using Enemy Erasers instead. Power up Tile 6 just once early in the game to collect a large number of extra lives and gain fire rate upgrades. However, if you die and find Weapon 6, it's not always a bad idea to pick it up. In stretches of level where System send predefined enemy waves to you, Weapon 6 not only clears the wave, but also stops the predefined wave prematurely which can be useful in such Areas as 8.
Tile 7 - High Speed

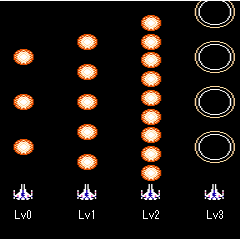
Description: Arguably the best offensive Special Weapon in the game. A rapid fire stream of energy balls shoots from the front of the ship. It veers a little bit left and right as you steer in those directions, but does not shoot directly to the sides or to the rear. A counter displays the number of seconds of continuous fire left. Collecting another Tile 7 will reset the counter to 200.
Level Description 0 An open line of bolts will fire at high speed from the ship. 1 A half-open line of bolts will fire at high speed from the ship. 2 A closed line of bolts will fire at high speed from the ship. 3 A line of large energy bolts will fire at high speed from the ship.
This works against Ground Targets and bullets.