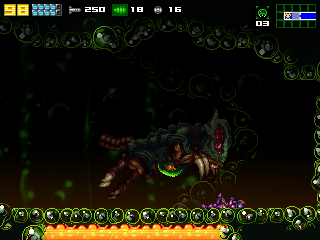
Throughout your mission on SR-388, you've visited many breeding grounds and nests where Metroids reside. But this area, known simply as The Nest, is home to some of the strongest and most powerfully evolved Metroids found throughout the planet. Three Omega Metroids occupy their own lairs and must be defeated before you can advance. But first, you must navigate your way through dark conditions to find them.

Reaching the Nest[edit]
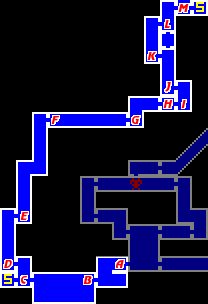
The earthquake triggered by defeating the first Omega Metroid allows you to continue on your way to the left through the lowest region of SR-388. As you run into room A, several enemies will burst from the ground. Drop down to the rocky region below, and either Screw Attack the enemies which protrude from the rock on the way to room B, or use the Ice Beam to freeze them in place.
Room B contains a pool of lava. Creatures crawl around the edges of the small platforms which are placed in a way that it makes it difficult to Space Jump through the room. The double spinning blade enemies pop out from both the ceiling and the lava covered floor. Make your way to the left to room C. As soon as you enter room C, cross over to the left to find a save station. Save your game, and then climb up to the top of room C to reach room D on the left.
Room D is a vertical chamber which you must climb. There are a couple of enemies placed between very narrow pathways to the top which are easily dispatched with Screw Attack. At the top, head right to room E. You must climb to the top of this room as well, but it's a more of a winding tunnel that leads to the right as you progress. Head to the right to reach room F.

Once you enter room F, the lighting will begin to dim. Room F contains a series of narrow crevices which are connected by tunnels which must be bombed or crashed into with Screw Attack in order to clear. Many of the crevices contain a small inhabitant that races back and forth within them. One easy way to determine where the tunnels are that connect the crevices, and simultaneously remove some of the creatures, is to detonate a Power Bomb in the room.
Make your way to the right side of room F in order to reach room G. As you climb up to the top of room G, the environment begins to change, and you begin to enter the Nest region. You will officially transition in single room H, where your scanners will detect three Metroid life signals. It's possible to discover a shortcut in this room. It turns out that the ceiling, and most of the blocks above it are Speed Boost tiles. If you run into room H from room G and squat down to store your Shinespark, you can press jump and fly straight up through the ceiling and take a shortcut all the way up to room L.
Assuming you don't take this shortcut for whatever reason, head right to room I. Carefully jump up any of the available narrow pathways to the top, and head left to room J. Jump up to the top of room J, avoiding or crashing into the small insect enemies with Screw Attack, Head left to room K, which contains no enemies and small platforms that are destroyed by Screw Attack. Head right into room L, and jump to the top through the insect enemies to reach room M on the right. Across the way is a path to a save station. Save your game and prepare for the Nest.

Investigating the Nest[edit]
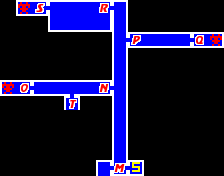
You will likely visit the save station at the bottom of room M frequently over the course of the next few battles. You are about to go up against three Omega Metroids. It's highly advised that you return to this save station between each battle to refuel and resupply your ammunition.
Begin climbing up room M, hanging a little more on the left side. It's extremely dark in here, but there should be just enough light for you to notice the entrance to room N. Once in room N, head left. You will eventually see a path that leads down below to room T. However, that room is filled with lava. Even though lava doesn't hurt you any longer, thanks to the Gravity Suit, you are still unable to progress any lower. You'll have to wait for the next earthquake to proceed further. For now, return to room N and continue left.

When you reach the end of room N, you'll have to pull yourself up into the narrow passage and roll through in Morph Ball form. You will arrive in room O, where the first Omega Metroid is waiting for you. Use the same strategy against this one as you did before. Seven Super Missiles to its stomach will destroy it, or four to the back when its open. Then return through the narrow passage to room N, and head back to room M.
If you are low on energy or ammo, return to the bottom of room M to save your game and restore Samus. Otherwise, continue up room M and stay along the right side to find the entrance to room P. Room P is a lot like room N, except with a couple of narrow pathway to navigate through. Morph Ball through the passage at the end to room Q to fight the second Omega Metroid. This fight will be no different. When you defeat it, return to room M and either drop down to save, or continue to climb up to the very top to find room R on the left.
Room R is quite a bit bigger than rooms N and P, but it contains no additional threats. When you reach the left side, climb up through the narrow passage and roll into room S where the third and final Omega Metroid is waiting. This battle is identical to the two that preceded it. Defeat this Omega Metroid the same way, and you will trigger the next earthquake. At this point, you can return to room T to find that the lava has receded and you can drop to the bottom of the room to continue your mission.