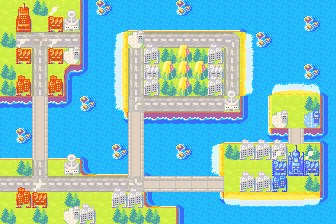
Pivot Isle, a small/medium map primarily focused on ground/air combat. Docks are present if one decides to take that route (in this brief walkthrough, this guide will not be using the docks at all). There are four central landmasses, two starting peninsulas and two islands accessible by long bridges. Because you start with a factory at the southern island, you should have a good early advantage in terms of capturing neutral bases.
The enemy CO here is Eagle, the daring pilot from Eagle Earth, who is well-tailored for this map because there are two starting airports.
Setup[edit]
Because we are dealing with ground/air warfare, choosing Eagle as your CO is a great option. However, because the number of cities here is not incredibly high, nor is the map very big, I actually will be using Rachel here. Eagle does have superiority in the air, but given the conditions here, I do not feel that I will be taking great advantage of this, as given the funds, most likely my air force will not be very large. In addition, Rachel's SCOP is very well suited for this map - almost all of Eagle's units will be stationed at his home island.
Skill set used:
- Star Power (power meter fills up faster)
- Brawler (direct attack +8%)
- Slam Guard (direct defense +12%)
- Road Rage (attack on roads +10%)
The brawler + slam guard pair was selected for an edge in direct combat while road rage is used to quickly clear the central island + bottom bridge. Star power allows us to quickly get Rachel's SCOP (possibly twice).
Strategy[edit]
Key points to achieve:
- Setting up a defensive position along the bottom bridge
- Quick domination of the central island
- SCOP + offensive rush
To note some things early on, I will be focusing on two battle fronts here, one at the central island, and one at the bottom bridge.
The first few turns, build infantry + transport choppers. Send an APC + infantry down to the bottom island on turn 2 as well. The two airports can be captured early, and once done, shuttle some infantry to the central island. Build a battle chopper once available as well. At the bottom island, continue to capture the neutral bases, while building a tank, anti-air, and artillery. Eagle will send down a recon early on, but with your tank, this should easily be taken care of.
At the central island, Eagle will start flying over some infantry, with a high chance of battle chopper support. I would station your battle chopper to defensively cover your infantry. If Eagle's infantry is capturing that factory, attack it with your chopper. We want superiority on this island, as it will force Eagle to stay on his own island for the rest of the game. You can build additional battle choppers if you see fit. I would lure Eagle's chopper with an infantry that is capturing a base, then attack with your own choppers. Meanwhile...
At the bottom bridge, its a simple matter of having a tank at the front, with an artillery at the rear. Additional rockets/tanks can be used as well. Eagle should have some anti-airs seeing your transport chopper/battle choppers, so your tank should be in great condition. Target enemy units further back along the bridge and slowly advance forward. Keep your battle choppers ready to provide any flanking cover.
Once you have a line of units at the bottom bridge, with some choppers in the air, you most likely will have the central island under your control. If you happen to have your SCOP ready, use it and it should soften up Eagle's forces for you. Use your tanks to target his anti-airs and your choppers for anything else.
From the central island, you can drop off some transport chopper + infantry at Eagle's airports in order to prevent him from building more choppers. At this point, Eagle should be severely weakened and the rest of the game is cleanup.
Summary[edit]
Estimated time of completion is around 14–16 days. A S-rank is easily achieved if you can successfully advance along the bottom bridge and hold the central island without heavy losses.