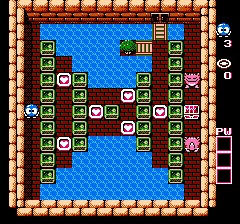
Push the two Emerald Frames that are above and below each of the two left Heart Frames to the right. Then push the Emerald Frames that are directly next to the Heart Frames up or down, away from the center of the room, and collect the Heart Frames.
Push all of the free Emerald Frames in the first two columns up or down to move them out of the way. Then repeat the process with the next Heart Frame, pushing the frames above and below to the right, and then pushing the center frame either up or down to collect the next Heart Frame.
Push the Emerald Frame to your right forward and collect either Heart Frame. Then push the Emerald Frames beyond those two Heart Frames to the right, pushing the center Emerald Frame in either direction to gain access to the last Heart Frame.
From the position of the last Heart Frame, push the Emerald Frame above it up one space, then push the Emerald Frame on Lolo's right to the right one space to block the upper Gol. Repeat the same steps with the Emerald Frames below to block the lower Gol as well, before pushing the center Emerald Frame out of the way and collecting the key.
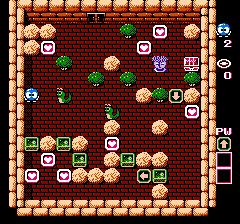
Walk up and collect the Heart Frame above you, as well as the one to the right which is close to the Medusa. Obviously, you must ignore the one above it for now.
Come back to the left and down, and collect the Heart Frame below the right Snakey. Continue walking between the boulders to the right and collect the Heart Frame along the right wall. This will activate the Arrow Tile power up.
Use the power on the down arrow tile just to your left. Then walk down and back to the left between the two boulders until you are above an Emerald Frame. Push it down to the bottom wall.
Walk back up and around the boulders to the right-most Emerald Frame, and push it left through the left arrow tile. Push the lower Emerald Frame all the way to the left and into the lower left corner. Collect the three nearby Heart Frames.
Come back to the Emerald Frame to the left of the left arrow tile, and push it up two spaces. Walk around all of the boulders (come up through the left arrow tile), and stand to the left of this Emerald Frame (make sure you walk between the boulders so that the Medusa doesn't see you.) Push the Emerald Frame right three spaces. Then get underneath it (up through the arrow tile again) and push it up until it sits to the right of the Medusa.
Come down to the bottom wall, and stand below the Emerald Frame directly below the left Snakey. Push it up two space, right one, and up four more spaces. Then walk around the tree and push the frame to the right until it sits above the Medusa. Collect the last Heart Frame and the key.
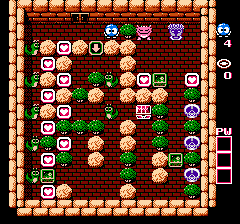
Collect the Heart Frame to the left of the down arrow tile for two egg shots.
Walk over to the upper left corner, and shoot the Snakey below you twice. Collect the Heart Frame below him for two more egg shots. Repeat this all the way down the left wall until you reach the bottom. Then push the Emerald Frame up.
Head to the right and collect the lower Heart Frame. Then walk up to the next Snakey, shoot it twice and collect the Heart Frame it was blocking. Do the same to the Snakey above, collect the Heart Frame beyond him, and return to the chest before either Snakeys return.
From the chest, walk down and to the right, and push the Emerald Frame all the way up to the Medusa. Collect the Heart Frame below the Gol.
Before you collect the last Heart Frame, head down to the bottom wall, and shoot all three Skulls once to turn them into eggs. Then collect the last Heart Frame, and run to the chest before any of the Skulls hatch from the eggs.
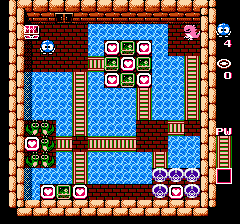
Head straight down and collect the middle Heart Frame along the bottom wall. Then cross the bridges to the right to the center island, and cross the bridges up to collect a Heart Frame in the corner of the upper island for two egg shots.
Return down and to the left and stand next to the Snakey that sits between a Heart Frame and the bridge. Shoot it twice to remove it from the screen and collect the Heart Frame beyond for two more egg shots.
Now shoot the Snakey directly above the Heart Frame along the bottom wall once. Push the egg into the water and walk across it to collect the Heart Frame below for two more egg shots. At this point, if you're quick enough, you can walk back across the egg to the island above and continue. If not, you can use a bridge to get back up.
Walk down to the patch of land along the bottom wall, and shoot the lower left Skull twice to remove it from the screen and collect the Heart Frame in the middle of the Skulls. This will activate the second Ladder power which you may or may not need.
Follow the bridges to the upper right corner of the room near the Gol. Stand in the lower left corner of the island, facing the Heart Frame across the water, and use your Ladder power to get across and collect the Heart Frame in the upper right corner of the island.
Push the Emerald Frame below you down two spaces. Collect the Heart Frame in the center of the island, and push the Emerald Frame beyond it to the left at least three spaces.
Now collect the last two Heart Frames and head immediately for the key. If you are quick, the Skulls should not be able to get near you, and the Gol's fireball should not reach you before you grab the key. (If you're worried about the Skulls, you can push the Emerald Frame that was to the left of the center Heart Frame back to the right so that it blocks off access to the upper left island.)
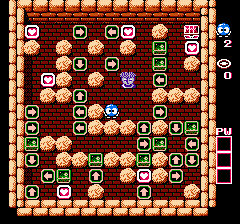
This round isn't as tough as it looks. Remember that you can walk through an arrow tile in any direction, you just can't walk on to it in the opposite direction as the arrow.
The only safe starting move is to go up one space, and to the up arrow tile on the left. Once you're standing on it, walk down through the two left arrow tiles. Then walk to the right until you are standing on top of the right arrow tile, and walk up through the up arrow tile, and right through the right arrow tile until you are standing above the Emerald Frame along the right wall.
Push the Emerald Frame down to the boulder in the corner. Walk left through the up arrow tile, and down through the right arrow tile, and then stand on the up arrow tile to your left. Walk up to collect the Heart Frame above, and proceed to push the Emerald Frame up until it sits to the right of the Medusa.
Come back down, and head right, repeating the steps you did earlier to reach the up arrow tile along the bottom wall. This time, walk through it, and walk through the following up arrow on the left. Proceed to collect the Heart Frame along the bottom wall.
Stand below the left arrow tile and walk up through it. Then stand on top of the down arrow tile, and push the Emerald Frame above you all the way up to the boulder above. Collect the Heart Frame to your right, as well as the one in the upper left corner of the room.
Follow the top wall, and stand on top of the right arrow tile. Walk down to the down arrow tile, then right to the right arrow tile, and then up to the left arrow tile along the top wall. Collect the Heart Frame to your right.
Head right and stand to the left of the highest Emerald Frame. Push it one space to the right, and then push the Emerald Frame below it one space down. Then stand below the first frame and push it up, granting you access to the last Heart Frame, and the key above it.