Password: PYPL[edit]
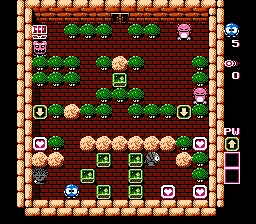
- New room!
Start with the 3 Emeralds that are just to your right. Push the lowest one 1 right, then push the middle one 2 tiles left, securing the Medusa's right side. Now focus on the 3 other Emeralds slightly further to the right, lined up vertically. Push the middle one 1 tile right, making sure not to trap Alma below it. Now push the top one 1 tile right, and finally push the middle one 1 tile right again, trapping Alma above it. Collect the 2 Hearts in the lower right corner.
Now go back left and up through the small crevice, waiting under the rock. Wait until Don Medusa is to your left, then run all the way to the right side of the room, collecting the Heart there. Now wait until he is moving left before making your way back left, stopping either at the middle of the room under the Emerald, or making it all the way under the rock to the left. Either way, carefully take the final Heart on the left of the room when Don Medusa is to the right, activating your power (Arrow). Do not wait there though: run back under the rock before Don Medusa makes his way back left.
Now, when Don Medusa is heading right, use your power on the Arrow Emerald on the left, and run through to the right until you push the Emerald 1 tile right; you will be safe under the rock. When Don Medusa is heading left past you, push the same Emerald 2 tiles right, then hide under it. When Don Medusa goes right past you, push the Emerald 2 tiles up, trapping him to the right. It is now safe to grab the Jewel.
Password: PMPB[edit]
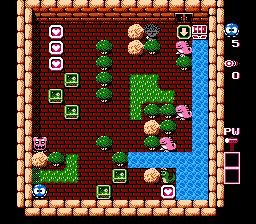
- Original room: Eggerland: Departure to Creation, room 32
Start by carefully making your way up to the 3 Hearts in the upper left corner. Stand to the right of them (they will protect you), and as soon as Don Medusa starts moving down, collect all 3, then run to the right of the 3 Emeralds just below. Collecting these Hearts will have activated your power (Hammer).
Now of the 3 Emeralds to your left, push the middle one 1 tile left (when Don Medusa is above it), then as far up as possible, trapping the Don Medusa in the upper left corner. Of the 2 remaining Emeralds there, push the lower one 4 tiles right, 3 tiles up, and 1 tile right, blocking the Medusa's bottom. Return to the remaining Emerald on the left and push it 2 tiles down, 4 tiles right, 2 tiles up, 2 tiles right, and 3 tiles up, blocking the Medusa's right side.
Now go to the bottom of the room, to where the 2 Emeralds are. Push the upper one 1 tile right, so you can collect the final Heart just under the Snakey. After doing so, use the Hammer on the rock just to the left of the Snakey. Now shoot the Snakey once, then push the egg right into the water, and hop on. The egg will carry you all the way up to the Jewel, behind all of the Gols.
Password: PJPR[edit]
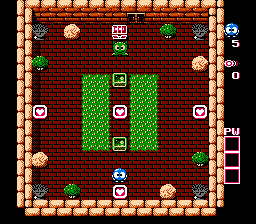
- Original room: Eggerland: Departure to Creation, room 31
Start by running up to the middle of the room and collecting the Heart there. Not only will this keep you safe from Leeper, but it will give you 2 shots.
Start by facing left, and wait for Leeper to hop in line with you. When he does, shoot him once, then push the egg left, above the Heart on the left side of the room. This will allow you to collect the Heart in question, and when you do, run back to the middle of the room. Now face right, and when Leeper is lined up with you, shoot him once and push the egg right, below the Heart on the left side of the room.
Now Leeper can fall asleep wherever you want him to, it does not matter. There are 2 Emeralds in the middle of the room. Push the lower one 1 tile left, then 3 tiles down, allowing you to collect the final Heart. Finally, push the upper Emerald 1 tile right, then 3 tiles up, allowing you to safely grab the Jewel.
Password: PTPV[edit]
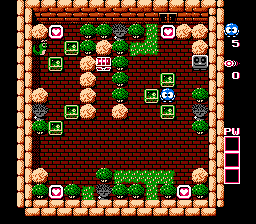
- New room!
Start by moving 1 tile left, pushing an Emerald with you. Now push the Emerald that is just to your lower right 1 tile right, securing the right Medusa's left side. Now, of the 2 remaining Emeralds on the right side of the room, push the lower one 5 tiles down, 1 tile right, then 1 tile down, blocking the bottom Medusa's right side. Grab the Heart to her right, gaining 2 shots.
Now there should still be a free Emerald on the right side of the room (3 tiles below a Heart). Push this one 5 tiles down, then 4 tiles left, blocking the bottom Medusa's top. Now that you can get to the left side of the room, get to the 2 Emeralds to the right of the left Medusa. Push the left one 1 tile up, blocking the left Medusa's right side, then push the right Emerald 2 tiles up.
Now you can get to the Snakey, so shoot him twice to blast him off screen. There should be an Emerald just to your right, so push it 1 tile down. After doing so there will be another Emerald to your upper right, so push it 1 tile up, and now collect the Heart in the upper left corner of the room.
Just below you should be 2 Emeralds side by side. Push the right one 6 tiles down, 1 tile right, then 1 tile down. This blocks the lower Medusa's left side, so grab the Heart to her left. Now go back up to the other salvageable Emerald in the upper left corner and push it 1 tile right, 4 tiles down, 5 tiles right, and then as far up as possible. This blocks the top Medusa's right side, so grab the final Heart to her right. Now, you also have a safe path to the Jewel, so grab it.
Password: PDPQ[edit]
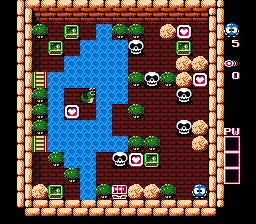
- Original room: Eggerland: Revival of the Labyrinth, room 46
Start by going up going through the 2 Skulls on the left side of the room, and grabbing the Heart past them, gaining 2 shots. Now notice that there is a Skull blocking your path up (resting between 2 trees). Shoot him once, then push the egg as far up as it will go. Take the Heart in the upper right corner of the room, gaining 2 more shots.
Now go back down to the Skull that is 2 tiles above the Treasure. Shoot him once, then push the egg up in to the water, and hop aboard. This will allow you to get to the little island in the middle of the water, so grab the Heart there. Wait for the egg to sink, then shoot the Snakey once and push the egg right into the water, and hop on. Get back off to the right as soon as you can.
Now go back down to the bottom of the screen. There is one Heart remaining that is just to the right of a Skull. With your last shot, shoot this Skull once, grab the final Heart while he is trapped, then grab the Jewel just below (the other Skulls will not have time to reach you). Touch the Staircase, and you are done with Floor 3!