This chapter discusses the solutions to level 10. One thing to take a note of: Every room in level 10 has at least one Gol in it.
10-1[edit]
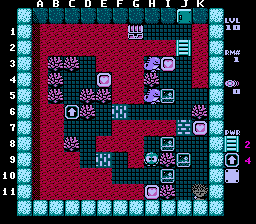
This one's not too tough. Just some EF distribution.
- Move the I10 EF all the way right. Move the J9 EF up one and then all the way down. You'll get the heart, and crack the bridge at J7. Move the I8 EF onto the cracked bridge on J7. Get the H11 heart.
- Taking the left path, get the I3 heart, this will crack both bridges. Move the I5 EF up two. Build a bridge on I7. Move the J7 EF left one and up to I5. Quickly go back down the bridge at I7.
- Taking the left path at E9, get the E4 heart, turn the arrow, and get the chest.
10-2[edit]
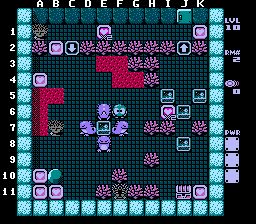
The Gols in this stage are no threat at all if you position them correctly.
- Go right and get the I6 heart. Push the F7 Gol down 2 spaces.
- Push the J8 EF left one space, the J6 EF up two spaces, and move the I5 EF to C7.
- Push the west-facing Gol at D7 to the bottom then get the 3 hearts in the bottom-left corner.
- Move the E7 EF to B6 (push it right 2, up 2, all the way left, down, then left).
- Move the J4 EF to A3. Get the B2 and A4 hearts.
- Move the I8 EF to B1. Get the hearts in the top row.
- Move the E6 or E8 Gol to I11. Don't worry if it takes you two shots. Get the bottom-right heart and the treasure.
10-3[edit]
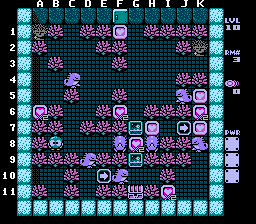
This level is about getting hearts in the right order to minimize the threat of the Gols.
- Get the F6 heart.
- Push the C4 Gol left under the medusa and get the A6 heart.
- Shoot the F8 Gol twice and get the G8 heart. Move the G7 EF to G4. Go back around before the Gol becomes visible. Move the G4 EF to K3.
- Push the D9 Gol to the bottom and the F10 Gol right. Move the G9 EF to I2.
- Get the H7 heart and the 3 hearts in the K column. Push the K8 Gol to the bottom and get the I11 heart.
- Move the J5 Gol to G5. Go the long way around back through the arrow. Shoot the G5 gol again and move to C1. This might take one more shot, but you have more than enough. If you want, you can also push the F8 Gol left on the way.
- Get the F1 heart and go to the chest. You have a straight path to it, and no fireballs will hit you if you keep moving.
10-4[edit]
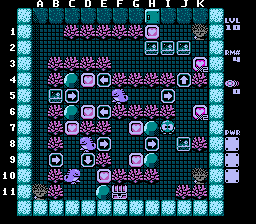
Like the previous two levels, this level involves getting hearts in the right order and Gol positioning.
- Push the J8 EF down two spaces.
- Push the I2 EF up, then the J2 EF right. Get the K3 heart.
- Get the H1 heart and move the H2 Ef to A10.
- Push the C10 Gol down and get the hearts at C7 and E10
- Move the D8 Gol to K7, and get the K6 heart.
- Go to J5. Shoot the Gol to your left twice and quickly loop around to push the B5 EF right 4 spaces, covering it respawn point. Get the hearts and wait for the Gol's respawn to fail, then get out.
- Loop around again and get the remaining hearts. You can get to the chest with no danger.
10-5[edit]
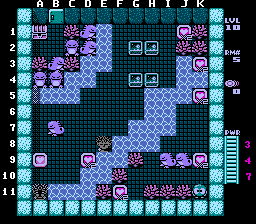
This level is mostly pushing eggs and EFs. Speed is required in some parts.
- Get the K9 heart, push the I9 Gol up one space, then get the K5 heart.
- Use the J9 Gol to cross the water and get the K3 heart, then immediately cross back. Put a bridge at I6 and wait for the Gol to respawn.
- Use the J9 Gol again to cross the water at H6. Get the J1 heart.
- Carefully move two of the EFs to cover the top and left sides of the E8 Medusa. Get the D9 heart and put a bridge at C11.
- Move the B7 Gol to D5 and get an EF to C6. The Gol will hatch before the EF is in place, so shoot it again and push the Egg left into the water then push the Ef straight down onto your bridge. Wait for the Gol to respawn.
- Repeat the process in the previous step, but get the EF to A10 (from the water, push the EF down 2, left 1, down 3, left 1). Get it there before the Gol starts respawning, so you don't kill it (you still need it) or it will block your path. Grab the A9 heart.
- When the Gol respawns, use it to cross the water at H6. Get the F11 heart, and use the J9 Gol once more to cross back.
- Stand at least 1 square below D5 (so that you do not activate the last bridge), and face up. Shoot twice to blow away the D2 gol, then quickly put a bridge at E2 (when going up, be sure to have enough distance from the B3 Gol to avoid its fireball), push the C2 Gol all the way left, and get the treasure.
Level 10 boss[edit]
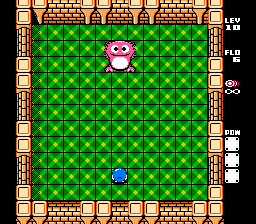
The level ends with a fight against a giant Gol. The Gol will jump around to the right and left and will shoot a giant, but slow fireball each time it lands. It never moves down from the row it is standing on. The best strategy is to simply stand to the side of it and keep shooting. When it starts getting close, move down. You can shoot the fireballs to destroy them. Once you get it into the giant egg, shoot the egg a bunch of times to get rid of it.