This is the final level of the underwater section, which means it is also the last level in which you will encounter Mobies.
13-1[edit]
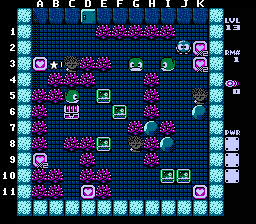
Placing the Mobies correctly is key, since they can cause a lot of pain in this level.
- Get the K2 heart. Move the I3 Moby to K4, get the K3 heart, then shoot the egg from the left before it hatches. wait for the Moby to respawn.
- Move the I3 Moby to J4.5 and get the bottom-right heart. Move the I10 EF to G9 and the J10 EF to F8.
- Push the E8 EF up two and get the hearts at A9 and D11.
- Push the F6 EF up two, then the E6 EF right two. Go to D5, shoot the Moby away,then put the E5 EF over its spawn point.
- Push the F4 EF up (you can only go half a space before getting pulled by the Moby at the right), then move the G3 Moby to C2. When the C5 Moby respawns at B3, Take the final heart and get the chest.
13-2[edit]
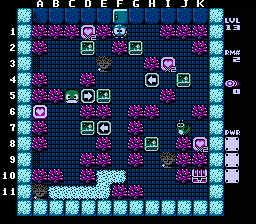
A pretty standard "block the Medusas" level.
- Push the G2 EF down one and the J4 EF left one, then get the I3 heart.
- Shoot the Snakey away, get the K8 heart, then wait. When the Snakey Respawns, Move it to I8 and push the H8 EF down one.
- Move the I4 EF to F3, then the G3 EF to E4. Push the D7 EF left one space, then move around it to C6.
- This step requires some speed. Push the Moby up two spaces, then quickly go around it to get the heart at top. Go back around the egg to get under it again, then shoot it away. Push the C7 EF to the bottom then go back up to C4 before the Moby respawns.
- Move the Moby to A9 and get the last heart. Push the E5 EF right two then the C11 EF left. Move the G5 EF to I10 (come down off the arrow and push it left one, all the way down, then all the way right). Get the chest and finish the level.
13-3[edit]
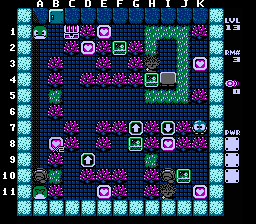
The moving monsters make good timing a necessity for this stage.
- Go to the grass at B5. When the Alma passes you going up, go left, get the B8 heart (if you miss it this time, just save it for later), then escape at B10.
- Move the G8 EF to J3 and get the K3 heart. Wait at J5.
- When the Rocky aligns with the medusa moving down, quickly push the EF above you up one then left two. Do not shoot the rocky, since you only get two shots and they must be used elsewhere. Get the E1 heart and push the F2 EF down, then wait at J1.
- When the Rocky aligns with the medusa moving up, go past it and get the D2 heart.
- Repeat the first step, getting the B8 heart if you missed it the first time, then wait at H9.
- Speed is required here. When the Alma reaches I9, shoot it then quickly get the I8 heart, push the J10 EF down, get the bottom-right heart, then go back to H9 before the Alma hatches.
- While you stand on the grass, the Alma will move through the chambers on either side of you. As soon as it passes your left going down, go left, shoot it, get the final heart and go to B5.
- When the left Alma passes you going down, go left and get to the chest.
13-4[edit]
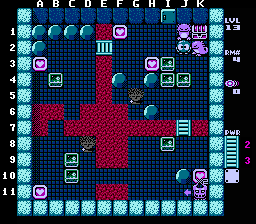
Speed is required for several parts of this level.
- Get the H3 heart, then move the three EFS on that section to G4, H5, and G3. Do not get the heart at F1, as that will be saved for last.
- Wait at J8. When the Don reaches I11 moving right, quickly push the I8 EF left two and go all the way right.
- Get the K10 heart when the Don is out of the way and immediately get above the rock. Go all the way up, then to F3, keeping an eye on the Don at the bottom.
- Put a bridge E3 then quickly move the G3 EF to D5 before it burns away. Get the A3 heart.
- Put a bridge at C7 then quickly move the B4 EF to C8. Make sure you're on the bottom-left section before the bridge burns.
- Push the C9 EF right then use the C10 EF to trap the Don in the bottom-right corner. Get the bottom-left heart.
- Get the F1 heart, shoot the J1 Gol away, then get the treasure.
13-5[edit]
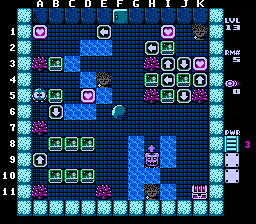
The Water in this level forms the letters S and K, possibly the initials of its designer. Some careful movement is required.
- Move the B5 EF to C4 and get the D5 heart. Wait at B6.
- When the Don reaches H7 moving down, quickly move to C8. Make sure you don't push any other EFs on the way there.
- Push the D8 EF right one, the B8 EF left one, then the C9 Ef right 3, against the water.
- Push the C10 EF down then move the B10 EF to D7 (push it right one, up all the way, then right one). Wait at E9.
- When the Don reaches H8 moving up, quickly push the E8 EF up two then go down as far as you can. Move the D10 EF to E8 (push it left one, up two, then right two).
- Use the D7 EF to trap the Don at H9, then move the E8 EF to J9.
- Push the I5 EF up 2, the H4 EF left 2, the I2 EF right 2, then the J4 EF down 2. Get the K3 heart.
- Push the I3 EF up, then right, then come from I5 to push it up again. Get the I1 heart.
- Put a bridge at I9 then push the J9 EF onto it.
- Move the J6 EF to G2, then to E3. Get the top-left heart.
- Carefully move the B3 EF to J11 (push it down 6, right 3, up 2, right 5, then down to the bottom). Get the treasure and exit the level.
13-6[edit]
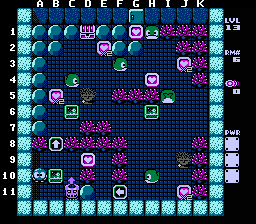
The Don Medusa in this level can be made useless with your first move. As with many levels with Mobies, placing them correctly is important to save a lot of pain.
- Push the B10 EF right, which will trap the Don.
- Push the C6 EF up and get the B5 heart.
- Push the C4 Moby right one space and move the F3 Moby to E4.5 (Push it left 2, right 1, then down 1.5). You will get the E2 heart in the process.
- Get the H4 heart then push the I5 Moby down 4 spaces.
- Push the H10 Moby right 2, get the J11 heart, and shoot the egg from the left before it hatches. Wait for the Moby to respawn.
- Move the H10 Moby to between I8 and J8, (blocking both the Medusa and the Moby) then push the H6 EF left 4 spaces.
- Get the remaining hearts and finish the level.
13-7[edit]
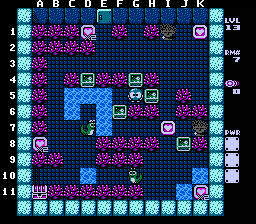
You'll need to cross water a lot in this level. Because of this, you need to make the most of each shot, which requires some speed.
- Push the F6 EF down, the H5 EF right, and the G4 EF up to the top. Get the hearts at D1 and A8.
- Push the D7 snakey right into the water and push the F7 EF right 2 spaces. Get back to D6 before the Snakey respawns again.
- Push the Snakey down into the water at D10 and cross to E10. Push the G10 Snakey right 3 spaces, being careful to keep it out of the water. Push the J8 EF up, get the I7 heart, then push the I5 EF up as far as it will go.
- Carefully Move the H7 EF to K9 (push it right, down 3, up 1, then right 2).
- Use the J10 Snakey to get the bottom-right heart and quickly cross back. Wait at F10 for it to respawn.
- Quickly move the G10 snakey to K3 (push it right 2, up all the way, then right 2 again).
- Push the D7 snakey into the water at D5, Push the D4 EF up, then quickly cross back. Move the D3 EF to J1, get the final heart, and finish the level.
13-8[edit]
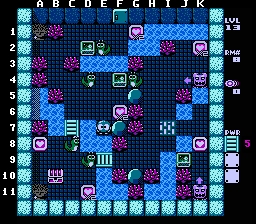
You'll need to move carefully in this level to use the eggs and EFs properly.
- Get the F6 heart. Use the D4 snakey to cross the water and push the D2 EF up.
- Push the E2 Snakey right one space, without pushing it into the water. Push the D1 EF left, get the g1 heart, then use the egg to cross the water at F3 and push the F4 EF down ONE space.
- Push the G4 Snakey all the way right to trap the Don against the wall. Move the F5 EF to K3 and get the K2 heart.
- When the D4 Snakey respawns, move it across the bridge to K7. Move to the left and let the bridge collapse behind you.
- Push the C8 Snakey to the bottom and wait at D10. When the Don at the right hits the bottom, quickly grab the heart below and get back up to D10.
- Use the D9 snakey to cross the water at I9 and push the EF, then quickly cross back.
- Push the E2 Snakey all the way left, under the Medusa.
- When the D9 Snakey respawns, push it all the way left and get the A8 heart.
- Make a bridge at J8, get the final heart, go get the treasure and finish the level.
13-9[edit]
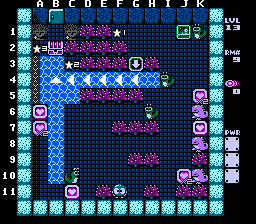
This level is about getting monsters to respawn in the right places. You'll need to be quick about covering spawn points.
- Get all the hearts except the one at A6.
- Shoot the top-right snakey twice then quickly push the EF all the way left and push the K6 Gol up onto its spawn point. When the Snakey respawns at C3, quickly shoot the Gol's egg then push the H6 Snakey over the Gol's spawn point.
- Get the final heart. Avoid the Gols' fireballs and push the I4 Snakey into the current at G4. Get the Treasure and exit.
13-10[edit]
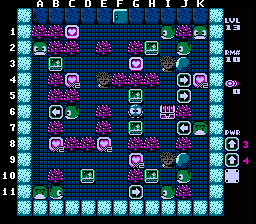
This is the last level in the game to feature Mobies. You'll often need to egg them for the sole purpose of stopping their pull.
Note: some parts of the steps may be done in different orders
- Push the G5 and G7 EFs right two spaces then push them against the medusas.
- Get the heart at K4. Shoot the top moby to get down, and push the K7 Moby down one space to get out of the corridor.
- Go to E10. Move down and push up on D10 EF while the moby pulls, pushing up EF to D9. Get the B8 heart and move the EF to E5.
- Go straight down to F11. Shoot the moby to your right, push the EF up half a space, then turn the arrow and get out of the alcove. Get the heart at G9.
- Go to the left wall. Shoot the bottom moby to be pulled up. Move the B3 EF right three spaces.
- Go to the top wall and let the moby pull you. Push the H2 EF down half a space.
- Shoot the I1 Moby then quickly get the hearts at g3 and C1 and get back to D2 before it hatches.
- Shoot both of the Mobies against the left wall then quickly turn the B6 arrow. Move the C6 Moby to D4.
- Get the final heart, shoot the leftmost mobies again if necessary, and finish the level.
Level 13 Boss[edit]
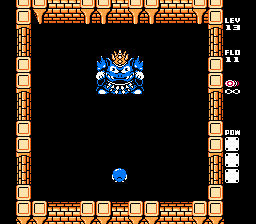
Here it is! The fight with King Egger...! Or so it would seem... Actually, he's invincible, so unless you'd like to have fun dodging and shooting him for a while, it's best to just let yourself be hit by one of his shots. The game will take you back to the overworld with your other character. Simply re-enter level 13 and walk up to King Egger. He will jump away and take the character you entered his room with captive. You'll then go to a cutscene and after which you will proceed down to the underworld with the other player character for the final phase of the game.