This chapter discusses the solutions to level 9. One thing to take a note of: Every room in level 9 has at least one Skull in it.
9-1[edit]
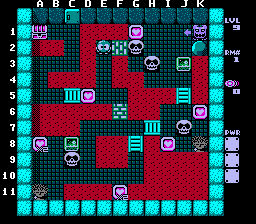
The first underwater map isn't too tough. Save the D5 heart for last.
- Move the C8 EF to A10. Get the heart. Move the C9 Skull to B11. Get the heart.
- Watch the Don and move the J7 Skull right one. Get the K6 heart.
- Move the J3 EF all the way up to trap Don in the corner. Get the G1 heart.
- Move the G2 Skull left one. Move the H3 Skull to J8 and get the heart.
- Run over the upper bridge twice to destroy it, then get the last heart, get the chest.
9-2[edit]
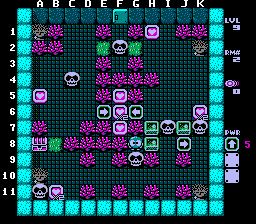
This one's a little trickier in the distribution of EFs/Skulls.
- Move the H8 EF all the way right. Move the J7 EF to K5. Get the heart.
- Move the G9 Skull to B10. Move the I7 Skull all the way down. Get the B11 heart.
- Get the 3 central hearts and rotate the E6 arrow. Move the F2 Skull all the way right.
- Move the H7 EF through the arrows and down to B9. Take the long way around to move it to A9.
- Quickly move the C4 Skull to C1, get the H1 heart, and shoot the egg again.
- When the Skull returns, move it to A4. Get the last heart and the chest.
9-3[edit]
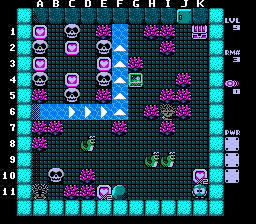
Remember the one egg in the water at a time rule for this one.
- Get the heart and move the H9 Snakey to G6. Move the B10 Skull down one. Get the E11 heart.
- Cross up on D6 with the D8 Snakey and get all but the C4 heart.
- When the egg sinks, egg the C5 Skull, get the heart and immediately push the egg in the water and get on it. Disembark on G4, pushing the EF right. The Skull from below will be nearby. Wait for it to go back down before pushing the EF right again and then get the chest.
9-4[edit]
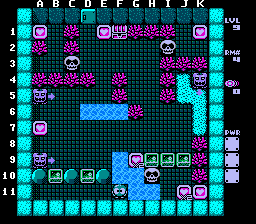
Trapping the Dons at the right moment is key. Save the E1 heart for last.
- Move the B10 EF up so it traps the Don on the wall. Move the D10 EF to D7. Get the G9 heart.
- Move the I9 EF down one. Move the H9 EF left one. Cross H11 with the Skull and head right. Get the J11 heart.
- Move the J9 EF to J6 and put it under the Don on K6. Move it up one to trap the Don. Get the K11 heart.
- Move the I10 EF to J4.5. Cross G10 with the Skull and move up to free the EF. Watch the Don and move the EF to A8.
- Carefully move the D7 EF to B7. Move it up one, get the heart, and trap the Don on the wall.
- Move the I2 Skull all the way right. Get the heart. Move the C3 Skull all the way left. Get the heart. Get the last heart and the chest.
9-5[edit]
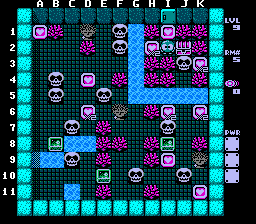
The last one is a little bit trickier with EF/Skull placement. Save the I1 heart for last.
- Get the H2 heart. Move the Skull down one, get the K3 heart and cross down.
- Move the I7 Skull all the way left. Move the G10 Skull up to G6. Get the I6 heart.
- Move the J10 Skull up one. Get the heart. Move the I8 EF to K7. Get the heart.
- Move the E10 EF left two. Cross B9 with the Skull and move down. Move the same EF all the way right and get the heart.
- When the Skull returns, cross on B9 and move up, moving the EF to B7.
- Move the B4 Skull to D3. Get the D4 heart. Move the E5 Skull down one. Get the D6 heart.
- Move the B5 Skull to C1. Get the heart. Move the B7 EF to F5.
- Cross G2 with the F2 Skull. Get the last heart and the chest.
Level 9 boss[edit]
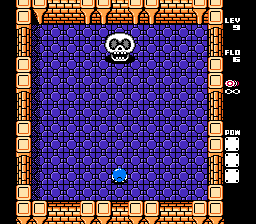
The level ends with a fight against a giant Skull. The Skull will move around the room quickly in a simple zig-zag pattern. It's not too tough due to the pattern. Just stay out of its way and shoot it from the sides when you're clear. Once you get it into the giant egg, shoot the egg a bunch of times to get rid of it.