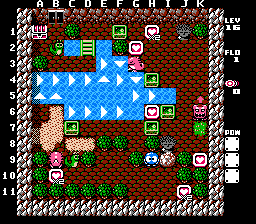
This level has some directional water. It utilizes the Gols well, too.
Get the heart on B10. Move the Snakey up one.
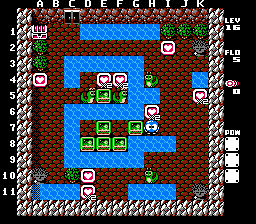
Quickly: Move the Gol up three and then move it right into the water. Move the C7 EF all the way right and wait for the egg to come near. Get on the egg and move the same EF down one. Move the EFs on H7 and I6 right one. Head down and get the heart on J11.
Move the Snakey to A6. When the Don on the right clears, push it up and ride the egg. When you near the G3 Gol, quickly shoot it and push it right 3.5 spaces so it traps Don and get back on the egg.
Quickly: When you come under the H4 EF, move it up two, right one, then up a half. Get the 2 hearts. Go down and push the J6 EF straight down. Get the heart and head back to B10 before the Snakey returns.
Using the B9 Gol, move it to the A5 water and ride up. When you get to B4, quickly move up, move the Snakey up and get the chest.
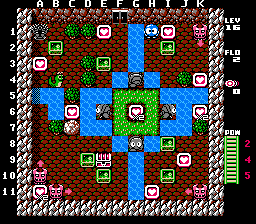
This is a pretty tough one because of the way you need to make Almas guard you.
Move the I2 EF right one. Get the heart on I1. When Don comes up, use the same EF to trap him in the corner. Get the heart on K4 for a bridge.
Build the bridge on H4. When the Alma steps out rolls at you, step aside and go past it and get the heart on G6.
Carefully move the I6 Alma right one to cross and get the heart. You'll get a bridge.
Shoot the G8 Alma. Build the bridge to the left of the egg. Push the egg down into the water, carefully avoiding the left Don. Move the I10 EF right a half space. Get the heart on J9 for the third bridge. Build this bridge on H8. Move the EF on I8 left one.
When the Alma returns, it will be walking into the lower left area. Move the same EF left one. Move the EF between I10 and J10 down one.
This is tricky: When the Alma is running to the right of the lower left Don you need to get the H11 heart.
Carefully head to the lower left area, pushing the EF on G8 to C8. Stand on the chest. Move the EF on D9 left one.
When the lower Don passes by, move the E10 EF a half space down to trap him against the water. This also keeps the Alma from going under the chest.
This part is difficult to explain: You need to shoot the Alma and have it running above the left Don. A good way to do this is to wait on B10 (when the Don is not near) and have the Alma roll. Shoot it as it comes above and push it up to B8. Move the C9 EF left one. If all went well, it will hatch and be above the Don. You can wait on D8 to force the Alma to keep rolling at you. The Don should pass under so you can have the Alma above it. Once it is above, move the C8 EF to A8 to trap them both in.
Get the A11 heart. Move the E10.5 EF down and then move the B9 EF to F10.
Cross D6 with the E6 Alma and get the heart. Cross back.
Watch the Alma in the upper area. When it's in the top right, go up and stand on F1.5. When it comes to F3, shoot it and leave it there. Move the EF on B2 left one. Get the heart. Move the egg down into the water and go left. Move that EF to B1.
Wait on I4. When the Alma returns, wait for it to come above you and shoot it. Move the egg all the way up and get the last heart and the chest.
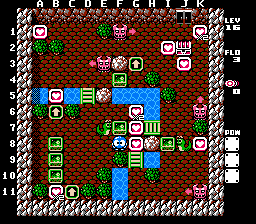
This one's pretty tough. You'll really need to watch the Dons.
Carefully go around and move the F7 EF down one and left one. Get the hearts on G7 and G8.
Carefully head up and move the EF on F4 right one. Carefully head back and get the heart on G6. Move down one and then a half right.
When the upper Don clears, continue right and move the I8 EF down two.
Carefully move the nearby Snakey to K6 and carefully get the heart on K8. Use the I10 EF to trap Don in the bottom right.
Maneuver the E8 EF to J4. You'll need to push it right, walk around and push it up, then right and up.
Carefully head to B7. When the Don above clears, move each of the 3 EFs right one space. Get the B11 heart.
Cross the water on G5 with the E7 Snakey and move the EF up to trap the top-most Don on F1. Use the J4 EF to trap the other Don on K5. Get the 3 nearby hearts.
Move the E7 Snakey so it traps the last Don against the wall. Get the B5 heart.
Move the C8 EF up to D1. Move the C10 EF left one. Move the C9 one to D4 and stop. Shoot the B3 Snakey twice and head right. Use the D4 EF to trap Don on E3. Get the last heart.
Maneuver the B10 EF to J5. Use the Snakey to cross the water up on G5. Get to the chest.
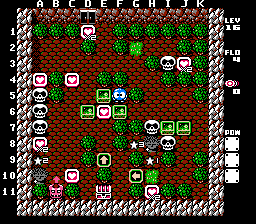
A pretty interesting Skull map. Remember: The heart on C4 is the last one.
Move the EF on E5 left one. Get the heart. Maneuver the EF on F6 to E8. Get the heart on D1.
From H5, shoot the Skull below you twice and very quickly move right. Go around and move the J7 EF up one and then the I7 EF left one.
When the Skull appears on H9, get the H11 heart. Shoot the I8 Skull twice and move the EF on J6 to I8.
Move the EF on D6 left one. Go around and move the one on D5 down one. Move the one now on C6 down one. Go around and move the same one left one and all the way down to trap Don. Get the hearts on A8, C10, and A4.
Shoot the Skull on I3 twice and get the heart.
Maneuver the EF on D6 to B3. Shoot the A5 Skull twice and move the same EF to A5.
When the Skull appears on G8, move the EF on E8 to C6.5 and get the C4 heart. Move the EF on A5 down 1.5 spaces.
From here, there's no real easy way to do this, but you basically need to move the C6.5 EF half down and then half left when the Skulls are away. Afterwards, keep moving both EFs down to confine their movements to a smaller area. You should have them low enough so they stay mostly right of the Don. Refer to the diagram on the right for a good positioning. Head around to F10.5 and when a Skull is covering the Don, get the chest.
The last level will involve lots of water crossing and one speedy part.
Get the heart above you. Cross G4 with the H4 Snakey and get the 2 hearts. Wait for that Snakey to return.
When it does, cross down with the F5 Snakey. Move the G7 EF all the way right. Cross back left again with the H4 Snakey. Move the C5 one down into the water (don't cross) and move the EF on E5 left three. Go back in and wait on D4.
When the D5 Snakey returns, use it to cross down. Move the EF on E7 right and then down to J11. Move the one on K7 all the way down. Go around and move the one on B5 all the way down. Head back around.
Move the H10 Snakey left three, get the 2 hearts, and then move the egg up, cross up and move the EF on E8 up, then cross back down.
This needs to be done very quickly: Use the H4 Snakey to once again cross left. Cross down with the D5 Snakey and maneuver the E7 EF to K3. Get the heart on K5 and head over left to E5. The Snakey should just finish returning.
When it does, move it all the way left and get the heart.
Head back around and use the H10 Snakey to cross up on F9, move the EF up and then maneuver it up to J2. Get the last heart and the chest.