17-1[edit]
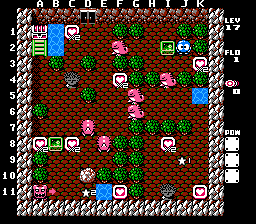
The first level of the big castle requires a lot of manipulation of the alternate respawn points. It is pretty tricky, so follow closely.
- Get the nearby heart and push the F2 Gol 3 spaces left. Get the heart over the egg then push the egg left into the water. Push I2 EF onto F2.
- Move the Gol on I4 down 2. Move the one on G5 to D4.
- Carefully move the Gol on D7 to C5. Get the heart on A8. Use the B8 EF to trap Don in the bottom left.
- Move the EF on F2 to I4.
- Move the Gol on G6 left and then up and right into the water on K5. Move the one on I6 left two. When the first Gol appears on D11, move the second Gol into the water like you did before. Go down and move the Gol on J9 to I10. Get the heart on I8.
- When the Gol from before appears on J9, move it left and down to H11. Move the EF on I4 to G6.
- Use the D11 Gol to cross the water right, get the heart and cross back. Move the Gol on E8 to B4.
- When the Gol appears on J9, move it all the way down and get the last heart.
- Move the EF on G6 left to A7 and go up to the chest.
17-2[edit]
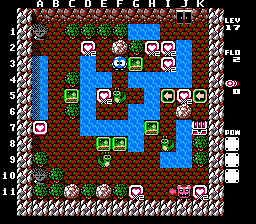
A little tricky. Though there seems to be an excessive amount of shots available and you can have up to 5 remaining at the end.
- Get the D2 heart. Move the F5 Snakey down one, get the heart, and then cross F7 with it. Move the F8 EF down two and all the way left. Make your way back up to G5.
- When the Snakey returns, push it left to cross D5, move the EF left, and quickly cross right. Maneuver the same EF up to A2. Push the E8 EF left two.
- Quickly move the E9 Snakey to H11, get the heart and shoot the egg again. While the Snakey is gone, move the C8 EF over to I10.
- When the Snakey returns, cross I9 with it and shoot the Snakey on I8 up and quickly cross I4 getting the I3 and I2 hearts and crossing back. Get the heart on J5 when you cross back. Make your way back to the bottom left.
- When the E9 Snakey returns, move it right to H10 and then pin Don on G11 with the egg. Get the K11 heart. Move the EF to G10. From H9, shoot the Snakey twice and move to the left. You'll have plenty of shots by this point.
- When the Snakey returns, move it to A8 and get the heart. Shoot the egg again.
- When the Snakey returns, move it up to B1. Head right and get the last heart.
- To get the chest, go to the top right, wait for Don to tap the wall, then move down. If you time it just right, you can actually reach the chest just in time. However, to be safer, you can also go down, move a half space left over on the right arrow, and wait for Don to tap the wall again, then get the chest.
17-3[edit]
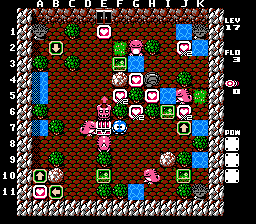
This is a hard one. It not only needs manipulation of the Alma's AI, but also using half spaces around the Don Medusa.
- Get the G6 heart. Push the H10 Gol down one and push the J10 EF right one. Push the E10 EF 2 spaces left.
- Quickly: Push the Gol on D7 so it's over the chest and up to E4. Go down, push the E8 Gol left one. Move up a space and shoot the egg above you and immediately head left. Move the other egg up to E5.5
- Push the EF on C10 to D3.
- This is a strange sequence: Stand on B3.5 and wait for the Alma to start rolling left. When Don clears, move down. Study the Alma and see that it is walking mainly in the lower area of that top right top right and never going into the topmost row. If this is happening, proceed. If not, keep trying to make the Alma do this. Head over and wait on G7. The Alma should still be doing the movement as mentioned.
- This is tricky: You need to time it so the Alma is under the K1 Medusa. Head right and when the Alma moves up from K4, go up and push the J5 Gol left one and move down. Do not get the heart on H5. Maneuver the EF you just touched to C5.
- Study the Alma and if it is still following the behavior of staying in the lower area, try to stand below it so that it goes back into the upper area again.
- This is tricky: Push the D7 Gol over to I6 (under the water spot). When the Alma enters the upper area, push the egg up and cross. Get the J2 heart and move down one. Wait for Alma to come down next to you and shoot it. Push it left by the water, get the 2 hearts. When the Don goes below you, cross with the egg, pushing and pinning Don with the EF. Move the same EF down a half space to fully trap Don.
- Go around and push the D3 EF all the way up.
- Go around again and push the EF on C5 left one. Push the D7 Gol up to D5.
- Push the same EF up to B2 and then left one. Get the A11 heart.
- Wait for Alma to walk in the top row. When it's far enough away, get the heart and run to the chest. You might need to stand below the Alma again to get it to walk up in that area.
17-4[edit]
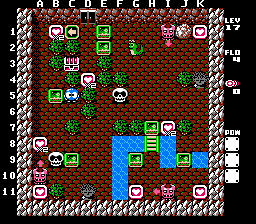
This one is also quite hard. Knowing when to trap the Dons is key.
- Carefully, go up and get the B1 heart. Move the B5 EF down one. Move the EF on C9 down one.
- Quickly: Push the B9 Skull left one. Get the heart. Move up to A5, shoot the egg below you and immediately move right and down to C5.5 to shield yourself from both Dons. When the Don on the left is above you and the right Don clears, push the B6 EF left and up to trap the Don on A1. Head down and push the C10 EF right one.
- Go right and when the right Don clears, head over and push the H7 EF down 3 spaces.
- Carefully, go back left and shoot the B9 Skull and push it rightly right into the water, moving the EF one right. Carefully, move the H10 EF right one and the H9 EF up one. Take cover on the space between G9 and H9.
- This is tricky: When the lower Don taps the heart, immediately move right and push the H8 EF two spaces up and then move halfway onto the heart to avoid both Dons. Keep inching this EF up until it's on H4. Be sure to watch both Dons when doing this. It's best to take cover to the left of the EF. When you get it there, head up to F2.
- When the Don clears, move the E1 EF left two. Carefully get the D4 heart.
- Quickly: Push Snakey right one space. Push the E2 EF right 2 spaces and down 1 space. When the right Don comes up, push the egg under it to trap it by the rock.
- Push the G3 EF right one. Carefully push the H4 EF right one and push the H3 EF down and over to K5.
- Go down from here and push the J9 EF all the way down. Get the K11 heart. Push the I10 EF a half space left. Get the heart on I7
- Maneuver the F5 Skull over to K3. Get the heart. Push the I4 EF a half space up.
- Push the B9 Skull right one then down two. Get the heart and shoot the egg again. When the Skull returns, put it on E11 and move the EF on D10 a half space right.
- Go back to the lower right. When the Don clears, move the EF between H10 and I10 a half space left. Carefully go around and move the same EF one space down. Get the last heart and the chest.
17-5[edit]
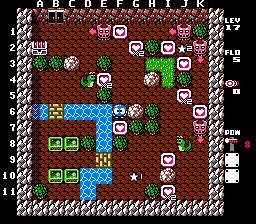
4 Dons, though they are all fairly well-blocked by hearts and rocks. The top left one is the main one to watch at some points. This is the only level in 17 to have a power too.
- Get the heart on E4. Head up to F2
- This needs to be done very quickly: When the top left Don clears, head down and push the Snakey down one. Move left and when the Don clears again, cross down. Carefully go around to C9. Push the C8 EF up one space. Push the B8 EF up two spaces. Push the C7 EF right one space. Carefully move the B6 EF up and over to D4. If all went well, Snakey will be on G10.
- When the Don clears, push the D4 EF right one space. Carefully go around and push it left a half space. Go to the lower right area.
- Cross D11 with the G10 Snakey. Maneuver the B10 EF to G10. When Snakey appears on J2 push the same EF up one. Get the J5 heart.
- Use the J8 Snakey to trap the Don on K7. Get the heart on I11, but leave the one on I9 for now. Shoot the egg from the left and head down. Put the G9 EF on J8.
- When the Snakey appears on G10, get the I9 heart now and push the J8 EF up to J5. Carefully head back down to H10.
- Watch the Don on the right and push the G10 Snakey left one and down one. When the Don clears, cross D11 and move the C10 EF up one. When the upper Don clears, move the same EF all the way right to trap the Don in the bottom right.
- Use the J5 EF to trap Don on K2. Get the hearts on J3 and F7.
- Carefully get the I2 heart and go under the Snakey. You should have the hammer power now. Carefully walk left and get the G2 heart.
- Carefully move the EF between D4 and E4 left 1.5 spaces and then maneuver it right and up to trap the Don in the top right on J1. Use your hammer to break the G6 rock.
- Maneuver the J8 Snakey to D1. You'll have to use 2 shots to do this. Get the last heart. Go under the egg on D4 and shoot it again, taking cover. When the Don passes to the right, go up and get the chest.
17-6[edit]
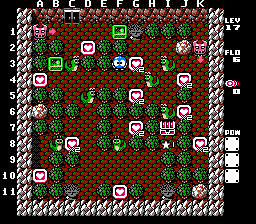
This one isn't quite as hard as the previous rooms, really. Only one small spot you need to time correctly.
- Carefully get the G5 heart. Head over to D4.
- Carefully maneuver the D5 Snakey to C10. Get the heart on C8. Carefully head up and over to I4.
- This needs to be timed carefully: Shoot the I3 Snakey twice. Carefully head over to G4. Wait about 5 seconds and shoot the H4 Snakey and put it on I3. When the other Snakey starts appearing below, move the egg right and up to trap the Don in the top right. Get all 3 hearts in the J and K columns.
- Shoot the I6 Snakey twice. Stand on the chest. When it returns, push it up to G2 and get the heart.
- Head left and down. Shoot the B8 Snakey twice. Get the A10 heart. Wait on A8 and when the Snakey returns, push it down to D11. Head right.
- Shoot the F8 Snakey twice. Get the G7 heart. Wait on F7 and when the Snakey returns, push it down to H11. Get the F11 heart.
- When the Don clears, get the A4 heart. Use the C3 Snakey to trap him in the top left and get the last heart. Get the chest.
17-7[edit]
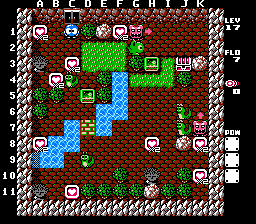
A tricky one. The ending sequence is the hardest part.
- Head to the spot between E2 and F2. When the Leeper taps the grass immediately move right and push the H3 EF down 1.5 spaces and wait. The Leeper will shield you from Don and the right Don can't get you. When it's clear, move the EF around to H9 and get the heart.
- Stand on I6 and shoot the Leeper. Use the egg to trap the Don in the top right and wait by the egg to put the Leeper to sleep when it hatches. Get the heart on F1.
- Very quickly: Push the J7 Snakey right one, go around, get the heart, move the egg all the way up to trap Don temporarily. Move the J6 Snakey down to I10. Get the K10 heart and shoot the egg on K5 twice. Head left and shoot the other egg twice. Use I8 for cover.
- When the 2 Snakeys return, use the J6 one to trap the Don in the bottom right. Use the J7 and put it on G10.
- Go up across the breaking bridge and push the D5 EF up and over to B3. Get the C3 heart.
- Move the C4 Snakey to A2. Get the A1 heart and shoot the egg again. Get the B4 heart too. Head back to the bottom left the long way (not across the cracked bridge).
- Move the D9 Snakey to the spot between A10 and B10. Head back to the top left (again, not over the bridge).
- This is the hardest part of the level: Move the C4 Snakey left two, get the A8 heart. Shoot the egg again. Wait a few seconds and shoot the Snakey on between A10 and B10 twice. Stand on B4 and when the Snakey returns, wait a few seconds and maneuver it down across the bridge to B10. The other Snakey should appear and you need to cross B9 with it and move the other egg down to B11. Get the last heart and the chest.
17-8[edit]
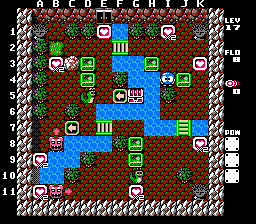
This room is very tricky in how you need to position the lower Don Medusa at the end. It's all about half space technicalities.
- Carefully move the J4 EF to K9. Get the heart.
- Move the G10 Snakey and trap the lower Don on the left against the heart. Move the G9 EF to the spot between I11 and J11. Do NOT push it fully onto J11. Get the G11 heart. Carefully work your way to the top left area.
- Very quickly: Move the D5 Snakey so it's over Don. Get the B3 heart and push the egg one space down. Move the D4 EF up to B1. Quickly shoot the egg again and move right. Push the D3 EF and use it to trap Don on B3. Get the E1 heart. Head down to D6 before the Snakey returns.
- Move the EF on G8 down one. Wait on D6 for Snakey to return if it hasn't already.
- Use the same Snakey and maneuver it up to J1.5, get the I1 heart and shoot the egg again from the left. The half space allows this. Wait on D4.
- When the Snakey returns, move it down two spaces.
- Head back to the lower right. Shoot the Snakey on C11 twice and take cover on G8. When Don comes near, move this EF to trap him on the spot between H11 and I11. Get the A11 heart.
- Move the Snakey on D7 all the way left. Get the heart and shoot the egg again. Wait on D6. When the Snaky returns, maneuver it to K2 and get the last heart.
- Maneuver the G10 Snakey to cross the water on G6 and get the chest. It's amazing how helpless that half space Don is on the bottom for these final steps.
17-9[edit]
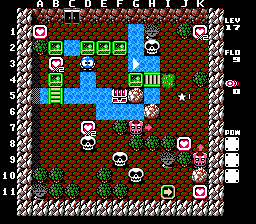
This is actually one of the easier ones in level 17. Really, no major difficult tricks here. Bear in mind: The A1 heart is the one to save for last.
- Move the EF on F2 up one space. Move the one on G4 right two spaces. Get the B3 heart. Move the EF on B4 down to A9.
- Maneuver the D8 Skull up to the water on G3. There is a current that'll take you one space right. Disembark and move the I4 EF down to trap the horizontal Don on G7 and H7.
- Move the D8 Skull up and cross up on C2 with it. Move the EF on B2 down to D8 and wait. When the Skull appears on the right, move the same EF to E7. Get the heart.
- Move the Skull on J5 down one and then to the right and over the Don and trap it down on K9. Get the J8 heart.
- Maneuver the E2 EF to I1. Get the K1 heart. Maneuver the D2 EF to D11.
- Move the F9 Skull 1.5 spaces right. Move the G10 skull 1.5 spaces right. Get the K11 heart. Head back using the half space to cross the right arrow.
- Get the A1 heart and get the chest.
17-10[edit]
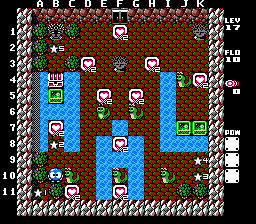
This is it. The final level of the game. Notice H-A-L spelled in the water, for HAL Laboratory, the makers of the game. Perhaps they wanted to get their name in the level or maybe it's a salute to your efforts. In any event, the level's fairly tricky. This is also the only level in 17 to not feature a Don Medusa. The level also seems to play a trick on the player with the use of unnecessary holes.
- Get the hearts on B7, C11, and E5.
- Use the C10 Snakey to cross and get the F11 heart. Cross back.
- Move the E6 Snakey to F4. Get the G5 heart.
- Use the G6 Snakey to cross and get the F8 heart. Cross back. When it returns, move it to G3. Get the H3 heart.
- Go to the bottom right area. Use the I10 Snakey to cross K8. Move the K7 EF up two spaces. Wait for that Snakey to return before proceeding.
- When it does, move the J4 Snakey to K2, get the K4 heart. Shoot the egg again and head back to the bottom right. Cross J8 with the I10 Snakey and move the J7 EF up to J3. Move the K5 EF all the way up. Move the J3 EF to H5.
- Cross I5 with the J4 Snakey and move the EF left one space.
- When the Snakey returns, move it up to J1. Move the I10 Snakey to F2.
- From below, shoot the G3 Snakey twice. When it returs, put it on E3. Get the D3 heart.
- Move the C10 Snakey to D1. Get the last heart.
- Move the G5 EF to D2. From below, shoot the E3 Snakey twice. Wait for it to return to G6.
- Very quickly: Shoot that Snakey and move it up 2.5 spaces. Go up and move the EF on D2 all the way left. Go back around and shoot the egg again from the right.
- When that Snakey returns, use it to cross C4 and get the chest. Thus concludes the last puzzle of the game!
Level 17 boss[edit]
Phase 1[edit]
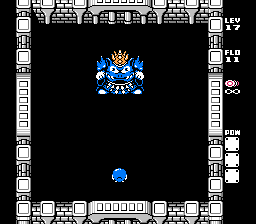
This is it! The real final battle with King Egger. He will move around the upper area of the room left to right and in a circular pattern. He tends to stay towards the top half of the room. He also shoots out fireballs. The fireballs will head straight down and when they are adjacent to your position, they turn and head towards you right or left, depending on where you are standing. The fireballs may be destroyed with a single shot. The best strategy is to simply watch the fireballs and stay somewhat close to the center and fire at Egger when you can.
Phase 2[edit]
After several rounds of shots, he will get a "shocked" look and stay stunned for a while. Keep shooting at him continuously. When the look fades, he will again move around the room shooting fireballs, only this time the fireballs move a little slower and home in on your position. They can be destroyed with a single shot. Egger can also come down further than the top half of the room this time around, though he still mainly stays on the top half. Just eye the fireballs and shoot him when you can. Also watch for if he starts coming closer to your half of the room.
After several shots, he will be turned into an egg. Shoot the egg a bunch of times until it starts shooting out smaller eggs continuously. Egger will explode and a wall in the top right will flash white. Shoot that wall and enter the hole you made. This will take you to the ending of the game. Congratulations!