3-1[edit]
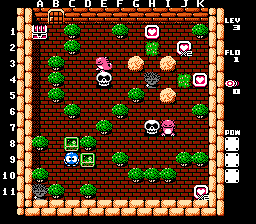
This level is not too tricky. You need to be a little quick with the shots and maneuvering eggs, though.
- To start, position the two EFs nearest you at A9 and C11. Go collect the heart at K11 then.
- Shoot the Gol on I7 and position it on H6, right above the nearby skull. Shoot that skull and move it to I4. Get the hearts on J2 and K4.
- Go down and left and in a similar process, shoot the Gol on E3 and position it right of the nearby skull and position that skull at H3 for safe passage to the last heart.
- Go left and down, avoiding the Gol's shot if need be, and get the chest.
3-2[edit]
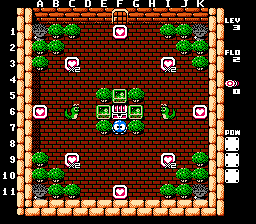
There are quite a few possible ways to solve this room as the positioning of EFs can be done a few ways. Here is one of the ways:
- First, obtain all four unguarded hearts.
- Go to the three center EFs and position one at D1, A8, and K8.
- Using your shots, shoot a Snakey and position it at G1, get the heart and shoot the egg again.
- Position a Snakey at A5, get the heart, shoot the egg again.
- Position a Snakey at K5, get the heart, shoot the egg again.
- Position a Snakey at G11. Position the other Snakey at E11. Get the last heart and get the chest.
3-3[edit]
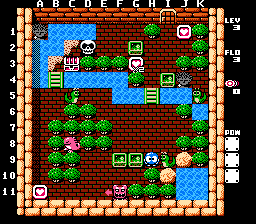
This level isn't too tricky. Trapping the Don is about the only hard part.
- Push the EF on F9 down one square and then move the one on G9 left one square.
- Push the EF that's now on F10 left one square and push the EF on F9 down one square.
- Wait for Don to come to the right and push the EF on E10 down to trap him on F11.
- Go up and get the heart on G3 and push the EF on G2 up one.
- Position the Snakey on C5 to A5 and get the heart on A11.
- Go up and position the skull on J2 and get the last heart. Go over and get the chest.
3-4[edit]
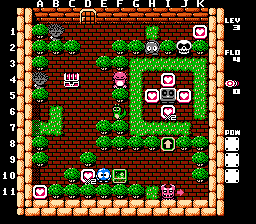
This level isn't too tough. There are a few ways one can distribute the monsters. Here's one way:
- Get the heart right next to you and trap Don with the EF in the bottom right corner.
- Shoot the Snakey and position it left of the chest on B4.
- Get the heart under the rocky on I6. Shoot and position the rockey on A6 under the medusa. Go down and get the heart on A11.
- Get the three hearts in the middle of the grass ring then shoot the Gol and position it up on D1.
- Go up and shoot the skull and position it on K7. Get the last heart and the chest.
3-5[edit]
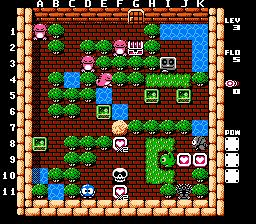
This level isn't too tough either. The fire from the Gols comes close, but you can avoid it easily.
- Get the heart above the skull and then shoot and position the skull down on G10. Get the heart.
- Shoot the Leeper and put it above the medusa on J10. You should wait for the egg to hatch so you can put it to sleep.
- Shoot the Alma and get the last 2 hearts. Push the Alma over to the right and up into the water.
- Push the EF on H5 up one. Push the EF on J5 right one.
- Stand on I4 and wait for the rocky to face you. Shoot it and push it down and left into the water spot on F6 and keep moving left to cross. You'll move the EF to block the nearby Gol.
- Go to A9, push the EF up and make your way to the chest.
- The level is complete, though if you have not yet cleared Level 1 and gotten the magic egg, you will need to do so to proceed to 3-6.
3-6[edit]
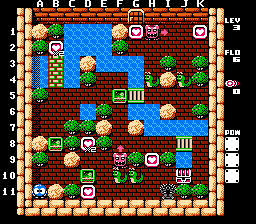
This level isn't too tough. There are plenty of rocks to shield yourself from the Don medusas.
- Go right and move the EF on D10 to the right one and down one.
- Get the hearts on D8 and D11.
- Move the EF on D11 all the way right and next to the medusa.
- Shoot the Snakey on F10 and push it up two spaces. Shoot the other Snakey on G10 and push it right two spaces. Get the nearby heart.
- Go back left and up, moving the EF on B8 to C6.
- Go across the breaking bridges and get the heart.
- Push the EF on F5 down one space to trap the Don.
- Go right and shoot the Snakeys on H4 and J4 and position them to sandwich the Don on I1. Get the 2 hearts in the upper area and get the chest.
3-7[edit]
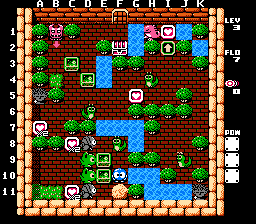
This one starts out peculiar, but it's not too tough. Just doing things in order is all that's important.
- You'll need to use the 2 EFs nearest you to get the 2 Leepers and 2 Almas trapped in the area left. A good way to do this is wait for the areas next to the hearts to empty out and inch the EFs left. Once you succeed, get the 2 hearts.
- Shoot the Snakey on F8 and move it right into the water and cross over. Move right and shoot the Snakey on J9. Move it right one square.
- Go up and shoot the Snakey on H4 and move it left into the water and push the EF left one space.
- Move the EF on C3 left one space and move the EF now on C4 down one space. Trap Don on the upper wall with the EF.
- Position the Snakey on D6 on A6 and then get the heart under you. Get the heart on G5.
- When the Snakey on H4 respawns, shoot and position it up on D1.
- Go down and right and up through the up arrow for the last heart. Shoot the Gol and push it left into the water. Cross and get the chest.
3-8[edit]
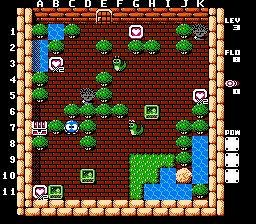
This one is a little bit trickier. You need to be speedy in a few points.
- Get the heart on A11. Walk right under the EF and shoot the Snakey. Position it on D9 and move the EF under the egg to the right. When you're clear, shoot the egg again and then move the EF to I6.
- Move the EF on H6 up one space and move the EF you have on I6 up to K2 and get the heart on K5.
- Shoot the Snakey on F3 and position it on D4. Get the heart on B3.
- Here's a part where you need to be quick. Shoot the Snakey on G7 and move it up to I1. Go down and left and up to get the heart on G1. Shoot the egg again and move down to safety.
- When the Snakey is back on G7, shoot and push it up on G5. Move the EF around to C5 and get the chest.
3-9[edit]
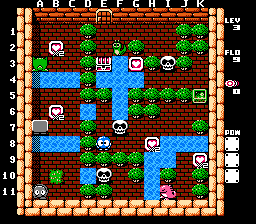
This level's not too hard, though it can trick a player at one point.
- Get the heart on H8 and shoot the nearby skull and move it right and down into the water on J8. Cross and get the heart.
- Keep using the monsters to cross left and when the Alma is away, cross there and wait on the grass.
- Wait until the rocky is above the heart and stops. When Alma is above you, shoot it and cross upwards. Get the heart and rocky will be above you.
- Here's the tricky part: When the Leeper is above the heart, shoot rocky and cross, but quickly cross back down. You do NOT use the Leeper to cross back.
- Wait for rocky to come back and use him to cros to the right.
- Go to the far right and up, shoot the skull on I3 and move it up. Shoot the Snakey and drop him down one space into the water. Cross right to get the heart and left to the chest.
3-10[edit]
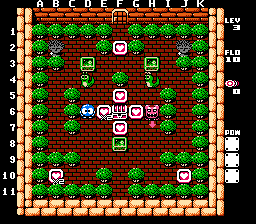
This is the last level in level 3 and it's a little tricky. Getting the top heart is probably the hardest part.
- Get the heart immediately to your right and move the EF on F8 right 2 spaces underneath Don.
- Shoot the Snakey on D4 and move it left two spaces. Move the EF on D3 to C2. Go down and get the heart on B10.
- Go up and move the EF on H3 right one space.
- Here's the tricky part: Shoot Snakey and move him down one space, move the EF on I3 up one space and go get the heart on F2. Go down and get the heart on F5 and hit the egg again. Take cover behind the hearts and wait for Don to pass.
- Go down and move the EF under Don and trap him up by the trees. Get the two hearts in the center area.
- When Snakey is back, shoot and move him to J4. Get the last heart and get the chest.
From here you can proceed to levels 4-7 and you can do them in any order you wish. All four must be completed before you can go on to level 8.