Note: every room in this level has at least one Snakey in it.
4-1[edit]
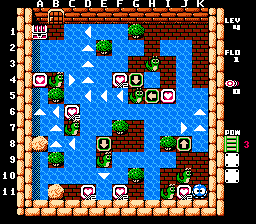
This first level isn't too tough. It's the first one to have water with currents, though no real dangers are present.
- Get the heart near you and shoot the J10 Snakey up into the water and ride up and right.
- Shoot the Snakey on H3 and push it right on down. Get the 2 nearby hearts (you'll get a bridge power) and shoot the Snakey on G5 and push it down. Cross down.
- Shoot the Snakey on E9 down and ride the egg down. Get the left heart first then the right one. Go right and build your bridge on H11. Shoot the Snakey and move it out of the way.
- Once again, shoot the J10 Snakey up, ride, put the H3 one down into the water, but this time shoot the G5 one and push it left and ride left.
- When you get to C5 drop down, shoot the Snakey and push it down. Ride over, shoot the other Snakey and push it right and ride up to the chest.
4-2[edit]
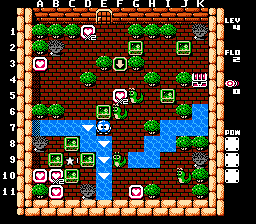
Quite a bit trickier here. You'll need to utilize your shots and be quick in a few spots.
- Go over and push the EF on I5 right 2 spaces. Push the one on J2 up one. Push the one on G2 all the way left and get the upper heart.
- Get the heart on F5. From here, you'll want to push the EF on E6 to F5.
- Shoot the Snakey on F6 and push it left 2. Push the EF on F5 down one space and push the Snakey down into the water and ride down. The current will take you down one. Push both adjacent EFs away while the egg is sinking, move off and push the other 2 EFs to block the Medusas and get the 3 hearts.
- Snakey will reappear on this island. Push him directly right, ride down one square, and move right.
- This next sequence needs to be done quickly: Shoot the Snakey on J10 and put it up one. Shoot the one on F9, push it up against the EF, go up and move the EF left one and push the egg back down to F11. Get the lower heart.
- The Snakey will appear in its initial spot now.
- Push the EF on E6 to C3, go right and around and push it left one.
- Shoot the Snakey on G5 and push it straight left. Get the last heart.
- Shoot the Snakey on F6 and put it up on K2. Get the chest.
4-3[edit]
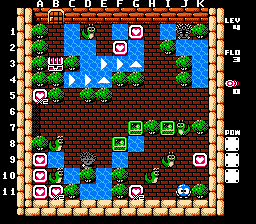
This one is slightly trickier, but not overly tough.
- Get the 2 hearts nearby and shoot the Snakey on J7 and move it up two spaces.
- Shoot the Snakey on H10 and move it around the other Snakey and into the water on G8. Move the 2 EFs adjacent to the water out. Position them at D8 and C9.
- Move the EF at I7 up to H1. You'll need to maneuver it around in the middle area a little to get it up there.
- Get the heart on A5. Shoot the Snakey on B8 and cross down. Get the 4 hearts, but wait for the B8 Snakey to return. When it does, cross up with the Snakey and shoot the B8 Snakey and put it into the water on C4. Ride along and get the last 2 hearts while the egg sinks. Cross left with the D1 Snakey and get the chest.
4-4[edit]
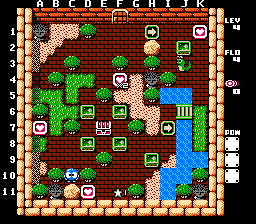
You mainly want that heart on F4. Positioning the EFs will take some maneuvering, but it's not too tough.
- To start, move the EF on D8 up one. Move the one on F6 right two.
- Move the EF on D6 left two and all the way down.
- Move the EF now on D7 all the way up and over to A2. Get the heart on A7.
- Move the EF on F8 down one, go into the lower area and maneuver it up to B1.
- Move the EF on H9 and maneuver it over to G4. Get the heart on F4.
- Go over to the Snakey. This needs to be done quickly: Shoot it, move it right one, move the EF on J2 down 1.5 spaces. Get the K1 heart. Move the Snakey one space down past the brige, cross the bridge and hit the egg again.
- The Snakey will reappear down on F11. Get the last heart and the chest.
4-5[edit]
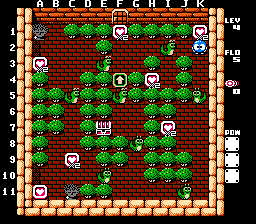
This one's got a part that needs some speed, but it's not too tough. Lots of shots.
- Get the heart above you and shoot the K5 Snakey down two spaces. Get the nearby heart.
- Shoot the J11 Snakey and move it all the way left. Shoot the E10 Snakey and move it left two. Get the heart.
- This next sequence needs to be done quickly: Shoot the C5 Snakey and move it up to B1, shoot the E3 Snakey and move it right. Get the heart on F1 and go back and shoot the egg on B1 (it'll nearly be hatched). Shoot the other egg then.
- Go to C6 and wait for Snakey to come back. When he does, put him up on A2 and get the heart.
- Walk the long way around and shoot the I2 Snakey and move it left and up to F1. Get the heart on H4.
- Shoot the Snakey on E3 and move it down to C9. Walk the long way around and once again shoot this Snakey and move it down to B11. Get the last heart.
- Shoot the Snakey on G8 and move it up. Get the chest.
Level 4 boss[edit]
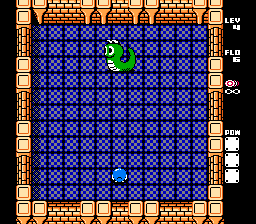
The level ends with a fight against a giant Snakey. It will basically follow you around the room in a slow manner. Touching it is fatal. You have infinite shots here, so all you basically need to do is keep shooting at the Snakey and run away when it starts getting close. Other than that, there are no real difficulties. Once you get it into the giant egg, shoot the egg a bunch of times to get rid of it.