Maps[edit]


Walkthrough[edit]
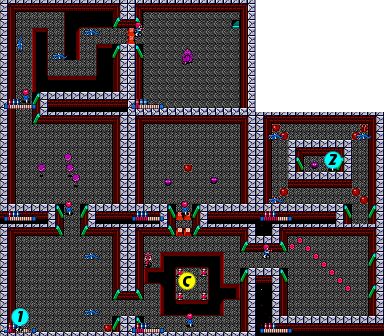
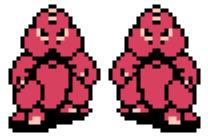
Although it's called the "Green Maze", the layout of the fourth stage is actually quite simple, composed primarily of two long vertical strips. There are three dinosaur bosses in this level, known as the Konagons, who first appeared in Konami's Arkanoid-like Nazo no Kabe - Block Kuzushi. They can breath fire in eight directions, and like to mimic your movements.
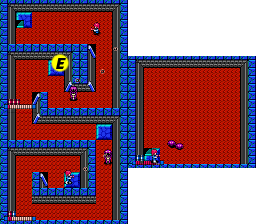
Both the left and right strip feature numerous opportunities to fall and wind up in the underground portion. While the underground that you arrive at if you fall in the small middle portions, or inside the dungeon is a single room of lava that isn't too hard to escape from, the normal two room underground portion is particularly difficult to navigate without losing a lot of health (or Astro Pants). However, you'll want to explore it at least one time, as doing so will net you an extra Energy Tank if you know where to look.
First Crystal[edit]
You can kind of think of this stage as a large letter P. You begin at the bottom of it. As a result, you have two choices. You can go up the left side, and then over the top and down the right side. Or you can head immediately over to the right side, make your way to the top, and then work your way down the left. The left side features much more jumping, while the right side features substantially more fighting. If you take the left side first, and travel down the right side, you can avoid an entire fight with one of the Konagon bosses, so that is the method this walkthrough will follow.
Before you get going, it would be wise to start out by traveling south to the very bottom of the stage. You'll have to fight some Lobsters near the bottom, but if you shoot in the lower right corner of the strip, you will find the Fire Rate Up enhancement. Once you collect it, start making your way north, fighting the Lobsters, Mummy-men and Kamereres that you encounter along the way. Between the first pair of Mummy-men that you encounter, you will find a pair of Power Shoes that would be a good idea to locate and collect. When you reach the dead-end, collect the Astro Pants. At this point, it would be a good idea to intentionally fall into the space in front of you. This way, you can collect the Energy Tank that you will find in the underground portion that you arrive in. There are two Cobras that you have to worry about, so make sure to jump continuously while you attack them. Shoot your weapon over all of the solid tiles to make sure you don't miss the tank, or any other hidden surprises in this section.
When you return to the main map, wait by the left side for a floating platform to come pick you up. Jump on board, and let it take your north, past the island with the Kinoko mushrooms on it (there's a hidden Cosmo Ball in the center if you really want it), and get off at the island above with the smaller Bsters. Cross over to the right side and prepare to jump aboard another floating platform that arrives. Let it take you up to the small island above. Then leap over the gap to the larger island on the right. Beware of the land mines that line the corners of the island. Head down the stairs, and there you will find the first Crystal Diamond Guard dome, completely unguarded. Destroy it and collect the crystal.
Second Crystal[edit]
Head back up the stairs, and jump back over to the smaller island on the right. Wait for a platform to pick you up on the north side of the island, and ride it up to the larger island above with the Kinoko mushrooms. Wait on that island, not for the platform which appears on the left, but for another platform which will show up later on the right. Ride that platform to the small exit on the right. Collect the Astro Pants, and pass through the connecting room with the series of Blue Flash Bombs. Cross over to the exit on the other side, and collect the Power Shoes that you find in the next region. Once you collect them, return to the left strip, jump back on the platform, and continue up to the last mushroom filled island. Get off and ride one of the moving platforms from there to the landing above.
You can only make it through this area if you've collected at least one set of Power Shoes, but two would be much better. You'll need them to make it over the large gaps in the corridor. If you haven't collected enough Power Shoes, you'll have no choice but to head back down and travel along the right strip to reach the top. It is possible to have collected enough Power Shoes by now, so as long as you have, jump over the gaps, avoid the land mines, and take the right exit. Here you will find the Blue Konagon boss, and a stairway. You can beat the boss and take the stairs, or do it the other way around, but either way, you will have to beat the boss to escape the room. Try to shoot at it off center; either just to the left or right of it, or just above or below it. When it starts to charge, get out of its way, as it can do a lot of damage to you in very few hits. When you beat it, make sure you head down the stairs to collect the next crystal diamond.
Third Crystal[edit]
With two crystals down, it's time to collect the third one. If you've followed the walkthrough, you'll be able to access the dungeon it's held in without even facing one of the Konagon bosses. Continue right from the top center room, and fight the Mummy-men waiting inside. Then destroy the blocks above the southern path. Start making your way south. You will see a stairwell on your right, but you can ignore it, as it takes you to a small room where you cannot collect anything. (The point of that stairwell is to alert you to the presence of the room, whose real entrance is hidden.) Continue moving south until you see some Power Shoes and Astro Wear stuck behind some blocks. Destroy the blocks to collect them.
At this point, you will be at the top of a very long stretch of black block that you will have to shoot in order to advance down to the right side of the right strip. Buried in the blocks are red flash bombs which can make your trip down this alley a little frustrating. Do your best to avoid freeing them, if at all possible. The thing that will incline you to free them most of all if your curiosity to discover if there are any items hidden beneath the blocks. Ultimately, you are looking for a staircase that is hidden beneath a block on the far right side. As soon as you find it, head down the steps.
You will arrive in the lower right corner of the dungeon. Ultimately, your goal is to head up, but first, explore the passage to the right. Here you will find two Kamereres and four land mines. You may think that the objective is to remove all of them to open the barrier to the room above, but in truth, all you are interested in here is the hidden Cannon Shot upgrade in the middle of the island. If you collected the first Cannon Shot enhancement from the first stage, this one will max out the power of your gun by upgrading it to level 3. Don't miss out on this, as it can make the rest of your battle substantially easier. If you're interested in how to access the hidden room that the stairway labeled number 2 leads to, take the path to the right from this room, and walk through the wall in upper right corner of the room. It is a fake wall, and you will arrive in the outer portion of the room where you can collect all of the items.
Return to the starting point of the dungeon, and take the north path. Here is the only place where you will encounter the Gyoron eyeballs. They should be easy to defeat with your upgraded cannon. Keep going up to the room above. Carefully take out the Eels that get in your way, and advance to the room on the right. You will encounter yet another Konagon boss who guards a stairwell. You do not have to fight the boss unless you plan to exit out of this room and revisit part of the stage. If you prefer, skip the fight, and head down the steps. Shoot the Crystal Diamond Guard dome, and collect the third crystal. This will summon your transport, which you can hop in and travel to the next stage without fighting the boss.


