Western Enclave[edit]
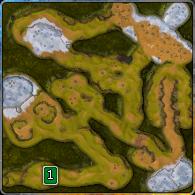
Within 8 minutes, you need to setup a defense in the western enclave.
When you head to the right of your starting location, you will encounter about 3 or 4 minions defending your second monument, along with two spawn buildings. Once you capture it, it will be reinforced by allied troops. You can also construct an additional wall to defend the monument as well.
The first enclave is to the west, and contains four power wells. About two minutes before the timer finishes, the enemy will push with one final rush to capture the enclave; on standard difficulty, there are 6 twilight minions, and 3 twilight brutes.
To defend the area, you should take out the two twilight structures on the plateaus just outside the enclave. Next, find a defensive position that can easily take out the incoming attack. While the best place is at the enclave, you can attack directly from the ramp before the enemy forces arrive.
Although not recommended, you may push forward and attack the enemy early before the assault. For example, you could smash a few of their unit production buildings, or with a Swift unit, advance to the other two enclaves to get additional power wells constructed.
Split Defense[edit]
Your next task is to defend both the northwest and south-east camps. Even though there are two locations marked on your map, you need to defend a third location to remain at full strength. After clearing out the nearby twilight camp and claiming the third monument, prepare your defenses.
The south-east camp is more easily reached, as it is a direct path from the western enclave. In addition to the four Power Wells in the camp, there is also two additional Power Wells to the west of the camp. Enemies will attack this camp from the path heading directly north. You only need to maintain a small force here.
The center area contains the fourth monument and two power wells. Enemies will attack from the north-east.
The north-west camp contains four powerwells, and enemies will attack from the north-east path. Some of the opponents may try circling around the outer wall and attack from the flank.
If you have powerful defensive structures, you can have them supported by only one or two units in any of these three locations; they can easily cut down the attacking enemy forces on standard difficulty.
Twilight Infester[edit]
Your final objective is to destroy the Twilight Infester; it is laying siege to the city of Hope in the north-east.
There are three approaches to the base. The southern path is a long canyon covered by anti-ground turrets, and is thus the most dangerous. Instead, pick either the southwest or western path.
It is an extra large unit, and can easily destroy individual units or forces. However, you should have a full-sized army when you lay an assault. Killing the brute will complete the mission, even before you retrieve the treasure chest at the north-east corner of the base.
Possible Rewards[edit]
- Defense Tower I
- Drones I
- Fire Bomb I
- Ghostspears I
- Kobold Trick I
- Magma Hurler I
- Nightcrawler I
- Ravage I
- Tremor I
- Ray of Light I
- Shadow Insect I
- Undead Army I
- Banner of Glory II
- Ice Barrier II
- Mauler II
- Nasty Surprise II
- Phalanx II
- Rageclaws II
- Ripper II
- Surge of Light II
- Banner of Glory III
- Ice Barrier III
- Mauler III
- Nasty Surprise III
- Rageclaws III
- Phalanx III
- Ripper III
- Surge of Light III