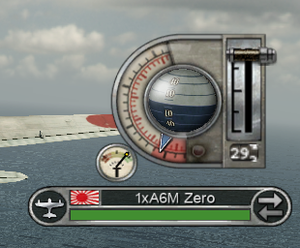
Aircraft are one of the most powerful units in the game given their high attacking power, mobility, and sheer strength of numbers. As in Midway, players have complete control over an aircraft, much like a flight simulator. Unlike a flight simulator, however, players will not have to concern themselves over things like G-forces, damage to individual aircraft components, and wind direction. Even during the stormiest night missions, players will find they will be flying in a virtual, windless environment. Only vision is impaired during these times.
Planes, however, are somewhat notoriously thin-skinned – they can only take a few hits before going down. Additionally, in a straight fight between a torpedo bomber and a warship, chances are the warship will win (although possibly not before the plane drops its torpedo).
Payloads, like bombs, rockets, and torpedoes, all negatively affect a plane's mobility. Be sure to drop any kind of payload before entering a dogfight, as you will not be able to climb as quickly or turn as sharply when carrying a depth charge or a torpedo. Plane armament can reload in Pacific, so simply dropping your payload will result in only a temporary gain in performance. Players can, during multiplayer and skirmish games, turn off the automatic reloading of aircraft payloads, although this option cannot be turned off for campaigns. (After all, with only one bomb, how would you bomb the USS Nevada twice in Attack on Pearl Harbour?)
Aircraft are separated into five main categories, based on what they're equipped with and how they attack their opponents:
- Fighters include the F6F Hellcat and the J2M Raiden. These aircraft are designed to bring down other aircraft, and as such are designed to be quick and light. Some of these planes can equip themselves with light bombs or rockets, both of which should be discarded before attempting to dogfight. The rockets come in two flavours – anti-air and anti-surface. As examples, the F4U Corsair carries the latter and the J2M Raiden carries the former.
- Dive Bombers include the SB2C Helldiver and the D4Y Judy. These planes are equipped with a single bomb to drop on a target. They are most effective, as their name suggests, when coming out of a dive. Dive bombers are now more effective with a relatively shallow dive, versus the 90° drop dive bombers perform in Midway (although the steep dive is still an effective attack). This allows them to release their ordnance quicker, but at the same time makes them easier to target from the perspective of the enemy player, as well as reducing the amount of time they have to drop their payload. Dive bombers now cause noticeable damage against battleships, and can still be equipped with air-dropped depth charges.
- Torpedo Bombers include the TBF Avenger and the B6N Jill. Planes like these are armed with a torpedo to drop in the water, which will then travel in a straight line toward its target. The TBM Avenger, not to be confused with the Grumman TBF, is a black sheep in this category. It is covered in greater detail in the Allied aircraft section of this guide.
- Carpet Bombers are designed to carry a large payload of bombs to simply dump on a target. Examples of this type include the G4M Betty and the B-17 Flying Fortress. Also known by some as level bombers, these planes are designed to attack large and imposing targets. The larger the target, the more bombs that will strike it. These planes have received significant upgrades since Midway, and are now effective against battleships. Additionally, the Japanese carpet bombers – the Nell and the Betty – have sturdier armour than before. Although they are still sitting targets for fighters, their weapons are more accurate, faster-firing, and they themselves can take more damage.
- Recon Planes are launched either through a shipyard or from a cruiser. The OS2U Kingfisher and the E13A Jake are examples of this plane type. Equipped with a sonar suite, recon planes can provide a pinch of firepower anywhere on the map, or act as a screen against enemy submarines. Only one recon plane can be launched at a time per ship. More often than not, floatplanes are equipped with either a depth charge or some kind of bomb, while flying boats (like the PBY Catalina and the H8K Emily) carry torpedoes, depth charges, or bombs.
It should be noted that the throttle control on planes works differently than some other flyers. Setting the throttle to the maximum will cause the plane to accelerate to maximum speed, but pulling it down will result in the plane braking. The issue is that the plane will continue braking until it reaches a speed of 0, during which a novice player can easily stall and crash. It is therefore important, while flying, to slow down while making an attack run without slowing down to the point of an unrecoverable stall.
Taking Off
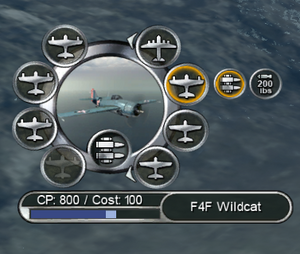
Launching aircraft in Pacific has changed considerably from Midway. Actions such as this are now done through the Support Manager (see the map section for further details). Pressing the Support Manager key will open the support manager. It is then up to the player to choose from where units will spawn. The map indicates where the unit will spawn, and includes both bases and carriers. In some missions this isn't a unit or building, but instead a simple reinforcement point from which to appear. This is most common in Duel and Siege maps.
Once a spawn point has been selected, the player can then choose which kind of plane to spawn. Planes are always spawned in groups of three – it is impossible to increase or decrease this number. Launching planes will take planes away from your current stockpile, or, in the case of Island Capture, will lower your command point reserve. The launch key will launch the selected unit.
Changing the loadout for each aircraft is as easy as pressing the respective key. Be careful, however, as payloads decrease your plane's ability to manoeuvre. If reloading isn't turned off, as is the case with most multiplayer games and single player, the payload will automatically respawn, and reduce your plane's performance again.
Landing
Landing aircraft isn't as important as it was in Midway. In Pacific, unless otherwise specified, aircraft will respawn their weaponry. This ultimately curbs the idea of crashing aircraft into the ocean to save time, although there are times still in which you may want to do this to quickly free spots up. This will happen most often when you send up recon planes to locate the enemy to decide what kind of units they have – be it ships, subs, or aircraft. You may wish to crash these recon planes to free up the slots for the necessary counter (if your recon plane spots enemy aircraft, you'll want to go all fighters – if all ships, you'll want ships of your own and torpedo bombers, for example).
It is still possible, however, to land, yet it remains considerably impractical; it is better to simply crash your units rather than have to wait for them to land. This is not a good idea, naturally, when you intend to use these units in the future.
Seaplanes and flying boats can land on the sea. Landing on the sea with a flying boat or seaplane necessitates approaching the sea at an extremely low angle of attack – it is still possible to crash a seaplane or flying boat into the ocean if you approach the ocean at too steep an angle. Successfully landing a flying boat or seaplane on the water yields the Flying Fish achievement.
Torpedo Bombing

Torpedo bombing is one of the most effective ways of taking down a ship, although planes delivering the payload are sitting ducks to AA fire and fighter patrols. Examples of this type include the TBF Avenger and B5N Kate.
To perform an aerial torpedo attack, it is necessary to fly above the ocean at a low altitude, and at a slow speed. Attempting to drop the torpedo at too high a height, or at too fast a speed, will have the torpedo explode upon hitting the water. Dropping the torpedo like a bomb does little to no damage. Once low and slow, switch to bombing mode and release the torpedo. The torpedo will swim in a straight line and, hopefully, hit the target.

Due to the vulnerable nature of their attack angle, it is often most effective to send in several squadrons of these aircraft simultaneously, spreading the AA fire and increasing the chance of a hit. In most circumstances, it is optimistic to assume your planes will survive the attack – AA fire is perhaps even more of a threat than in Midway, shooting down most planes before they can turn and flee or strike again.
Due to the fact that payloads now replenish over time (unless this option is manually disabled), attacking small convoys with fewer squadrons is now possible. When striking these small clusters of ships, squadrons can circle above until their payload replenishes, then dive for another attack. Due to the lack of armour on Japanese aircraft, you may find US aircraft more effective, being able to launch several torpedoes each before even getting close to being shot down.
Even though this may be obvious, it is important to remember torpedoes have no effect whatsoever on land-based targets, and that they must be launched under a certain threshold to avoid explosion on impact with the water. This is marked on your instrument cluster in the bottom right hand corner of the screen. Always make sure you drop your ordnance below this altitude.
Dive Bombing
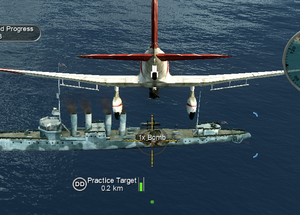
Dive bombers are versatile tools, possessing the ability to attack land and sea targets, and, when equipped with depth charges, submarines. In addition to this, the steep attack angle employed by dive bombers means AA fire is less effective against these planes than your torpedo bombers. Examples include the SBD Dauntless and D3A Val.

Dive bombers are most useful against lightly armoured/defended targets such as destroyers, carriers or light cruisers, or land-based targets such as hangars and shipyards, due to the fact that individually they pack nowhere near the punch of level bombers. However, their versatility and relative agility allow them, in many circumstances, to assume fighter roles if there is a shortage of these aircraft or if your squadron comes under attack.
The AI in this case are relatively good at scoring hits with dive bombers, however sometimes you will wish to drop in a bit lower before deploying your ordnance to improve accuracy. Another thing to note when attacking ships is the speed of the ship. If the ship is moving at a high rate of speed, aim at the bow or even ahead of the ship to ensure the bomb hits its target rather than exploding off of the back of the ship.
With heavily armoured ships such as battleships and heavy cruisers, the dive bomber has limited effectiveness – the thick deck defences mean the bombs do little damage. They can still, however, be employed as an effective distraction for torpedo bombers.
You will rarely find a need to use them in the anti submarine role. Most cruisers, battleships, and Japanese submarines can launch floatplanes that are often equipped with depth charges. It is preferable to use these, because they are easily replaced and allow your other forces to continue with the objective. However, when employing them in this tactic, bear in mind that unlike the ship-launched recon planes, they do not possess on board sonar and therefore are only effective at targeting submarines within a destroyer or recon plane's sonar range.
Carpet Bombing
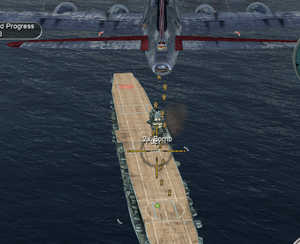
Carpet bombers, or level bombers, are large, heavily armoured aircraft which, rather than diving to attack, remain level and drop a "carpet" of bombs from a high altitude over the target. While it is unlikely that all the bombs will hit, the sheer number of bombs which can be launched from a squadron of three of these bombers makes up for this. Examples include the B-17 Flying Fortress and G4M Betty.

These bombers are best employed against heavily armoured or defended targets. Most (especially the B-17) have highly proficient defences against fighter aircraft, however they are vulnerable if attacked from below or above, so a fighter escort is advisable. While you may wish to control the squadrons yourself, the AI is fairly good at delivering ordnance on target, so this is not as necessary as with torpedo bombers.
Although the game suggests that these units are good against structures, they are in reality good against anything with a really large profile - the larger the profile, the more bombs will hit. Therefore, smaller buildings like headquarters and shipyards can take multiple runs to disable - most of the bombs will hit to the side of the building rather than the building itself. Battleships are much bigger than these buildings, so carpet bombers are most effective against large targets than they are smaller ones.
When controlling the aircraft, remember two things. Firstly, the aircraft does not respond well to quick, sharp movements in direction, and secondly, when delivering your bombs, start the bombing run just before the target – the bombs will then carpet the target and cause maximum damage.
Strafing

Strafing tactics are most effectively employed by fighter aircraft, however most aircraft types (bar level bombers, heavier seaplanes and aircraft which do not lack guns) can employ this tactic with relative success. Even when strafing does not induce damage, it is often a perfect option to distract or split anti aircraft fire and allow heavier ordnance such as torpedoes and bombs to reach their targets.

Many light ships such as troop ships and patrol boats are most effectively destroyed by strafing, sitting too high in the water for torpedoes and being too small for accurate bomb hits. Ship based AA fire can also damage these ships, however getting in range also brings the danger of torpedoes from the patrol boats themselves.
In the campaign, most ships are vulnerable to strafing - the game seems to almost arbitrarily decide which ships are vulnerable to strafing and which ones are not. Fortunately, however, it does tell you that your attack is "Ineffective" when you attempt to do so. Some targets that weren't previously vulnerable to strafing in Midway just might be in Pacific - LSTs, for example. In multiplayer, know however that only patrol boats are vulnerable to machine gun fire.
As with Midway, it is possible to suppress anti-aircraft fire from most open-mounted machine guns and flak cannons. Shooting these with machine guns can render them inoperable, at least until the ship fixes them. It is generally impossible to completely suppress a ship's air defences, but destroying enemy AA turrets - combined with the fighters themselves being a distraction - can distract the remaining AA defences. This allows bombers to attack unhindered.
Dogfighting

Dogfighting is usually employed by fighter aircraft, and involves the destruction of enemy air forces by your own. Before attempting to dogfight an enemy aircraft, be sure to drop any kind of ordnance you may have. This sharply increases your plane's responsiveness, and can mean the difference between getting a kill and becoming a kill yourself.
As you approach the enemy, they will often turn and head straight for you. As soon as you're in range, pepper their engine with machine gun fire. Be careful though since they'll be doing the same to you. The idea is to hit them in the engine before they can hit yours.
As you close the distance, you'll want to pull up and away from the enemy planes, as it is highly possible to crash into them.

What happens now depends on how your opponent fights. The general rule remains the same - hit them from behind. Dogfighting is very simple in BSM terms, and pretty much anyone can do it. Get behind them, lean on the trigger, and watch for the explosions marking your bullets hitting.
One mistake commonly made by rookies is not adjusting their airspeed. Airspeed is extremely valuable - the common military aviator saying is that "Speed is life". Speed in this case is more like money - easy to expend, tough to get, especially in a fight.
Despite this, low airspeed is good for turning, so apply the airbrakes when you're ready for a turn. Additionally, if you're in a dive and need to pull up quickly, apply the brakes first in order to slow your descent, then angle your plane up and open up the throttle quickly to gain altitude.

Each aircraft has slightly different flight characteristics, so it's best to look at each individual aircraft's profile under the Nations section of this guide to see their strengths and weaknesses.
Legendary WW1 fighter ace Oswald Boelcke wrote the Dicta Boelcke, which is a list of fundamental aerial manoeuvres. Although hard to employ in Midway and Pacific, they are a good starting point for almost any kind of flying game. It consisted of eight rules, paraphrased and summarized as follows:
- Secure the upper hand when attacking. If possible, keep the sun behind you (especially when dive bombing)
- Always continue with an attack once you've started
- Only fire at close range, and then when the enemy is properly in your sights
- Always keep your eye on the opponent - lose sight, lose the fight
- Always attack from behind
- If an opponent dives on you, don't try to evade but turn to meet it
- Never forget your line of retreat
- Avoid two aircraft attacking the same opponent.
The training sections aren't good for dogfighting, because there are absolutely no aerial targets aside from the dummy targets. The best place to practise dogfighting is in two places - in the Duel mode (any map, just be sure to select fighter as your unit of choice), and in Competitive Clash. Duel mode lets you fly practically any fighter against a few opponents (the AI will always pick either J2M Raidens or F4U Corsairs, both with rockets), while Competitive Clash puts you behind the controls of a Raiden. You must then attempt to shoot down as many American fighters as possible (including the prestigious Shooting Star).
Kamikaze Strikes

Kamikaze strikes can only be utilized by Japanese forces, and can take the form of purpose-built, bomber-based Ohka rocket suicide planes, or fighters fitted with explosives. Attempting kamikaze attacks with a non-kamikaze aircraft - including all American aircraft - will cause no damage.

Ohkas aren't flown into the air like normal aircraft, but rather carried to the target by a G4M Betty (specifically called an Ohka Carrier in-game). When the plane is in range, the Betty can release its payload, and then control switches over to the Ohka. Once the Ohka is deployed, it's up to the user to fly it into a target. The Ohka is unique among aircraft in that the boost control is one-time only, and accelerates the tiny aircraft close to 600 kph. This makes it almost impossible to hit, except by dedicated anti-aircraft ships (and, of course, the computer).
Make sure not to launch the Ohka from the bomber too early, otherwise it may run out of fuel before reaching the target. This does not mean it will not hit the target, rather it slows down rapidly, making it much easier prey for AA fire. Damage caused by Ohka and general kamikaze aircraft is similar.
The other form of air-based kamikaze behaves much more like an ordinary plane. Kamikaze planes are mostly Zeros, Ki-43s, D3As, and D4Ys. The big advantage of these aircraft is their ability to fire guns – if a fighter squadron is encountered mid flight, the squadron can fight back, unlike with the Ohka, which would remain in its bomber aircraft at this stage and be much easier to shoot down. However, strong AA cover can easily take out this form of kamikaze aircraft, which approaches at a much slower speed than the Ohka.
If you wish to rely heavily on kamikaze strikes, a good idea is to launch several volleys of Ohka aircraft, escorted by generic kamikaze aircraft which can protect the Ohka carriers and still pack a punch at the target.
When defending against kamikaze attacks, neutralize them as soon as possible. Even if you destroy the plane, its carcass still carries its explosive power until it explodes. This is true for all kamikaze planes, including Ohkas.
Standing Orders

There are a few standing orders for aircraft, most of them are very similar to those found on warships.
- Defensive Stance: Replaces Combat Air Patrol from the previous game. The selected squadron will guard the unit or position it is assigned to. Attack planes ordered on CAP will only use ordnance on human-selected targets.
- Aggressive Stance: The planes will select their own targets to engage, but human-selected targets will take priority. When the plane has shot down or destroyed all targets, it will resume its previous movement orders, if any.
- Attack: Your squadron will attack the assigned target. This leaves you free to, as the squadron leader, attack a target of your own. It is shown as the upper option in the diagram on the right.
- Regroup: Orders the entire squadron to withdraw from an attack and regroup with the squadron leader. It is shown as the lowest option in the diagram to the right.
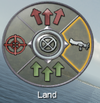
- Land: Simply enough, orders the squadron to return to its home carrier or airfield. It is shown as the rightmost option in the diagram on the right. Its icon tends to change from map to map, but is in all known cases, on the right.
- Retreat: Orders the squadron to move back from the combat area to the nearest safe zone.