- Required items: Communicator γ (blue)
Part 1[edit]
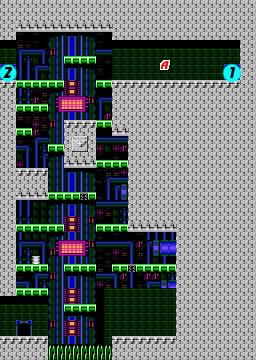
Area 8 is broken up into a three major area connected via a network of tunnels and elevators. You bring in the lower left corner of the first area shown to the left. As you make your way to the top of this area, you will be attacked by gunmen who are stationed on various platforms, as well as soldiers who parachute down from the ceiling. They all drop precious bullets. If you haven't reached the maximum level at 300 total bullets, this area is an excellent opportunity to do just that.
In particular, if you make your way to the very top, there is a hallway on the right, leading up to the door that connects with the right elevator shaft. Around location A, two soldiers will parachute down every now and then. You can stay put and continue to kill these soldiers and collect the bullets they leave behind until you reach 300 total collected bullets, putting you at maximum combat level with eight bars of health.
To either side of the top, there are doors which lead to the elevator shafts. For the purposes of this walkthrough, it is faster to head through door 1 on the left. Whenever you walk through one of these numbered doors (with one exception), you must walk through a corridor. These corridors are patrolled by a robotic gun that moves up and down as it moves down the hall. The robotic guns are fairly easy to destroy with one or two shots from the rocket launcher. Shooting the pole they ride on does nothing.
Elevator shafts[edit]
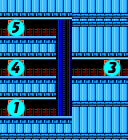
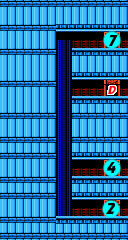
The left and right elevator shafts connect the first area with the other two. Doors 1 and 2 come from the first area mentioned above. Doors 3 and 5 in the right elevator shaft lead to your next destination, the second area described below. Door 5 drops you off quite a bit closer to your goal than door 3 does.
Door 4 is a special door which connects the two shafts via an extended corridor consisting of two screens. The corridor closer to the left elevator shaft contains the usual gun robot, but the corridor closer to the right elevator shaft instead contains a soldier who is a bit more clever than the robot. He will always occupy the height that you do not. If you are on the floor, he will grapple up to the ceiling. If you grapple up to the ceiling, he will drop to the floor. The only way to successfully hit him and remove him from your path is to fire while you transition from the floor to the ceiling or vice versa.
In the left shaft, door 7 leads to the third area. While you're there, you can visit the communication room inside, but don't try to drop down any further as you're likely to land on spikes. The location marked D is the entrance to the boss battle, but you must first find a way to open it.
Part 2[edit]
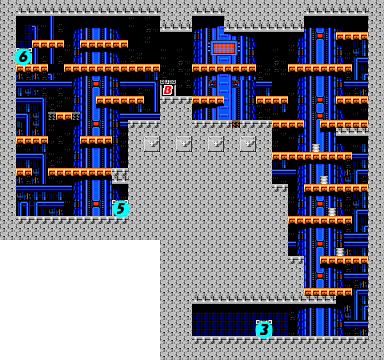
It's recommended that you arrive to this area through door 5 since it decreases the distance you must travel. Door 3 is just as suitable, but you must battle your way through a longer series of platforms to reach the top. This area contains grenadiers who parachute down from above and toss grenades around. The fewer you encounter, the better off your'll be.
You're ultimate goal is the communication room at location B, although you won't learn a lot.
- Communicate: A soldier will tell you that the δ communicator, the very one you are currently using, is useful in Areas 7 and 9.
- Wiretapping: You will overhead Super Joe trying to determine his new location, which he says sounds close to the ocean.
It appears you won't find Super Joe in this area after all. Once you are finished here, step outside, and head to door six in the upper left corner. Watch out for the tinkerers who send their remote control drones flying around the room. Clear a path to the upper left corner, and step through door 6 to reach the bottom of the third area.
Part 3[edit]
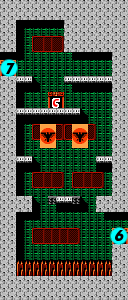
If you arrived through door 7, you can make your way down to the communication room below, but don't try to drop down to the bottom, as you are likely to miss the floating platform below and land on the spikes. If you came through door 6, you will be at the bottom, and must use the floating platforms to safely navigate your way to the top where the communication room can be found at location C.
Whether you arrive from above or below, right around the time you can see the door to the communication room, an item box will parachute down. In fact, this box will continue to appear every time you enter this area. Leave and return until the box provides you with one extra life. When you're ready, head through door C.
- Communicate: A commander appears to have determined that Super Joe has been moved to Area 9.
- Wiretapping: One enemy soldier will ask his superior to open a door. This is the boss door marked D in the left elevator shaft.
While the dialogue suggests that this is the only communication room that you need to gain access to the boss, you do in fact need to visit both communication rooms. In order for the boss door to open. It does not matter which order you do them in, as long as you visit them both. Assuming you have done so, head through door 7 to return to the left elevator shaft, and drop down one floor to locate the core.
Boss[edit]
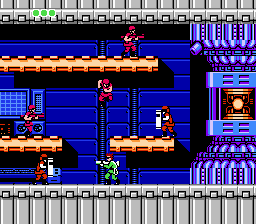
This room offers few surprises. You will be attacked en masse by a never ending supply of soldiers while you attempt to destroy the core. There will be one new element to this fight however. Two soldiers, one on the floor and one in front of the core, possess shields that deflect all of your shots if you hit them from the front. The only ways to clear them are to get behind them and shoot them in the back, or try to stomp them and make them defenceless for a while, then shoot. Don't focus too much on them, concentrate your fire on the core and destroy it as quickly as possible.
Reward: You will earn ten bullets as well as the Iron Boots. These boots are good replacement for the Energy Recovery potion if you have a lot of health. They allow you to kill weak enemies by swinging into them.
Famicom Differences[edit]
- In Part B, grenadiers are already in the room, while paratroopers are all common soldiers.
- In Part C there is no parachute box.
