General strategies[edit]
Focus on the top buns[edit]
When working to complete the hamburgers, your effort is best spent focusing on the top bun of the burger and nothing else. As you push the top bun down, it will gradually push all the rest down so you don't actually need to focus on them. Only push down another layer of the burger if A) it just happens to be along a safe route that you are taking to another bun or B) if it would squash a significant number of enemies, taking them out of play for a little while and giving you a little more breathing room.
Send the enemies for a ride[edit]
Whenever possible, walk three quarters of the way across a layer, and wait for an enemy to follow you on to the layer before walking the rest of the way. This will cause the enemy to fall down with the layer, and its weight will cause the layer to fall several floors instead of just once. This will reduce the amount of work that you have to do personally to drop the layers down. Be aware, however, that this will not remove the enemy from play like squashing them will. It merely stuns them while they fall, and they can recover quickly. If they drop down to the burger tray, they immediately climb back up.
Conserve pepper[edit]
Use pepper as sparingly as possible. Pepper should only be used in two circumstances: a) If you are trapped between an enemy and a dead end or b) if you are trapped between two sets of enemies with no available avenue of escape. Due to the limited supply of pepper and the difficulty that claiming pepper bonus prizes presents, expert players realize that the key to conserving pepper is to actively prevent the two above mentioned situations from occurring. It is better to lead a chain of enemies to the other side of the stage in order to drop one layer than it is to know that you will become trapped and rely on pepper to escape.
Grouping[edit]
To get major points, you will need to learn patterns for all the levels. Another strategy you need to use is 'grouping'. This involves gathering all the enemies into one area, so that they follow you as a group. Once you are able to do this, you will be able to kill all the enemies at once with each drop.
Stage strategies[edit]
Stage 1[edit]
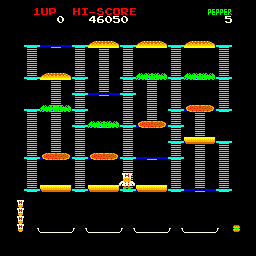
The introductory stage is very spacious and balanced, and you will only have to contend with three copies of Mr. Hot Dog and one copy of Mr. Egg. No one section of the stage presents any danger since ample escape routes can be found. At most, the burger layers only need to drop through five floors, so this stage won't take you as long as some of the other stages. Use this stage to understand the nature of the enemies' movement. Note how they tend to alternate between walking across a floor and using a ladder whenever they encounter one or the other that brings them closer to your position. Setting up the layers to allow enemies to drop with them is fairly easy to do.
Stage 2[edit]
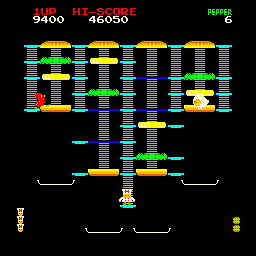
While this stage features the same number of enemies as the previous stage, the layout of the floors makes the top portion of the screen much safer than the bottom portion. With the limited space and choices in the lower half of the stage, it is best to save it for last when you have no choice but to clear it. Focus on getting to the top as quickly as possible, but watch out for where the enemies are appearing. Staying on a ladder for a little while is a great way to lure enemies to a lower floor than the one you intend to visit. Once the two side burgers are complete, you must venture down the center of the stage. Before you do, draw the enemies as high as possible before heading down the center. Once you're ready to clear the stage, try to lure an enemy on to a top bun before dropping it. If you time it well, the enemies can clear the stage for you faster than you could. Note that the lower floors where the burgers wait are dead ends.
Stage 3[edit]
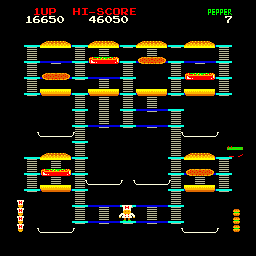
Even though you must build six burgers with only three layers each, this stage is a lot tougher than it looks. This time, six enemies will pursue you, including the never-before-seen Mr. Pickle. First and foremost, you need to get out of the bottom portion of the stage as quickly as possible. And the left is not a good choice for escape routes. If the copy of Mr. Pickle that enters from that side doesn't get you, another enemy is almost sure to come down that left ladder and trap you. Instead, head immediately for the right. If you're an expert player, you may choose to complete that lower right hamburger before continuing on to the top, but the more time you spend there, the bigger opportunity you give the enemies to trap you. Beginners should climb the right side of the stage all the way to the top in order to gain a little control over the enemies' movements. Like the previous stage, focus on completing the burgers at the top before tackling the lower burgers on either side.
Stage 4[edit]
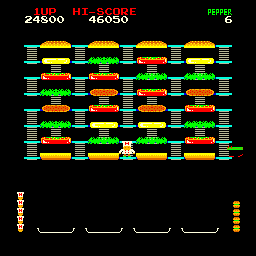
You may feel a little daunted by the task at hand when you first see this stage: four hamburgers composed of eight layers. That's a lot of walking. But if you remember to focus your efforts on the top buns as much as possible, you won't waste a lot of time. The ladders are arranged in such a way that continuous climbing is difficult to accomplish. Instead, you and the enemies are more likely to staircase your way through the stage in order to get around. This can be a blessing and a curse. It's good because the enemies have few direct paths or multiple options to attack you from. It's bad because you need to become very skilled at controlling Peter in order not to slow down as you progress up or down the screen. Peter can feel very sluggish on ladders, and it can be difficult at first to properly time his transitions from ladder to floor and back to ladder again. By the time you complete this stage however, you'll have plenty of practice.
Stage 5[edit]
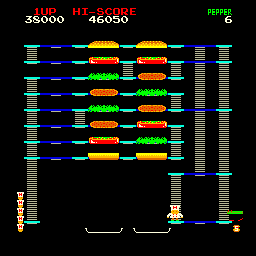
If you think that this stage is easier than the last stage because there's only half as many burgers to make, you're wrong. The layout of the stage is such that you have very few options to get from one section to another. Fewer options to move means fewer chances to escape so you must plot your course through this stage very carefully in order to avoid the six enemies that will be occupying the stage with you. There are two strategies to take. One involves luring the enemies to the lower right hand portion of the stage to keep them occupied for a while. This can be risky however, since you might become trapped from above and below. The other strategy is to employ pepper more liberally, provided you have a good supply by this stage. If you intend to use pepper, and wish to make the most use out of it, be sure to freeze enemies while they are standing on top of a layer so that you can walk across the layer and send it falling several stories with the enemy on board.
Stage 6[edit]
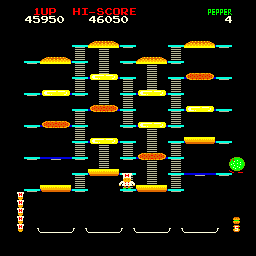
This is the last new stage that you will see before the game repeats the cycle of stages over again. In the heat of the moment, it's very easy to assume that certain paths on this stage connect when in fact they don't. Total comprehension of your available escape routes will decrease your chances of getting trapped and increase your chances of survival. The burgers on the side are especially dangerous since every layer is perched on a dead end. If an enemy is following you, it's relatively easy to drop a burger layer with the enemy standing on it, but getting out of the area can be tricky if you are too slow and allow another enemy to pursue you. You'll need to employ every trick that you've learned in the previous five stages to make it out of this one. The most important thing is not to panic.
Beyond Stage 28[edit]
The game will continue normally until stage 28. Starting on stage 28 the enemies move about 2 1/2 times faster than they did before. After 90 seconds (if you can survive that long on one chef), they slow down to a crawl, moving one step every 5 seconds. You can still die if you run into the enemies. The chef's speed never changes. If you can make it to the top of the board (28), you can find the "safe" spot. You can hide out here until they slow down. You will need new patterns for each board to group the enemies, and wait each time for each drop. It can take 1-1 1/2 hour per board at this level.
