This is a continuation of the walkthrough for Chip's Challenge. Levels 21 (ICEBERG) through 40 (FLOORGASBORG) will be discussed here.
Level 21: ICEBERG[edit]
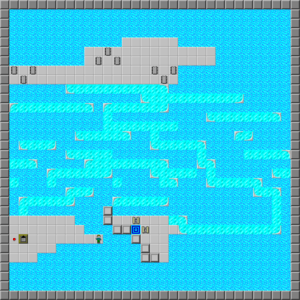
To begin with, you can't use the cloned blocks to bridge to the exit "island" — there are hidden walls blocking this.
Therefore, move the first block 3R 2U from where it's cloned, and follow with a second, then a third, where you ignore the boost towards the ice corner. If you boost, you will trigger what is known as cross-checking - following one space directly behind a block will cause Chip to push the block over an ice corner and keep sliding, which here leads to suicidal consequences.
When you take a fourth block to the top island, do the same on the first turn, and then repeat it on the next turn beyond the third dirt. When you land, collect the west three chips, move the block 5R and collect the middle three, and then move the block lastly D 4R, take the remaining chips, and place the block D to take a shortcut to the exit. With perfection, this route scores 119.
Level 22: FORCED ENTRY[edit]
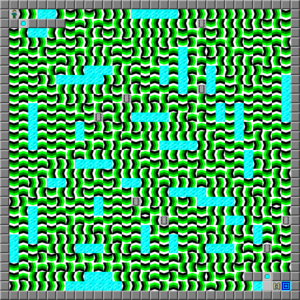
Forced Entry is certainly the single most annoying level to this point. In only seven seconds, the shown 293 route will twist and turn into boosting oblivion. The important principle of Forced Entry play is to use sideways overrides: these allow Chip to move at 20 m/s!
Hold east, take the chip you reach, and then continue 7D to take the next chip and D 5L to reach another chip on the left. The remaining moves are: LDL (chip) D >[2R D] 5D (slide over the ice) 2D (chip) D 2R (chip), hold 5R and slide the ice, 3R to the next chip, L 2D to the last, and LD >[2L D] D to be thrown to the exit.
Interestingly, if you press R and just sit back and wait, you reach the exit, although without any chips.
Level 23: BLOBNET[edit]
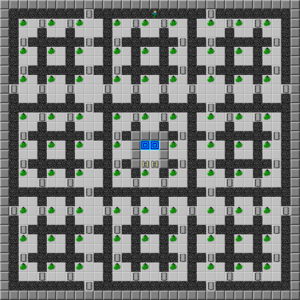
Out of the frying pan and into the fire! Blobnet is quite simply the most annoying level of all time, even higher than the later Block Buster. The moment you start playing Blobnet, you're aware of this. It provides a very overwhelming introduction to the blob: a mass of green that moves every other turn, applicable to even step and odd step, in a completely random fashion, even when cloning or being released from traps. The only things that can force a direction are obstacles and sliding tiles.
There are many, many ways to play Blobnet at an advanced level. The first basic is to use even step: this route in odd step is practically impossible. The quickest safe route is (2L D) R 3D 7R 3U 2L 5R 3D 3R 5D 2U 3L 7D 3R 3D 3L 7D 3R 2U 5D 3L 3D 5L 2R 3U 7L 3D 3L 3U 7L 3D 2R 5L 3U 3L 5U 2D 3R 7U 3L 3U 3R 7U 3L 2D 5U 3R 3U 5R 2L 3D 5R L 3D (R, 2D) 4L 4D (2R) 3D 6R UR 4U 2D 3R D 5U 3R (2D) 4R 4D (2L) 3D 5L R 3D L 5R 3D (2L) 4D 4L (2U) 3L 5U D 3L U 5D 3L (2U) 4L 4U (2R) 3U 6R D 2R 3U.
Eventually, you'll want to use a combination of logic and gambling. When diving for chips, Chip can only be killed by blobs when he collects them on a non-moving blob turn, and a blob is right next to Chip. When you see this type of situation, you can often take a different route to the intended destination along the above route, but possibly to change the route for a quicker time if the movements of the blob are favorable or are likely to be. The standard advanced route through the start of Blobnet is 2L D 3R 2D 5R 3U 2R DU 3R 3D 2R 3D.
Note that the areas touching the very edges are prime spots for gambling moves; they allow Chip to save large stretches of floor. Ideal situations include where Chip is approaching the edge chip and the blob is two spaces in front and one space to the side of him, allowing him to bust directly through if the blob moves towards him, and also where Chip is next to the blob as he picks up the chip; this risks a 1/4 chance that Chip will die, but 1/2 of the time in total Chip will be able to walk three spaces to the chip. In many situations where gambles are called for or encouraged, Chip can move in sync with a blob when it does not kill him in this situation, allowing for an ideal outlook on Chip's next move.
Other strategies to gain this outlook include, of course, the spring step: this can be used when Chip and a blob could potentially be moving onto the same square at once, among others. If Chip can see where the blob is moving, he can make his decision accordingly and, if the timing is correct, lose no moves at all.
Also overlooked are [1] waits, particularly on the edges; whether to use them depends on the upcoming chips and how far apart they are from each other. When considering a wait, look at the next few chips and see whether they would be always safe to collect. If a wait would switch many chips from safe to dangerous, it is best to take the chance. Also consider whether blobs can physically reach upcoming chips.
In the second half of the level, Chip should tend to be very conservative unless he is pressed for time against his target score. Again, prime areas for gambling are the largest, where Chip can switch the order of two chips and dash across the center of the 3x2 area. To account for the feasibility of such a move, however, pay attention to the current status of the blob: if you can reach a favorable position such as the ones described in paragraph 4, there is a notable reason to attempt the move. Throughout the level, you can tend to take gambles which, if they work, will allow you to reach such sections at times when the blob positions are favorable, adding to your speed.
Also, in the ending stretches of Blobnet, most of the chips can be collected directly, as they are generally all even moves apart from each other. Therefore, tend to avoid [1] waiting unless required by blob positions. In these areas, there is also great interchangeability of the chip order - the chips can often be collected in different orders. One example is the chip to the left of the exit: it can be taken on the way underneath or as the last one before the exit.
When confronted with this choice, read the blobs and determine whether some of the chips can be dangerous if Chip walks straight to them. In such a case, collect the other chip first and come back, assuming this is less likely to be dangerous in itself. Should both chips potentially be dangerous, move to the one that is less likely to be touched by a blob.
The rest is just nerve and a lot of luck, and despite the extensive strategy outlined here, the use of it is sporadic and depends on many different factors, and is never guaranteed to work all the time. The bold time is 436, which is quite an undertaking to attempt; the highest route captured on video is 434.8 (actually a 435 with one crucial error at the end), which can be downloaded at the public TWS.
Level 24: OORTO GELD[edit]
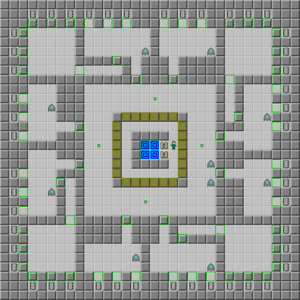
Since the walls in the 12 rooms of Oorto Geld are in different states, the only way to get through them is to use the gliders to change the walls for you. This can be achieved as such: (2R) 4U 2D 3L (3U) 2L 3D 3L 2D 2R URULR 2U LRU 3L ULD to entrap the first one, then 4R URDRUD 2R UR 2U RUL. At this point, a button will be pressed every move, so you can just breeze through the rooms.
Start with the room to the right of the upper glider (room 1), then continue to circle counterclockwise through each room; in room 4, collect the middle chip, then the top and bottom. Room 10, reached with 12 chips left, has a slightly different structure with the glider moving against Chip's flow; move block 6 on the bottom 2U, then block 6 to the right all the way east, before collecting the top chip. Knock the block down to the corner and finish this, and end the level with rooms 11 and 12 before you return to the exit for 425 seconds.
Level 25: BLINK[edit]
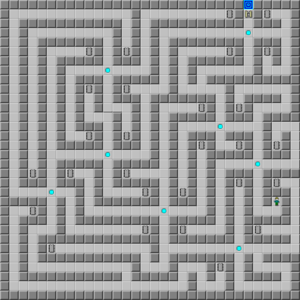
It's very easy to get lost in this level, even though there are only eight teleports and there are no blocked edges of the teleports.
Slide in the given directions to collect the chips, and follow other instructions when given to score 435 in a blink: U chip D chip U chip DU chip D [move left to chip] U [move all the way up to chip] RL chip R 2chip LR chip L chip R chip LR chip D chip U chip D chip UD [circle around to right side] L chip R chip L chip R chip L chip R chip LR 2chip [circle to bottom side] U 2chip D 2chip. Now, finish with >UDUDU to reach the exit.
Level 26: CHCHCHIPS[edit]
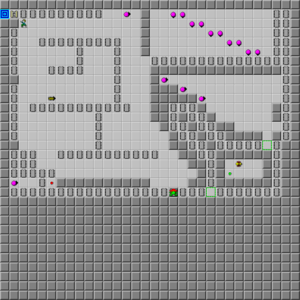
Chips, chips, and more chips. Did I mention eat some tortilla chips while playing this level? :) Actually, don't; there's some obstacles that will leave you saying caramba. In particular, the final monster, the paramecium, has been introduced. It works identically to the bug, except it follows to the right instead of the left. This paramecium will cause Chip to die a lot; Chip has to snatch the chip at exactly the right time to survive, which in this case will leave his enemy in a circle.
There is more than one way to collect the chips in the central room, but only a few are correct and allow Chip to collect the southeast area quickest.
Start with U 8R 2L 5D 4L 3U 8R 3D U. This will strand the paramecium and set Chip up to reach the toggle wall at the correct time. Now, collect four chips in the northeast room, four after waiting, and then wipe out the remaining chips all the way to the toggle wall. Take ten chips from the southeast fork, leaving one for later, then reverse and collect the chips from the northwest fork. Grab the chip that was left behind next to the toggle wall, then move west and grab all the chips on the bottom. If done perfectly, Chip will get through the toggle walls exactly on time.
From the southwest corner, move 4U 2R DLD 2R DUR, releasing the ball onto the red button. Fortunately, the teeth are slow to clone, and Chip can collect everything around the clone machine because they clone slowly. When the teeth finally mass to the right of the clone machine, Chip is gone and they cannot run northwards quick enough to catch Chip. In slower routes, the chip blocking the button is the last one collected.
Collect the row of chips to the right, then double back and go up to collect the columns of chips on the right. Grab the remaining row of chips on your way back to the west wall, then finish up the chips on the wall on your way to the exit. You can now sneak past the ball to the exit with 254 seconds to spare.
Level 27: GO WITH THE FLOW[edit]
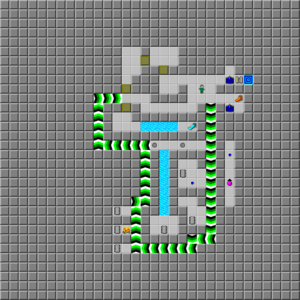
The "flow" in Go With the Flow is the force floor strip, which drives the south area of the level. Before entering it, move to the east to collect the fire boots; wait [1] before going past the tank and [10] when coming out. As the tanks switch back in a mere [2] after they are first switched, exact timing is required.
Take all the chips around the flow, with the fire boots assisting in one, and then move to the block area and pile the first three blocks into the water. To get the fourth one to work, move it U and then return back the other direction. Now, with the flippers, you can swim to the last chip in the flow and then come back out to the exit. Your time is 147.
Level 28: PING PONG[edit]
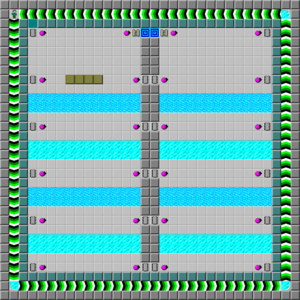
The "ping pong" area that makes up almost the entire area of Ping Pong contains "nets" of water and ice, with blocks that allow Chip to break through the water and pink balls that make the transitions more difficult.
Slide all the way around the force floors to the single blue wall entrance, then move block 3 south to the water, block 1 U and block 2 R and to the water, and then move block 1 in succession to the next piece of water. As the chips to the west are isolated, collect them on the way back to block 4, which finishes the bridge and makes the entire area accessible.
From here on out, starting at the very southwest, move in a zigzag motion upwards: run to the southeast, then, then up, west, up, east, up, west, up, and east just ahead of the bouncing balls at the start, which will lead to the exit at the time of 239.
Level 29: ARCTICFLOW[edit]
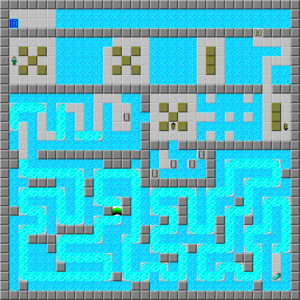
This level is not difficult, but there are small tricks hidden in even the simplest puzzles.
Start by building two bridges of five blocks to the right, then knock block 2 on island 3 R and use the blocks in order of 1, 3 and 2, to build a bridge on the very top - anywhere else and you won't make it. Walk to the next stage of the level: paramecia! Nudge the block in the center L [1] L, which will cause the paramecium to drown while Chip starts the next bridge.
Below the next room are four of the five chips required, but you need the blocks for another purpose. Instead, use blocks 3 and 4 to reach the fifth chip, without being bothered by this paramecium, and walk and slide across the ice to what eventually leads to flippers. The trickiest part of the level is getting back; you can just slide back, holding south to override the force floor, but it's slower. Just swim and slide instead.
The required route, using the principles of boosting, is 2:[L 4U] LUL 2D L 2D RDLDLD 2L 2U 3L D 2L D 5L U 2L 5U 3R UR 4U 4L 4U 4R D 4R, and now collect the four remaining chips, open the socket, and land at the exit with 302 seconds left.
Level 30: MISHMESH[edit]
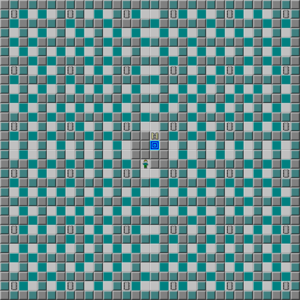
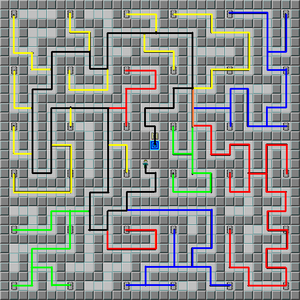
Mishmesh is not difficult either, as long as you are holding a map. Of course, without one, it is going to be another monster! Fortunately, we've provided one. There are several key intersection spaces in Mishmesh, located in the specified areas. In parentheses, Chip should move in this direction and then retreat the same way.
Begin with DR 2D 3L 2D, which is [13, 22] and the first major intersection (A). Turn east first, and then come 2L 4D, collect the chip to the east, and 2U 2L 2U to B at [9, 22]. From here, move west first, and then walk as such: 2U 2R 5U (2R 3D) 4U 2R (2D) (2U 3R 2U 3L) 6L (2D) 2L 4D (2R 3D) 3D 2L 2U (2L 3U) 5U (2L 4U) 2U 2R 2U (2L 2U 2L 4U) 2U 4R (2U 2L 2U) 2D 2R (2D 4L 2U) 2U 4R (2D 3R 2D) R (2U 3L) 4R 6D (2R 2U 4R 4U 4L 2U 4L) 2D, all the way down to C at [20, 11].
Continue 4R (2D) 2U 2R 4D 2R (2R) 2U 2R 4U 2L 2U (4U 4L) (2R 4U), and then return to C and walk 2D to D at [20, 13]. Move south for two quick chips, then move east: 2R 3D 2R U 2R 3D (2D 2L 2U) 2R (3U 2R 3D) 3:[2D 2R 2D 2L] 2L 2U 2L 4U. Go back to C and, with all the chips, continue west to the exit. You have mashed your way to 454 seconds.
Level 31: KNOT[edit]
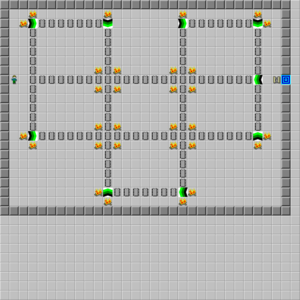
There's only 29 seconds allotted in Knot, so you have to be careful. When I played it for the first time, I was walking along and I ran out of time! Then I looked at the time limit and gulped.
Fortunately, the level isn't hard; Chip must always be taking chips, using the force floors for help, in a knot pattern. Start with 2R and work URDLDRURURDL 2D LU 2R U at each turn, and above is the exit, which will leave you with 6 seconds.
Level 32: SCAVENGER HUNT[edit]
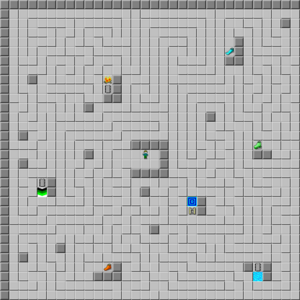
This level is another classic maze hunt, and there are seven places where you're trying to reach: the three chips, the boot that will allow you to access each one, and the exit.
At each successive intersection (even ones with obvious dead ends) go DLR 2D U, then follow the path to the fire boots and return, following with LUDR and get the suction boots. Backtrack all the way to the start, take the other way, and then RD to reach the chip behind the force floor.
Regress to the last intersection and continue ULUR to the chip behind the fire, and from that intersection DLDUL to the flippers. Once again, return to the previous intersection, and move 2D (the exit is right there) RD to the last chip behind the water. With all three chips, go back to the exit. Don't get lost and you will get 379.
Level 33: ON THE ROCKS[edit]
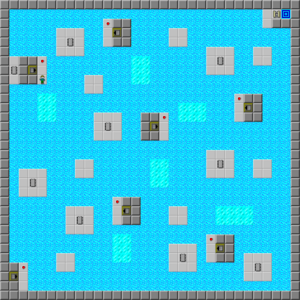
A relaxing break: take as much time as you need to make bridges out of the unlimited supply of dirt blocks you have. There is a route which completes On the Rocks in little more than five minutes, which will be described here.
Build six blocks down, then one 2D R further, and stuff a block into that open space, followed by removing the water underneath it and thus allowing you to do both at once. Add a fourth floor space on top of the east row, move another block 9D R and another block 8D, then the first one 2D and the second one UR, and a new block 10D RD, right in the outcropping. Fill in the water above on the way up, put another block 9D R, and then use a new block to access it and move it R towards the chip island, and head back L 6U.
Shove another two blocks 9D R and 9D, then 2D and R in this order, take the chip, and remove another water space going up. Follow with two more spaces moving north and slide two blocks onto the ice, causing the second to rebound back up. Meanwhile, step R, fill in the water with [1/2] and a LU spring step, and take another block and move it R while removing the dirt, again using a spring step after waiting [1/2].
Now, move the new block R after you move the first one L, the first block 2L while the new one R, and then 3L to take the chip, and 4R to expose the island. Build 2D from this island to free a chip, then move the block into the next island and shove it north to the water.
Continue until you can reach the next cloner, then build DR (without stepping on it) and stuff two blocks 3D and 2D respectively. Now, step LD 2R U 2L (3U) L, take the freed chip, and build all the way east to the next chip. Move three more blocks U from, R from, and on the chip location, then walk U 3R L 3D ULU, replace both blocks on the R and equal positions, and repeat this cycle two more times. This leaves one block and one water space at the top, ready to exit when necessary, and Chip at the next clone machine to the south.
Build 14D 4L, collecting all three chips in the process, and now move the single block at the top to reach the exit. This will yield a score of 683 with a theoretical 999 time limit.
Level 34: CYPHER[edit]
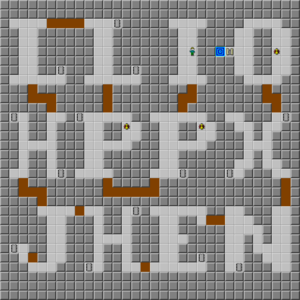
Cypher is rightly known more for its hints to the storyline than its play; just walk through the rooms, avoid the bugs if they're there, and take the chips. At the exit area, you can sneak past the bug to the left if you haven't made any mistakes.
When you read the map, you will note that Chip walks through twelve letters which spell out passwords to later levels: "llio" (Socialist Action), "hppx" (Goldkey), and "jhen" (Cake Walk). The latter is the secret way to reach Cake Walk and later levels, since Ignore Passwords will not go past Fireflies (although it does reveal that there is a level 145).
Level 35: LEMMINGS[edit]
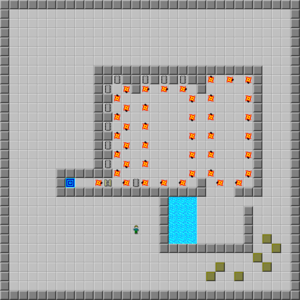
As the title suggests, Chip would need to move the fireballs towards the water by using the blocks. He cannot walk in because they block Chip at every turn. The shown solution will use only one block, and will continue to move it to choke the fireballs out of their circles, freeing the chips.
Move block 3 6U 4L 6U, temporarily blocking out the fireballs, and then 3L to cause the next room of fireballs to stop themselves. Continue the block [2] 2U [2] 3U, and continue to move the block 2L and take one chip alternately.
The fireballs are now moving around to the left; throw the block L twice when you can fit it, and now take the block all the way down along with the remaining chips. Open the socket and then play RU out of the way, then go to the exit for a score of 576.
Level 36: LADDER[edit]

There are five ladders of various functions lumped together in Ladder, which run into one on occasion.
Take the blue key, climb down the chip ladder and clean out all sixteen chips, and continue to walk down to another ladder with chips. Wipe out the first five, take the blue key, and then interrupt this area to move through to the blue lock. To start the tank ladder, release the tank and pass into the room to the left. Touch this green button twice, then knock the second block onto the brown button, return to the green button, and continue to move the blocks onto the buttons and swap the walls until you reach the chip.
Now, free yourself by moving block 1 onto the brown button, release another tank, and take care of this section in exactly the same manner - except with no more need for toggle walls, escape by touching the green button twice instead and ignore block 6. Now, free three more tanks to reach a chip at the top, swap the blue key for a red key, and walk all the way to the lower ladder. Take the chips left behind and exit the level past the red lock and socket. You score up 232 seconds.
Level 37: SEEING STARS[edit]
Seeing Stars is at this point the longest timed level, which leads to long, complex block movements across the entire level. There are two main sections; you'll deal with the bottom section first. Fourteen blocks are required, and only twelve exist in this area, so you will have to move two of the four extra blocks from the upper area to complete both areas. The usual level guide of block numbering will be divided into upper right, upper left, and lower rooms.
Enter the lower section by moving block 2 to the water, and below that are two more blocks; move block 4 D and block 5 2D, then move L further and push blocks 9, 7 and 4 L, 2L and 3L, also moving block 9 D. Now, run to blocks 8 and 10 and move then R and 2R, using 8 and then 10. This is a frequent maneuver limited only where physically impossible.
Keep walking, move block 5 6L, use block 9, and then resume 3L. In this room, move blocks 6 and 3 L and 2L, D and 2U, and then add block 9 with 2U 2L. Go back and collect block 7, using block 4 on the way, and shove it D 3L U 3L. You are now setting up the chainlink which drives the remainder of this area.
Use block 9, continue block 3 4L 3U 4L, and then walk back, shoving block 7 2D. Mine the remaining block in this area from 11/12, using block 12 to reach the chips, and move block 11U 8L U 3L. Now, perform a similar chain below; shove block 7 4L 3D 4L and block 11 3U 3L 3U, then collect block 1 all the way from the start and move it UR 8D 9L U 3L 2D. To complete the chains, you need one block on each side.
Sneak into the northeast area, moving block 10 2U out of the way, and then shove block 9 10D 9L U 3L, block 1 3L 3D, and then pick up block 9 and move it 3U 4L 4U. This allows Chip to chain all the way to the far west, picking up an additional six chips. The second extra block will perform a similar action on the bottom; walk back to the northeast room and start by using block 9 for these two chips.
From here, move block 8 2U, block 7 2D 2L for preparation on the southwest spoke, then use blocks 6, 4, 2 and 1 individually for a further eight chips, in the process moving block 8 UL. Continue over to the west, moving block 8 D, and then move block 3 2L 2U L, in preparation for another chain on the way out starting with block 9 from the northwest. To be able to use this, use block 10 to enter this area.
Push block 8 2D, use block 4, and move block 3 2U 2L as part of position strategy on the north. Duck behind block 1 and use block 2 on the northwest, using block 3 in addition. Use each of the remaining blocks, except the unnecessary block 7, to clean out this room, and then move block 9 out and collect the chips above it on the way to moving it southwest to its destination. In the northeast, leave block 5 to the vultures and shove block 8 4D, use block 7, and then carry block 8 2R 13D 9L U 3L 2D 4L 4D to chainlink to the remaining chips. Now, go back to the exit to see 597 seconds added to your total.
Level 38: SAMPLER[edit]
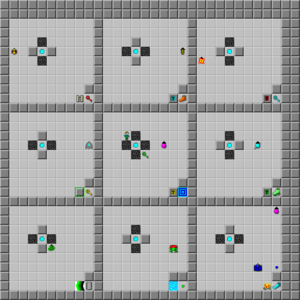
Sampler is composed of nine rooms with all nine monsters, nine different obstacles, and nine different goals - a sampler, if you will.
Follow this sequence to the exit: green key, >UDUD, suction boots, >ULRLR, chip (hopefully without blob impediment - use blob dodging strategies), >LUD, red key, >UDUD, blue key, >UDUDLR to fire boots, >R to reach flippers, and then >LRDUD to reach the green button.
You can beat the teeth successfully, so continue without interruption to the yellow key - >UDR. Wait for the glider to move out, as Chip cannot collect the key immediately even with perfect boosting. With that done, slide >LRLR to return to the exit and earn a free 462-second sample.
Level 39: GLUT[edit]
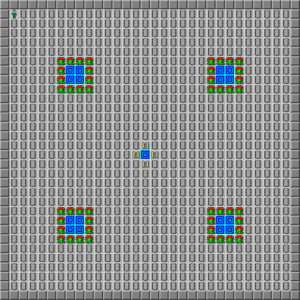
The time limit of Glut is the shortest in Chip's Challenge, at only 20 seconds, but is one of the simplest levels. Chip can simply collect chips and reach the exit, which gives you 14, or use the secret no-socket solution built into Glut from the beginning. The safe exit is hidden in the center, far away from the guarded exits, and Melinda's special dispatch implies that the only way to exit is through the guarded exits.
The path works quickest in odd step, and is done either 6R 4D U 2L D [1] 2R 2D, or simply slanted 90 degrees to use the west side. In even step, either start with 7R and hide on the northeast corner or simply wait [1], which will not affect the time of 17.
Level 40: FLOORGASBORG[edit]
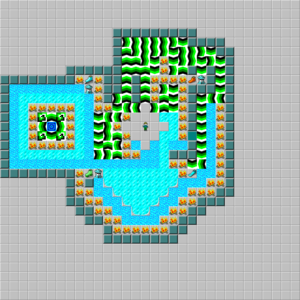
Due to the compact size of this level, it can take as little as five seconds to complete, but it's also difficult to control your movement. Floorgasborg contains a smorgasbord of floors, including temperamental force floors!
Run 3U, then >4 U >3 R, and immediately D to be carried to the fire boots. Use these to walk to the force floors and flippers, then swim LU 6L, and then the tough part: 3U and hold left.
If executed properly, Chip lands on the random force floor at [6, 12], which will allow Chip to override the north or east force floor and exit the level at 195 with cooperation. In practice, since Chip is holding the west key, only with the down move from the force floor is the 195 a feasible possibility.