
Find and recover the container.
Infiltrate the airfield[edit]
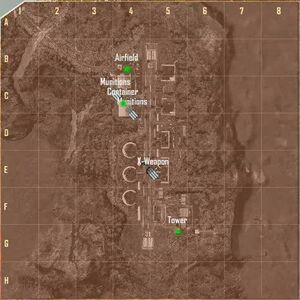
The container is in the airfield. Find a way in.
There are a fair number of KPA between you and the airfield, so sticking to the bushes is best. Watch out for the soft-top that appears further down the tracks. Once you reach the entrance, as always, you can shoot your way in or find a quieter way around. If you prefer the stealthy approach, you can head around to the northern side to find a broken fence entrance (those KPA should really repair their fences).
Locate and secure the container[edit]
The container is by the main hanger. Take out all the KPA defenses and wait for further instructions.
Get more munitions[edit]
Re-supply if you need to.
There are three weapon caches around the base, and they are worth checking out, especially if you're low on ammo. The eastern one, inside of a shipping container, holds a Scar rifle and ammo, rifle grenades, missile launchers, and frags. The western cache holds gauss and Scar rifles, a missile launcher, and rifle grenade. The last cache, to the south-east of the container, holds the same.
The airfield is, as you might expect, well defended. Alerting the KPA to your presence makes it even more so. There are numerous patrols walking around, so you might want to take yourself high up to a rooftop where, conveniently, there lays some ammo and a missile launcher. From this position, you can pretty much take on the entire army if you want to. In fact, to complete the objective, you're going to need to defeat pretty much every KPA, at least those around your objective. Watch out for the tank's attacks, and use the missile launcher. Also beware the helicopter that arrives if the alarm is called. Reach the container and kill any remaining KPA around it.
Contact the VTOL[edit]
The sphere is interfering with all communication. Get to the control tower and contact the VTOL yourself.
From here, you need to get all the way down the airstrip towards the large control tower to the south. You can either be quiet about it, or find an APC (ignore the soft-tops, they won't last). There are tanks and soldiers equipped with rocket launchers, however, so make sure you don't stop.
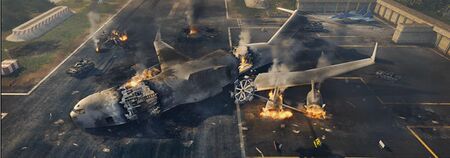
There are many paths to take along the strip, but the route along the eastern side is heavily covered with foliage and will give you ample locations to stop and recharge any energy. Just make sure you don't go down the center runway if you’re on foot, no matter how fast you are: you'll get taken out pretty quick. Don't forget to use your strength to jump over any fences in your way. There are also a series of holes in fences that will allow you to walk around the biggest challenges and open areas of the strip. Just keep moving towards the large, white tower. In the middle of the strip there's a crashed C-18 with a lot of assorted weaponry and explosives if you want to risk it.
On the west side of the tower, there's a minigun. It's your choice if you want to pick it up, but you'll soon need some heavy firepower on your side, you if for some reason you've been using any machine gun but the Scar, you might want tn change your arsenal. At the tower, you can either climb up the large ladder on the east side or walk inside and go up the numerous flights of stairs. Once at the top, make sure you're well-equipped, and get ready for a fight.
Defend the container[edit]
The exosuits are surrounding the container. Defend it.
Get the experimental weapon[edit]
An experimental weapon is in the crashed C-18. Get it.
You're about to be introduced to the Particle Accelerator Cannon (or PAX), arguably the best weapon in the game. But it's not going to be an easy fight to get to it. There are numerous aliens in the way, the C-18 is |in a wide open space, and even it doesn't provide much cover. Once you get it though, you'll get a powerful short-range cannon with infinite ammo that can take down almost any enemy in one shot. It's in a large case with a keypad on it. Do realize that this is a splash-damage weapon, and it will kill you if you're too close to your target.
There will be a pair of fliers around your position. Make sure you take them out from a secure location before wandering out onto the strip. There's some gauss ammo on the balcony of the tower if you need some, you can use it to take out some hoppers below. When you think the area is safe, move your ass through the airstrip. Look out for the red fliers, they'll drop mines that can take you out quickly. Look for the anti-air emplacement outside of the tower if you need help taking them out. Then you'll see your target.
Destroy the exosuit[edit]
The giant exosuit is preventing the extraction. Destroy it.
Grab the nearest vehicle that isn't ready to immediately explode, and chase the big red bastard down the runway. The thing has two basic attacks: it launches a volley of missiles that will track you while in the air, and it uses two freeze rays to sap your health quickly. You can either strafe around it as fast as you can, either with a vehicle (keep mind where you're headed so you don't abruptly crash), or using the speed mod. Alternatively you can hide behind some cover and pop out to fire at its big ugly jaw. If you picked up the PAX earlier, this is the best time to use it. If it gets close enough to the container, O'Neill will come in to give you a hand.
Now all that's left is to make your way to the container. Make sure any remaining alien forces don't pick you off along the way.
Get to the VTOL[edit]
O'Neill is brining in the VTOL to extract the container. Get over there.
Head over to O'Neill's hovering VTOL, watch the final cutscene, and watch as Psycho kicks ass.