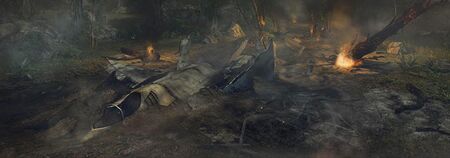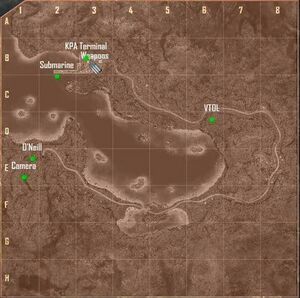

The plane's camera picked up some interesting photos.
Secure the camera[edit]
Hop down and begin to make your way through the valley. There are a few patrols hidden throughout the area, so either stick to the bushes and cloak yourself, or make sure you know where they are so you can gun them down before they swarm you. Along the way, near the western ridge, you can find a pair of pistols and grenades. Soon you'll reach O'Neill's smoking wreckage. To the southeast of it you'll find a shotgun, F7Y1, and ammo. Stick to the underbrush as you approach, there are patrols about.
Follow the green dot, and you'll hear a beeping noise, alerting you to the pilot's chair, where the camera you need is.
Rendezvous with O'Neill[edit]
Follow the path, and strength-jump up to O'Neill.
Reach the Submarine[edit]
Once the submarine leaves there's no way of tracking it. Get there before it leaves.
Keep O'Neill safe[edit]
Protect O'Neill from KPA units guarding road.
Get to the rally point[edit]
A vehicle escort section, this part is kind of annoying. It's not too bad if you're playing some of the easier difficulty levels, as you can shoot enemies as you drive by them. If you don't get control of the turret while driving, however, this part is a little worse. You'll need to follow O'Neill while bunch of KPA fire at you. If you get out of your vehicle, they'll begin firing at O'Neill's substantially-weaker vehicle, so you need to sit tight and just switch between the driver's seat and the gunner's seat as the situation demands. Try not to take too much damage to your ASV, because the one you get at the start has a powerful 20mm autocannon, which no other ASV on this map has. All the other ASVs have a minigun, which although is pretty effective, just doesn't have the same punch as the autocannon, so try to keep your starting vehicle alive for as long as possible. Luckily, O'Neill won't drive off without you. Make sure to spray the horizon with fire. YOu never know what you might be able to hit. The key to this part is to destroy targets from range.
As you make your way forward, make sure to differentiate between the importance of targets. One of the keys to success is eliminating targets from long range. Shoot red, exploding barrels to take care of enemies nearby. Take care of vehicles early on to avoid them pursuing you. Your priority targets should be gunners, mounted on the ground or on vehicles. They can do some heavy damage to you. You'll pass a checkpoint on a bridge, and then get a new objective.
Get to the VTOL[edit]
The VTOL pilot couldn't land at the RP and landed further down the road. Get O'Neill this new location.
Soon after this, you'll go by an APC on the side of the road that you can take control of, if yours is getting a little worse for wear, although hopefully yours didn't take too much damage. You'll soon leave the paved road, just make sure you follow O'Neill and you'll get back on. Soon afterwards, you'll pull up a dirt road and meet your VTOL and its escort under heavy attack.
Secure the LZ[edit]
KPA are surrounding the LZ. You must neutralize them before the VTOL can take off. Shoot anyone who isn't on your team. Keep under cover behind rocks, but if you're so inclined, you can yourself, move under cover, and see how much damage can do to the enemy from behind. You can also defend the LZ from the safety of your vehicle, which is a pretty effective tactic. There's a bunch of ammo and a variety of guns, including Precision Rifles here to replenish your reserves. Note: Even if you aren't going to take a Percision Rifle, it's worth picking it up once and then getting your other weapons back to acquire a Tactical/Sniper Scope. Just keep shooting all enemies until Psycho says the LZ is safe.
Infiltrate the harbor[edit]
The submarine is inside harbor. Infiltrate the harbor and figure out a way to on board.
If you want a vehicle, grab one down below, as well as any ammo you want near them. Otherwise walk along the road. On the beach is a small outpost with some ammo and explosives, including a missile launcher.
You can swim to the objective, but if you decide to walk/drive there, you've got some resistance. If you've got a Precision Rifle, now is a good time to use it. The SCAR works pretty well too, if you still have it. Be careful, though: if you're spotted and don't act quickly, a flare will be sent up, calling in a helicopter. Make sure to tag it if this happens. Helicopters are irritating buggers that can be eluded, but not lost. They're good at spotting you in the underbrush, and they hurt when they shoot. Stay cloaked, stay in the bushes, and move fast. Or, if you have a missile launcher handy, shoot it out of the sky with a couple shots.
The roadblock ahead can be cleared with your rifle, or avoided entirely with stealth, your choice. Just make sure to watch out for the watch tower and mounted machine gun. There's a cache of ammo near the tower, including another missile launcher.
Access the KPA tactical network[edit]
There may be a way onto the sub via the KPA terminal. Access it.
The harbor comes up immediately after some bends in the road, and it is well-guarded from the front. As always, running in guns-a-blazing is an option, but not recommended. If you want to play it quietly, look the south side of the complex for a broken fence that will give you access.
Locate weapons cache[edit]
KPA's been moving munitions into one of the buildings. Move in if you need to re-equip. On the second-floor of a poorly-defended large building is a stash of weaponry, including a FGL40 Auto Launcher, a powerful but clumsy weapon. Useful if need to take down electronics. There is also FY71 Incendiary Ammuinition. If you are carrying an FY71 and you pick up the Incendiary Ammo, then make sure to equip it right after you get it from the weapons customization menu.
As you move farther into the harbor, it gets better defended. You can jump over some razor wire to take a quieter approach, but there's enough cover to allow you a fighting change otherwise. It's also a good time to test out your new grenade launcher, if you picked it up. Don't be afraid to use up ammo, as you will lose all your weapons in the next mission anyway. Keep in mind that making yourself known will sound an alarm and bring in reinforcements.
Head onto one of the walkways leading onto the sub to complete your objective.
Board the submarine[edit]
The submarine will leave soon. Get on board.
Do as it says. You'll have a run near the sub where you'll have no cover at all. In this case, simply jump into the water and find the closest ladder that you can. Make your way onto the sub and jump right in.