Introduction[edit]
On your way through Willamette, you've got the opportunity to pick up some Prestige Points by taking photos of the zombie outbreak on the city. The camera controls are on the standard, non-inverted setting, but don't press ![]() or the you'll skip entire section, missing out on some Prestige Points.
or the you'll skip entire section, missing out on some Prestige Points.
    |
Frank can only take 30 photographs at a time, so don't be too snap-happy early on or you could miss out on some of the following high-prestige point images:
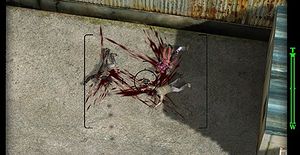
- Three zombies eating a dead body on a side street just as the section starts.
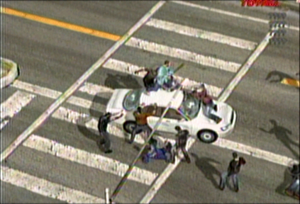
- The man on the roof of the white car surrounded by zombies.
- Extra points will be awarded if you get a photo of him hitting any of the zombies, or the zombies dragging him off the car.
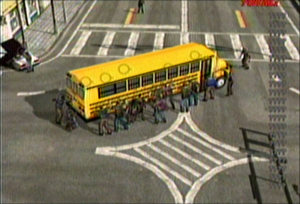
- The crowd of zombies around a school bus.
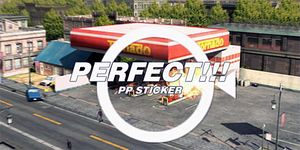
- The Tornado Gas Station explosion.
- The woman on the roof of the CW Factory building.
- A single zombie will fall off the roof a couple of seconds before the woman does; snap her in mid-air, and on the ground after she falls, for a Prestige Point bonus.
Go through the door just ahead, into the Security Room. Go down the stairs; straight ahead is a couch, the first save point, and the first Prestige Point sticker on a noticeboard above the couch. Straight ahead down the corridor is the security monitor room; go through that to the main air vent room, then take the door on the right and follow the corridor to the Entrance Plaza.
A small group of survivors is barricading the main entrance, and Frank is sent to find more materials to strengthen the blockade.
Photographing all the survivors here will unlock the Portraiture achievement, and if you get the angle right out the main doors you should be able to get enough target markers to unlock Group Photo as well.
Approach the pile of benches and other large items at the back of the entrance plaza. Frank is interrupted by an old man demanding to know why he's here, but before Frank can get any answers the barricade is broken down by zombies. From the upper walkway, another man starts shouting at the survivors caught in the Entrance Plaza to get to the stairs.
If this is your first play through, your best bet is to try outrunning the zombies; jumping will make it harder for the undead to grab you on your way to the stairs. If you do happen to lose all your health, you'll be dragged into the Security Room by Otis; otherwise Frank will make it in on his own.
Once the cutscene is over, you'll be following Brad out the vent, but not before Otis hands you a mall map and transistor which he'll use to provide you with information about the mall and Scoops.
Head out onto the rooftop and you'll find two survivors, Jeff and Natalie Meyer, which can net you upwards of 30,000 Prestige Points for getting them back to the Security Room. You'll also have a chance to snap a photo worth enough to get you the Artiste achievement, when the two are reunited.
There's two ways from the rooftop into the Warehouse below - you can take the elevator straight to the floor, or take the door where you found Natalie to move across the top of the warehouse shelves.
Case 1-1: A Dangerous Encounter[edit]
Move through the warehouse and down the corridor.
Case 1-2: Backup for Brad[edit]
When Frank enters Paradise Plaza, turn right to find Cam's Camera. Frank can refresh his camera's battery at the far left corner.
Your next stop should be Columbian Roastmaster's upstairs, to pick up some orange juice.
Jump out onto the canopy outside the first window, closest to the cash register, to pick up a Katana, but don't use it just yet - it'll come in very handy before too long, and the sword is too fragile for much use. Jump back into Columbian Roastmaster's and go down the stairs to the restroom to save.
Beside the door out into Leisure Park, you can often find a couple of security guards who have handguns, which might come in handy in the upcoming boss battle - if you've got the space in your inventory for them.
Go straight across Leisure Park, past the pond, and enter the Food Court - making sure your health is full before you go in the door. If you need to clear the zombies away from the entrance, you can use the lawnmower on the right of the doors to cut a path through - and you'll get a 30 Prestige Point bonus for every zombie you kill with the lawn mower.

|
Carlito |
|---|
Carlito can be tough if you're careless, but there's a couple of different approaches that will work against him - the one you choose will depend how brave you're feeling, and how much health you've got.
The safer course is to use the food court restaurants and pillars as cover, using your handguns to chip Carlito's health down and using the food and drinks in the area to keep your own health topped up. After his health drops a bit, Carlito will retreat from the gantry at the front of the Wild West section to the roofs of the stores at the back. At this point, if your ammo is running low, you can jump up onto the entrance arch of Chris' Fine Foods to pick up a sub-machine gun, but you will be open to attack from Calito while you're exposed. If you picked up Brian's shotgun earlier in the Entrance Plaza after he is killed by the zombies, don't shoot the shotgun to the zombies to save ammo for shooting Carlito, the shotgun is effective and can take out lots of Carlito's health.
Alternatively, if you prefer the direct and reckless course of action, equip your katana and head up to the raised area below Carlito's perch. On one side of the central steps along the front edge of the Food Court's Wild West area are a few boxes which you can use to climb up onto Carlito's walkway. You'll want to wait until he's as far to the right as possible to give yourself the best cover when pulling yourself up onto the gantry, then run up to the corner and wait for him to come around - start swinging just before he comes around. You might take a couple of hits from Carlito's machine gun, but you should survive long enough to land the three or four katana slashes required to end the fight.
Case 1-3: An Odd Old Man[edit]
If your health is still low after the fight with Carlito, check around the stores to find food - the best source is the wine in Chris' Fine Foods next to the entrance. If you need weapons, there's the aforementioned Sub-machine Gun on top of the entrance arch of Chris' Fine Foods, and a cleaver in Jade Paradise. You can also get a good Prestige Point bonus by shooting out all the plates on the wall of Chris' Fine Foods.
Follow Brad over to the entrance of Al Fresca Plaza and go through the door. On the right as soon as you enter is the Flexin' Gym, which has a yellow door save point in the back corner. You'll also get Prestige Point bonuses for running on all of the treadmills and destroying the punchbags.
Head through the Plaza, past the fountain in the middle (which contains a Sub-machine Gun and Dumbbell, both of which regenerate), and into the Entrance Plaza. Once inside, follow Brad over to the control switch to open the door into the Entrance Plaza proper.
Case 1-4: A Temporary Agreement[edit]
Before you leave the Entrance Plaza, go up the escalators and follow the upper walkway around to the left; the second store on the right past the big sports store window you'll find is an antiques store, Ned's Knick-Knackery. Inside, in the cabinets at the very back, you'll find as many katanas and battle axes that Frank can carry.
Once you're stocked up, head back to the Security Room - you'll have to go the long way, through Al Fresca, the Food Court, the Leisure Park and Paradise Plaza, but there's plenty of supplies and weapons so you shouldn't run into any major problems, unless it's after 6:00pm and the Convicts have shown up.
The warehouse has zombies in it now, although if you're coming through after 5:00pm you'll be introduced to the Queens. The undead are also in the elevator up to the rooftop, but if you don't want to face them there's another way to the roof. As soon as you come out of the corridor into the main Warehouse room, turn right and climb the boxes against the wall to get up to the top of the shelving units; you can jump across those to the diagonally opposite corner, where you'll find a narrow walkway that'll lead you to a door that opens onto the Rooftop.
Case 2-1: Image In The Monitor starts on September 20 at 6.00am, in the Security Room - so you've got some time to kill. The best thing is to save your game, then head out into the mall to do the Cut From The Same Cloth scoop with Kent in Paradise Plaza, and the Out Of Control scoop once it appears - the latter will open a very helpful shortcut between the Paradise and Wonderland Plazas.
If you're back in the Security Room after midnight, you'll get an optional cutscene between Frank and Brad.
