-
Town of Aisle[edit]
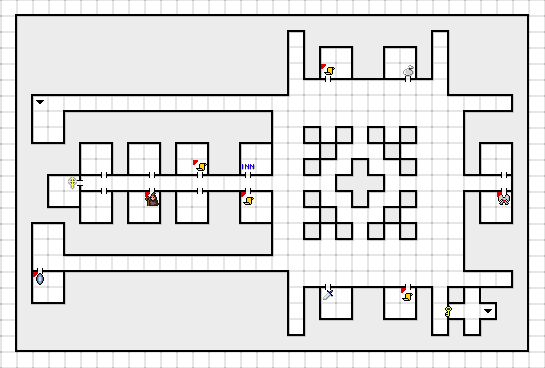
When you pop out from the bottom right corner of the Underground market, you will arrive in the upper left corridor which leads to the Town of Aisle. This town may be a welcome sight, but it will take a lot of work an effort to make any progress towards the next leg of your journey. You can access the Tower through this town, but combat inside the Tower takes a great leap in difficulty over the Underground.
The primary attraction in Aisle is its Equipment shop along the southern edge of town. It hosts a much wider variety of armor, shields, and weapons, but they are quite expensive. You'll especially need the added protection if you hope to survive even the safest floor of the Tower. Unfortunately, that may mean a lot more grinding and gold collecting from the second level of the Underground.
Before attempting the Tower, you should try to obtain a Spear (250 gold), Iron Shield (300 gold), and Chain Mail (300 gold) or Sprint armor (500 gold) for your Soldier. For a Hunter, either armor will do, although the stronger the better since he can't wear a shield, and the Arbalest (300 gold) is a powerful weapon. A Priest should don the same protection as your soldier, and equip the less expensive Maul weapon (200 gold). Finally, a Wizard is the cheapest party member to outfit, as all he can equip is the Shield Ring (100 gold), and he'll absolutely need one. Don't forget to sell your unused equipment.
As you can see, it will take a lot of money before you can walk confidently through the Tower. There are more powerful items to purchase, such as the Flail (1000 gold) for your Soldier and Priest, Bandit (2000 gold) armor for your Hunter and Priest, and Plate mail (4000 gold) for your Soldier, but you should save up for these items as you explore the Tower.
That being said, you can enter the Tower at any time by walking west along the lower left corridor. As soon as you step through the door marked "Tower", you will be transported to the first floor. No ladder marks its return to town, so you'll have to remember where you entered from in order to return.
Tower Floor 1[edit]
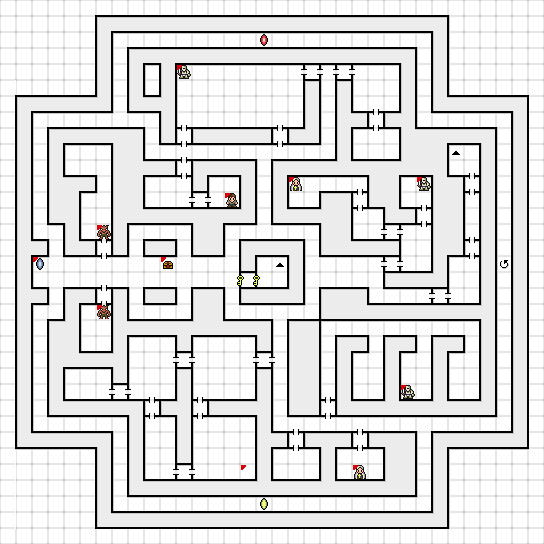
Once you feel prepared to fight the difficult enemies that you will encounter within the Tower, step through the door, and you will arrive on the west side of the tower. While wandering through this floor, you can expect to be attacked by Kobolds, Assassins, Sylphs, and Tower Soldiers. Assassins as quite fast and are capable of dodging a good number of attacks. In addition, they have the potential to poison one of your party member when they attack. Sylphs are also quite dangerous, with a wide array of low level spells to choose from, including Sleep, Shield, and Cure.
There are two fixed battle locations on either side of the doors just ahead of where you arrive. They are fights against rather formidable Tower Soldiers who wear very strong armor and take little damage from your attacks. Your Wizard should cast Spear as much as possible to help whittle them down. If you grow strong enough, and can take the Soldiers out with ease, you can enter the tower, trigger these two fights, leave the tower, and return to fight them over again as many times as you like. They are a relatively good source of experience points and gold.
There are a few other features to this floor. Of particular note are the two warp tiles along the very top and bottom corridors of the floor. If you step on them, they will instantly transport you to the same location one floor up. You may only notice a slight change in the hue of the walls, but the enemy battles will be a little tougher, so don't trigger these warps unless you intend to. Additionally, there is a spin tile along the east corridor which turns you to face a random direction.
There are a few people on this floor who will tell you things, but only one gives you a message that is truly helpful. He tells you that it is said a mirror can be found between two pillars. Another message suggests that pillars can be found 8 spaces from the east entrance of the Tower. If you search the floor between the two pillars, you will find the Hand Mirror. When you use the Hand Mirror, you are shown a small sketch of the map around you. This can be very helpful when you get turned around and are not sure which way to travel.
Finally, there are two Priests on this floor who will offer to join you, but only if you have an empty space in your party. If you do not, they cannot join you, but if you do, it's worth it to let another adventurer tag along. If you don't like having them in your party, you can always rid yourself of them at an Inn.
Note that you cannot open the door in the center of the Tower. In order to progress to the next floor up, you could use one of the two warps, but it's safer to access the ladder which leads you up. You can find this ladder by exploring the region to the east of the locked door in the center of the floor.
Tower Floor 2[edit]
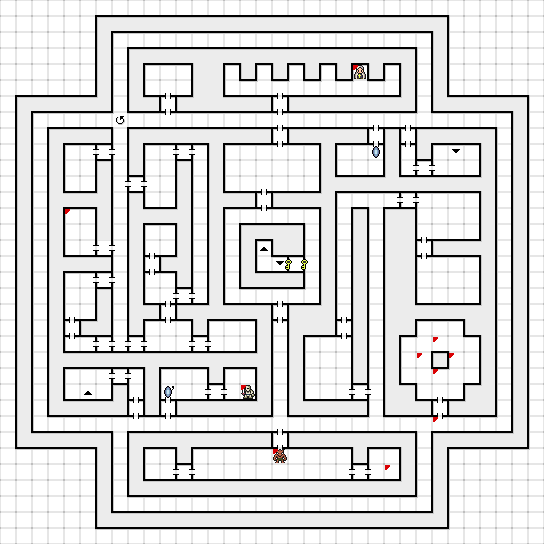
There are considerably fewer interesting features on this floor, but they are worth exploring. The enemies on this floor continue the trend established on the floor below, but composed of slightly stronger configurations. If you were doing well below, you should continue to be fine here.
Assuming you took the ladder, you are now near the upper right hand corner of the map. You must make your way through two doors to reach a main hallway. Just to the left of where you arrive is another door. When you walk through this door, you actually activate a warp. This warp sends you to the lower left corner of the map. Leaving the square you arrived on and stepping back on to it will send you right back to the upper right. Use this as a shortcut when you want to travel directly to the third floor.
There is yet another Priest who will offer to join you if there's room in your party. He can be found in one of the small alcoves near the top of the floor. A very valuable fixed battle location can be found through a door at the bottom of a central corridor. When you step through this door, you will be attacked by Tower Soldiers. If you defeat all of them, you will be rewarded with the Boomerang, and ranged weapon for a Hunter that is even more powerful than the Arbalest.
Once again, you need a different key in order to access the center of the floor. There is a room with several messages near the lower right corner of the floor, which speak of the combination of good and evil. Ultimately, you need to visit the room in the lower left corner of the floor which leads to the third floor. But be warned, the enemies that you encounter up there take another leap in difficulty, so try to be around level 10 before you ascend.
Tower Floor 3[edit]
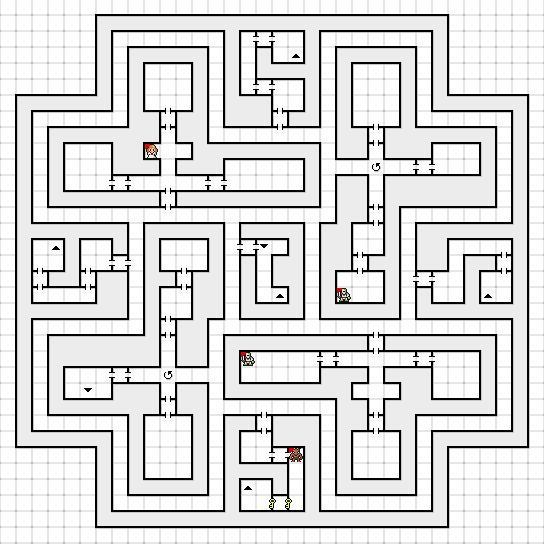
With the addition of Lizardmen and Werewolves, combat on this floor gets a bit more deadly. Make sure you are wearing the best equipment you can possibly find at this point, and double check your party members to make sure they haven't accidentally unequipped their weapons. You may also encounter Death Eyes, who are undead and susceptible to the Priest's Sunshine spell.
Apart from the center portion of the floor, which is closed off with a different key, the floor contains four quadrants. In each quadrant, there is a large interior space to explore, and a smaller exterior space which always leads to a ladder up to the fourth floor. You won't find anything of importance in the interior spaces. Just a couple of adventurers looking to team up with you, or the random bit of advice.
Since all four exterior spaces lead to the fourth floor, you may imagine that it doesn't matter which ladder you choose. Indeed, all four ladders lead to a very small closed off section of the floor that forces you to advance to the fifth floor before exploring the rest of the fourth floor. However, the bottom space is of particular interest.
First off, if you attempt to approach the bottom space, you will run into a forced encounter with a particularly deadly enemy, the Harpy. Harpies are strong, have great defense, and can inflict your party members with Poison. They are a serious challenge, and should not be taken lightly. If you happen to have a Wizard that has reached level 11, it may even behoove you to return to the magic shop in town and learn the Bomb spell.
If you manage to defeat the Harpies, continue on and you will find an ordinary room with a ladder that leads up. However, if you climb this ladder and go one square south, you will find a message that suggests that you search the room immediately below you. Climb back down the ladder, go one space south and check the floor, and you will find the Agate key! This is the key which unlocks the doors to the stairs in the center of the tower. Now that you have it, head to the middle of the tower, enter the closed off room, and climb the center ladder to the fourth floor.
Tower Floor 4[edit]
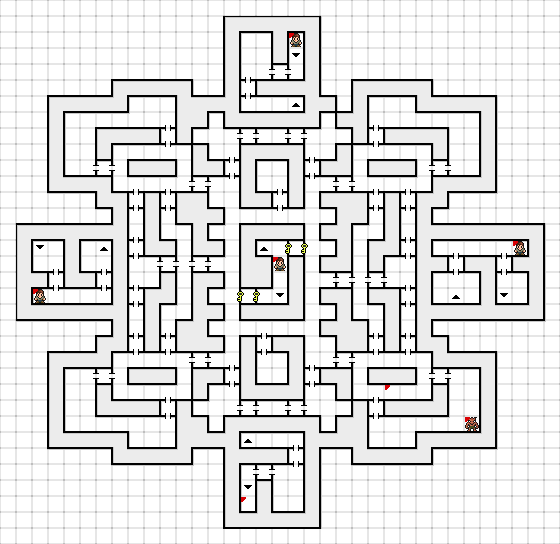
Unless you came to this floor through the central ladder, you won't be able to explore very much of this floor. Any of the other four ladders from the third floor deposit you in small closed off sections that are disconnected from the rest of the floor. Men who stand outside the doors to the ladders strongly suggest that you explore the southern ladder room if you haven't done so already.
Enemies on this floor will continue the trend set in the floor below, with stronger groups of Werewolves, Lizardmen, and a few Tower guards thrown in. However, you are also more likely to run into groups of Harpies, so you should keep your health as high as you can between fights in case you run into some of these dangerous monsters.
For all of the doors and chambers that the fourth floor possesses, there is very little of actual interest here. The only excepting is inside the large room in the lower right corner of the floor. There happens to be a fixed fight in the corner of the room. This fight will be with a variety of blue dog known as the Shinobanken, and they are quite powerful. Shinobanken have the ability to cast Combustion, which will damage every member of your party. Keep your healers working throughout the battle.
If you beat the dogs, you will earn the Silver Rod. After being stuck with the Dagger since the very beginning of the game, you will finally have a chance to upgrade the offensive power of a Wizard by equipping him with the Silver Rod. Once you have the rod, there is nothing left to find on this floor. However, before you run off to the fifth floor be aware that the increase in difficult from floor four to five is as great as the increase from floor two to three. So make sure you have leveled up to around level 12 before trying to tackle the monsters that you'll find up there. It's also a good idea to purchase any new magic that your spell casters might have earned the ability to cast.
Tower Floor 5[edit]
Unlike the previous floor, all of the ladders lead you to a location that allows you to explore the entire floor. However, there's only one section worth exploring. Harpies and Shinobanken appear as regular encounters throughout the floor. In addition, the strongest variety of Tower guards can be found on this floor. In fact, there are two sections of the floor in particular where the like to congregate. One is in the lower right corner of the floor, while the other is behind the locked door in the center where you would expect to find a ladder to the sixth floor.
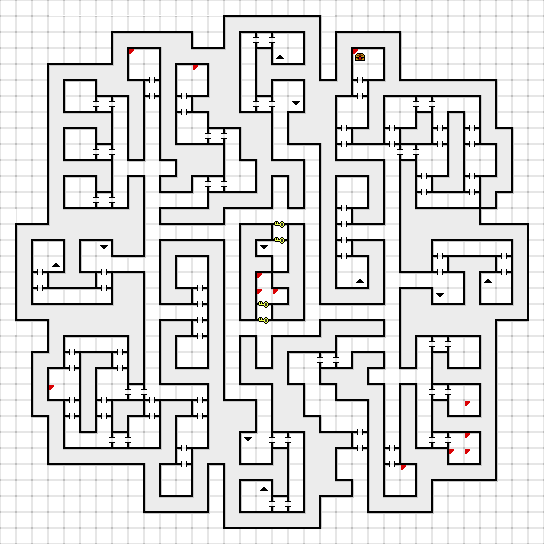
If you happen to visit a room in the lower left corner of the floor, you might find a message that tells you to explore the room eight spaces over and six spaces up from the room on the opposite side of the floor. To find the specific location, you would have to map out the floor in order to better understand the suggestion. However, if you refer to the map above, you will find a treasure chest icon near the very top of the floor. This happens to be the location that the hint is referring. Head over to it, and search the floor, and you will locate the Broadsword, a significant improvement over the Flail that your Soldier can equip. Grab it and prepare to explore the sixth and final floor.
Tower Floor 6[edit]
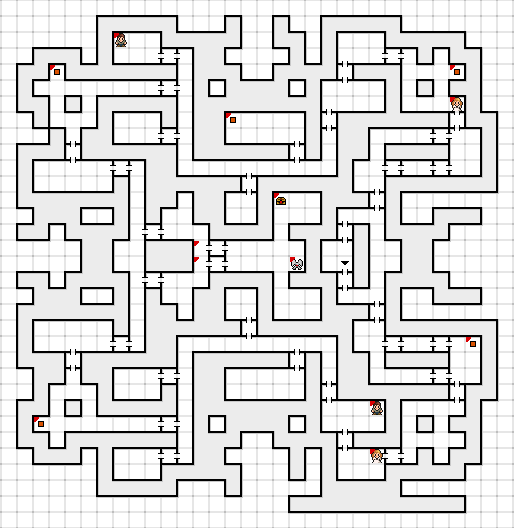
The only real points of interest on this floor are the boss, Barzas (appears alone), and the Demon Cloak that can only be found after defeating him (denoted by the chest icon). There are two people on this floor you can recruit, like on the previous floors, and also two people that tell you that Barzas is located in the Yang room. The stronger Tower Soldiers, Death Eyes, and Harpies appear frequently here and in slightly larger numbers than on previous floors.
When fighting Barzas, it is imperative that you have someone use the Shinto Bell at the start of battle; it is also recommended, but not necessary, that you cast both Sharp and Shield on the Swordsman if he possesses the Broadsword as he will do the most damage. Barzas has quite a bit of HP but is not a serious threat if you're properly leveled and equipped; his physical damage does not really deal a whole lot, but as always, keep your Swordsman's HP up.
After defeating Barzas, you are awarded with the Light Orbs and can obtain the Demon Cloak as previously mentioned. Afterwards, exit the Tower, rest up, and head back to the Underground Dungeon.
Underground Dungeon (Revisited)[edit]
Once here, go to the 2nd floor, head all the way up to the Northeast corner to a locked door that needs the agate key to open. Take the ladder up and grab the Slate (denoted by the chest). In this new area of the dungeon, we see new enemies such as Bug Eye and Bug Horn (undead). With the Slate in hand, work your way back to the Town of Aisle and head toward the Southeastern corner to where the previously locked door is. The ladder here will take you to the Cave.