The maps of World 1 are rather large, and can be difficult to see on one page. The manholes and hidden entrances may be particular hard to see. They have been presented here to fit inside the width of most browsers, but feel free to click on the map itself to get a larger view of it. Please bear in mind that besides entrances, other items such as health restoring dorayaki and bonus point diamonds are hidden throughout the city. Shoot inside small alcoves or enclosures to see if you can make hidden items appear.
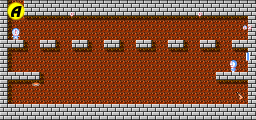
You begin the game in the lower right hand corner of the city, above manhole A, and you begin the game unarmed. You'll want to start by collecting a weapon, which can be done by jumping down the manhole and running to the right to collect the Shock Gun. It is the weakest weapon, but it's better than nothing. A dorayaki below the manhole entrance can be collected to revitalize Doraemon's health every time you visit.
Head north and walk up and around the tall blue building on your left until you reach the other side of the green building below it. Shoot at the corner created by two pipes to make a hidden manhole entrance appear. Drop down inside. Avoiding the mice that you encounter below, cross over to the right side of the tunnel, and up to the highest ledge. Shoot the left side to make the first weapon upgrade appear, the Air Gun. (Note: If you already collected the Air Gun elsewhere, this will be the Power Fan.) Then head back to the left to escape.
Before you travel any further to the west, head north and visit the park above the large green building. In the upper right corner, you will find the first rapid-fire drink which will increase your rapid-fire capability from one shot to two.
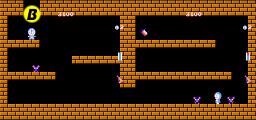
Optional: If you like, you can travel along the southern routes of the city and make your way to the far left. Eventually, you will have to climb north and double back to the right to reach manhole C. If you enter it, you will find yourself in a dark tunnel that dead-ends about halfway through. It appears the be empty, but if you stand on the ledge and shoot to the right, you can make a hidden 1-up appear. Once you collect it, return to the left and exit. You can shortcut your way back to the east side of town by making a door appear near the lower left corner of the city that will take you to the door located by point 5.
Next, make your way to point 4 by taking the second bridge from the bottom, and walking along the left path until you reach the park. Shoot at the very center of the park to make the secret manhole entrance appear. Drop down inside and watch out for the rock spewing monsters that occupy the bottom floor. The platforms should protect you. Cross over to the right, and shoot at the space above the right most platform against the far wall. The next weapon upgrade should appear, which will transform your Air Gun into a Power Fan. (Note: If you did not collect the first weapon upgrade, you will get the Air Gun now. You can still collect the other upgrade.). Hop back to the left and exit the tunnel.
Head to the door at point 5. When you enter this door, it will take you to the west side of town, in an area that you can not ordinarily reach. You will appear inside a closed off section of town. Walk to the right and up and pass right, through the park with the lake. Walk up to the north side of the town where a door is hidden at point 7.
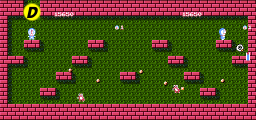
From the location of the hidden door, walk to the left above the park with manhole D, and cross over the top bridge. Walk below the park with manhole E, to the right side, and head north to reach the entrance to the park. A rock spewing monster will be guarding the entrance to manhole E, so destroy it or dodge the rocks. When you jump inside the manhole, you will arrive at the top floor of a two story basement. UFOs fly around in every corner, so be on the lookout for them and watch out for their shots. Drop down through the hole in the floor to the bottom. You will see the first Genki Candy that you can collect, which extends the length of Doraemon's health meter. Drop down and collect it, and head to the left to climb back up on the platforms. You can't leave the way you came, so continue to the right and climb up to the right hole. Jump up through the hole and push to the right so that you land on the floor of the story above. Then make your way back to the manhole entrance to escape.
Now return all the way to the location of the hidden door at point 7, and shoot the area to make the door appear. You will advance to the location of the door that allows you to access the upper left corner of the city.
From the door that you just arrived at, walk up and to the right of the small blue building to the right of the passage that leads north. Shoot the empty area to the right of the small building, and a second rapid-fire drink should appear, upgrading you from two shots to three.
Finally, head north between the buildings, and approach the upper left corner of the map. Shoot the space just below the north city wall to make manhole F appear and hop inside. (You may need to scroll the map in order to see all of it.)
Doraemon must cross this long tunnel to reach the other side where the cemetery and factory await. Along the way, Doraemon must avoid getting attacked by the myriad of creatures that live in this tunnel, including the lone witch who makes her residence inside. After you pass the witch, climb up to the top platform and proceed to the dead-end at the right Shoot the space just before the dead-end to make a special item appear. This special item is the Flash Light, and collecting it will enable you to start the second world of the game off with a powerful weapon, so don't miss it. Once you have it, double back to the left and drop down so that you can continue to the right. Once you reach the right end of the tunnel, jump up to the hole in the ceiling above and you will appear in the cemetery.
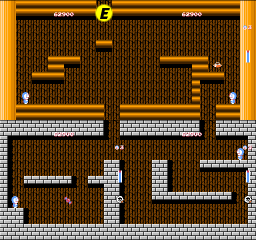
You will arrive in the upper right corner of the map, where the cemetery begins. The enemies that you encounter here are far more aggressive than they were in the city. Nearly every enemy will fire bullets at you, and a new enemy, a snake with wings, flies through the screen extremely quickly, making it very difficult to anticipate and attack. Keep your health up by avoiding conflict as much as possible, and shooting enemies with hopes of making a dorayaki appear. Head south through the cemetery, then west and north along the next passage. Then cross the long corridor along the north to the left and head back down until you see two little buildings. When you reach the two buildings, head to the west building and shoot the area below it. A hidden manhole entrance should appear. Drop inside, and you will appear on the far right end of a tunnel you may have visited in the city.
When you drop down, head to the left side of the pit. Jump up on the first ledge up and shoot the empty space to the right. A third rapid-fire drink will appear, upgrading Doraemon's firepower from three shots to four, assuming that you collected the two earlier drinks. Then jump up to the higher ledge to the left and work your way to the far end. Jump up through the hole you encounter to appear near the lower right corner of the cemetery area. When you arrive, walk to the right, then down, and all the way back to the left. When you reach the lower left corner of the map, begin walking north until you reach the top.
Hidden away in the upper left corner of the map is another Genki Candy, the second of two that you will find in this world. Be sure to collect this rare and valuable candy before you continue. Once you have the candy, begin walking all the way to the right until you reach the factory. Wandering around the factory, it may appear as if you've reached a dead-end, but in fact there is a door hidden along the south side of the factory.
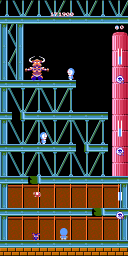
Shoot at the space along the bottom of the factory, roughly near it's center, to make a door appear. Enter the door to be taken to the final area of this world, where the boss awaits. Once inside, you will find yourself at the bottom of a tower that you must climb in order to face the boss. A number of different enemies await you and engage you as you climb your way to the top, but once you reach the highest platform and jump, the boss of this world, Bull-Robo, will appear and the other enemies will leave.
Boss fight: Bull-Robo is a tough enemy who runs back and forth along the platform, and occasionally stops to jump into the air. All the while, he spews rocks out of the top of his head. You must avoid touching him, or you will die instantly, regardless of how much life you have. You can shoot any position on his body to damage him. He takes 28 shots to destroy with the Shock Gun, 14 shots with the Air Gun, and 10 shots with the Power Fan. In order to shoot him, you must expose yourself to his rocks. But when he ventures too far to the right, you must get out of his way. Dropping below the platform will protect you from both his touch and the rocks he fires. When he is destroyed, you will advance to the next world.