
With the items you now have, you can create the Rainbow Bridge and reach Charlock Island. Hidden within a secret entrance to the Dragon Lord's castle on the island, you will find Erdrick's Sword as well as the Dragon Lord himself.
Enemies[edit]
Enemies that you will encounter on Charlock Island:
The Rainbow Bridge[edit]

At long last, the time has come to set foot on Charlock island and investigate the castle of the Dragon Lord. You should have all of the necessary items:
- The Stones of Sunlight
- The Staff of Rain
- Erdrick's Token

If you do, it's time to make the story of legends come true. In the temple south of Rimuldar there awaits a grumpy old man who refuses to talk to anyone but the person who can prove their ancestry. With Erdrick's Token and the other two items above, he will perform the miracle that will create the Rainbow Drop.
With Rainbow Drop in hand, trek back north to the edge of the channel that leads to Charlock Island. Hold the Rainbow Drop aloft in your hand, and another miracle will occur: the Rainbow Bridge bridge will appear and span the channel. You can now come and go from Charlock Island as you please. Of course, there's only one point of interest on the whole island: The castle of the Dragon Lord.
The Dragon Lord's Castle[edit]
The first time that you come here, you may be strong enough to face the powerful monsters that roam the first couple of floors, but you'll definitely need to spend some time leveling yourself up to become more powerful. You will not be any match for the Dragon Lord with levels below twenty.
The dungeons beneath the top floor of Charlock Castle are a twisting maze, with a multitude of stairwells that lead back and forth to one another. To make matters worse, even with Radiant, your view of the floor plan is somewhat limited, making it difficult to tell where you are in relation to other staircases. More confusing still, the entrance on the ground floor that you must use is a secret one and must be searched out.
Enemies that you will encounter in the first floor and first basement:
Enemies that you will encounter in basement two through four:
Enemies that you will encounter in basement five through seven:
Ground floor[edit]

After you cross the poisonous marsh to reach the castle, you will be greeted by powerful monsters. As you battle your way through, you can spot two stairwells down to the lower floor. If you thoroughly investigate both stairwells you will eventually conclude that neither of them leads anywhere. Now remember the words of the lone wizard on the island in the town of Rimuldar. "Tis said he (Erdrick) entered the darkness from a hidden entrance in the room of the Dragonlord."
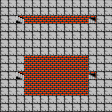
The trick is to search directly behind the throne, revealing a stairwell that leads to a rather straightforward path down into the castle's dangerous dungeons.
-
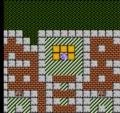
The throne room contains a secret...
-
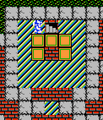
...which is revealed by searching behind it


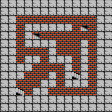
Basement 1[edit]

Once you find the correct, secret, entrance to this basement, it is a straight path from the top of the floor, down the left side, and along the bottom to a stairwell that will take you to the second basement level.
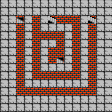
Basement 2[edit]

When you correctly enter this floor from the first basement, you'll travel along a circular pathway that takes you straight down to the next basement.
The corners are straight lines or loops coming and going from the adjacent basements.
The center room contains a treasure chest, but to claim it you'll have to go down to Basement 4 before taking the correct stairs back up. If you are successful in finding it, you will be rewarded with the ultimate weapon of Dragon Warrior: Edrick's Sword, the fabled sword that according to legend is the only one capable of cutting though the Dragon Lord's iron-like flesh. It's actually just a normal sword, albeit the most powerful one in the game.
Basement 3[edit]

You will arrive on this floor from the staircase at the top right. There are two other accessible staircases that lead up, but they simply loop around to one another. Your only other choice is the down staircase on the left side of the level.
You will travel back through the central part of this floor when you find the correct path leading to Edrick's Sword in Basement 2.
Basements 4, 5, and 6[edit]

You will arrive in the lower left corner of basement level 4. There is one other staircase leading up, in the lower right corner, and it will take you in a straight line up and down many levels to Erdrick's Sword; after getting the sword either use Escape to leave the dungeon or return the way you came to get back to this room. The stairs in the upper right take you to a never-ending looped dead end: a trap designed by the Dragon Lord. The other option is to take the stairwell in the upper-left corner of Basement level 4; these stairs will lead you toward the Dragon Lord and the final conflict.
Level 5 contains two straight pathways. The outer one connects the true path toward the Dragon Lord; the inner one is part of a dead end.
Level 6 likewise contains two straight pathways. The simple corridor contains a stairway down, but this stair leads back to the stairs on the left and is a looped dead-end. The larger room contains the stairs you will enter if you correctly traversed the maze above, and leads directly to the Dragon Lord's chamber.
-
Basement 4
-
Basement 5
-
Basement 6


Basement 7[edit]

With the strongest monsters that exist in all of Alefgard roaming the hallways of the lowest basement, reaching the Dragon Lord will be no easy task. You may be lured to the treasure room, however it contains nothing you are likely to find useful: a key, two herbs, a Wyvern Wing, gold, and a cursed belt. To reach the Dragon Lord himself, you must travel around the left side of the floor and along the top until you reach a broken portion of the castle that lies in a state of ruin. Cross the bridges and marsh until you are back inside the castle, in the designated throne room of the Dragon Lord.
The Dragon Lord[edit]

When you reach the Dragon Lord, he will welcome you with an explanation, and a surprising offer. Instead of fighting him, he offers you a place by his side, to share in his dark rule over the world. If you accept his offer, he will ask if you're sure. If you say that you are, the game will come to a dark close. You must stand firm in your beliefs and reject his offer. If you do, the final fight will commence.
The Dragon Lord appears as little more than a slightly stronger Wizard, and you may be surprised to find that you can defeat him with only a few strikes. The real surprise comes next, when his true form is revealed as a giant fire-breathing dragon. You'll need as much strength as you can muster, and as many magic points as possible for all of the Healmores that you will be casting throughout the battle. If you succeed at striking down this monstrosity, you can begin your journey back to Castle Tantegel, where you will be acknowledged as the true hero of Alefgard. Congratulations!