- Green text on this page indicates that it is exclusive to the GBC and SNES versions.
Very little stands between you and the Archfiend Baramos, except a means of actually reaching his castle. Rumors claim that when one gathers all six orbs, they will no longer require a ship to get around the world. But what does that mean? And where does one bring the six orbs? The only clue is given by the spirit of a prisoner who gave you one of those orbs.
Using the orbs[edit]


| Monsters in Liamland Area |
|---|
Now that you have all six orbs, it's time to put them to use. If you stashed any of them in the Vault at Aliahan, go ahead and pick them all up now. The question is, where do you take them? If you spoke with the prisoner in Tedanki who gave you the green orb, he mentions an altar in a place called Liamland far to the south. Liamland is this world's version of Antarctica. The fastest way to reach it is to Return to Noaniels, hop in your ship and sail due north. When you reach the icy continent, sail west a short distance until you can see a shrine in the middle. Park you boat and head to the shrine. Before you climb up the ladder check right of it for a ![]() TinyMedal /
TinyMedal / ![]() Small Medal.
Small Medal.
Inside, you will find two young maidens who stand guard over an egg in the center of the shrine. Around the egg are six altars. The maidens claim that when the orbs are placed on the altar, the legendary phoenix Ramia will hatch from the egg. Go ahead and use each orb on each altar. It does not matter which orbs is used on which altar, just use all of them so that you light six flames in the room. Then return to the maidens and speak with them. They will rejoice in your success, and the egg will hatch. Ramia will fly around the room, and leave the screen. Exit the shrine, and you will find Ramia waiting patiently for you just outside. Step on the square with Ramia and press ![]() to ride him. With Ramia, no region of the world is out of reach, including the Archfiend's castle.
to ride him. With Ramia, no region of the world is out of reach, including the Archfiend's castle.
Checking out the Pit[edit]


In addition to being unable to investigate Baramos' Castle, you were previously unable to visit the Great Pit of Giaga to the east. Before you head to the castle, make a stop at the pit and take a look inside. You'll find two guards who have been stationed there to protect the pit… even though no one else can reach it, and it is encased in a giant wall. The guards claim that anyone who has ever fallen into the pit has never returned. But since it is walled off, there's little you can do to test that theory. But that may not be the case forever.
Next stop: Baramos[edit]
Unless you have any last minute shopping or preparation to do, it's time to take the fight to Baramos. Hop on Ramia, and fly her across the globe until you reach the island that his castle sits upon. Then land Ramia in front of the castle and enter.
All of your party members should be level 30, or higher. If you changed any party members' classes, such as gaining a Sage, be sure to give them some extra time to get as close to level 30 as possible, so you have a chance at Baramos. If you're not certain that you can beat him, you may wish to deposit as much gold in the Vault in Aliahan as possible. Not only are the monsters that patrol his castle terribly strong, attempting to fight Baramos too soon will surely fail. Take some time to level up in Necrogond, or on the castle grounds themselves. Then, when you feel you're ready to give it a try, go through the castle to get to Baramos on the most direct route possible, avoiding as many fights as you can. Save your HP and MP for the battle with the Archfiend.
The castle of Baramos[edit]
| Monsters in Castle of Baramos |
|---|

While the castle looks like a typical king's home, it is anything but. Enemies roam every inch of the place, and random encounters should be expected on a regular basis. In addition to Marauders/HellNites and Lionheads, which you've met in Necrogond, you'll have to deal with the incredibly strong Stone Hulks/Stone Men, and the powerful Evil Mages. Even if you manage to successfully cast StopSpell on an Evil Mage, it won't stop them from breathing fire at you. Snow Dragons/Ice Dragons are also a considerable threat with their frost breath.
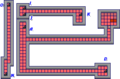
As you can see, the main floor of the castle alone contains a large number of staircases, sixteen to be exact. Some of these lead to places you want to go, while others only lead to loops or dead-ends. The trick is to figure out the locations of the stairs you should actually take. Stairs A, B, C, and D are immediately available to you at the front of the castle. Unfortunately, none of them take you anywhere useful. A and D connect together, as do B and C. Go down A and go right to a Cell. Check left of the Corpse for a ![]() TinyMedal /
TinyMedal / ![]() Small Medal. You're going to have to look harder to find the stairs that begins your journey into the castle.
Small Medal. You're going to have to look harder to find the stairs that begins your journey into the castle.
It turns out that you can walk up along the right edge of the castle ground, and find a fifth staircase, E, below a pond of water. Climb these stairs and walk across the second floor corridor to staircase F, which takes you back down. You'll arrive in the upper left corner of the castle interior. To move on to the next staircase, you'll have to cross the dangerous Barrier floor, so make sure you cast StepGuard before walking on it. Once you cross the Barrier, you have to choose between I and G.

If this is your first visit to the castle, take staircase G, which leads to a small narrow path on the second floor that ends with staircase H. Take H back down to the east side of the castle, and walk left to access three treasure chests. They contain, from top to bottom, a ![]() Demon Axe (
Demon Axe (![]() Demon
Demon ![]() ), a
), a ![]() Wizard's Ring (
Wizard's Ring (![]() Wizard
Wizard ![]() ), and an Unlucky Helmet (
), and an Unlucky Helmet (![]() Misery
Misery ![]() /
/ ![]() Misery Helmet). You don't have to think too hard to realize that the Unlucky Helmet is cursed. While it has 10 more defense points than the Iron Mask, it reduces a Hero or Soldier's luck to 0, and it can't be removed without help from a House of Healing or magic. Due to its name, you might think that the Demon Axe is cursed, but in fact it's not. It's just difficult to strike enemies with it, although when you do, you do tremendous damage with it. Once you collect these items, return to H and G, and head back to staircase I.
Misery Helmet). You don't have to think too hard to realize that the Unlucky Helmet is cursed. While it has 10 more defense points than the Iron Mask, it reduces a Hero or Soldier's luck to 0, and it can't be removed without help from a House of Healing or magic. Due to its name, you might think that the Demon Axe is cursed, but in fact it's not. It's just difficult to strike enemies with it, although when you do, you do tremendous damage with it. Once you collect these items, return to H and G, and head back to staircase I.
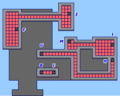
As soon as you take staircase I down, you'll see J immediately below, which leads nowhere. Instead, cross underground to the right, and climb staircase K. From K, you can go up or down, but down leads to a dead end, so take the upper path to staircase L. Climb it and cross back to the left to staircase M. This staircase leads to a small clearing in the middle of the castle, from which you can access the right chamber of the castle, and take staircase N up. Walk up the small corridor to O, and take it back down.
You'll now be in small building near the top of the castle. There's a door at the bottom for you to enter, but don't be too hasty. Beyond the door is a hallway full of Barrier tiles, so cast StepGuard again before you walk through the door. There is a lifeless skeleton sitting on the throne. Check the spot before the throne for a ![]() TinyMedal /
TinyMedal / ![]() Small Medal. Exit the room through the south, and you'll be back outside. You're nearing your destination, which is found to your right, in the middle of the water. Cross the bridge, and cast StepGuard to avoid one more set of Barrier tiles, and climb down staircase P.
Small Medal. Exit the room through the south, and you'll be back outside. You're nearing your destination, which is found to your right, in the middle of the water. Cross the bridge, and cast StepGuard to avoid one more set of Barrier tiles, and climb down staircase P.
-
The basement level
-
The second floor
-

Baramos' chamber


Baramos' chamber[edit]

Baramos stands atop an altar, which he has surrounded with Barrier tiles, naturally. Before you advance on Baramos, it would be a good idea to heal up your party, and make sure your equipment is allotted correctly. When you are confident that you are ready to attack him, step up and talk with him. He will give a fairly boastful speech before beginning the battle.

Baramos can attack twice per turn, although he chooses his attacks entirely at random. He has the widest assortment of attacks available to any enemy that you have fought so far. He can attack you regularly, he can breathe fire on your party (with tremendous damage), and he can cast a great number of spells, including Chaos, Limbo, Explodet, and BlazeMost. He can also cast HealAll on himself, which will cause a great deal of frustration.
Once the battle begins, you should try to improve your party's chances as much as possible by casting SpeedUp, Increase, and if possible, BiKill on your best warriors. If you are high enough in level and have the Barrier spell, that will be effective against Baramos' fire attacks. Once these are cast, you probably won't have time to cast many other spells besides HealMore and HealAll. If you can, Bounce is a good idea, although be careful because only the caster of Bounce will be able to heal him or herself while it's active. Warriors should do nothing but strike at Baramos every turn. If you are desperate, it is sometimes possible to cast Sleep on Baramos, but it rarely works, and he still gets his extra turn when he wakes up. Use the Orochi Sword on him while asleep if you can. StopSpell also has a low chance of working, but once it hits, it stays effective for the entire fight, nullifying one of his methods of attack and wasting his turns when he attempts to cast.
Whether you can succeed at defeating Baramos will depend on whether you have enough HP and MP at the start of the battle, and whether you can heal all of the damage dealt to your team. Choosing whether to cast Vivify and Revive, or use a Leaf of the World Tree, if a party member goes down can be tricky. It reduces your effectiveness for one turn, and that can work against you, even if you succeed in bringing the member back to life.
The archfiend defeated[edit]

If you were successful in defeating Baramos, he will disappear in a flash of light. All of your teammates will be fully restored. You can exit the castle, although you may notice that Ramia is gone (you will automatically sent to Aliahan after the battle). If you attempt to cast Return, your only option is to choose Aliahan. Return to your home town, and everyone will be buzzing with the news that you defeated the archfiend. Your family will be especially proud. You will be encouraged to visit the king.
When you reach the throne room, the soldiers will be all lined up, and the king will be waiting. He praises you for your accomplishment, when all of a sudden the castle quakes and the soldiers disappear. A new voice is heard, going by the name Zoma. He claims to be a Master Archfiend from the World of Darkness, and he declares his intent to ensnare your world in darkness as well. After swearing you to secrecy, the king will fall victim to depression, and be unable to perform his duties. From then on, the chancellor standing next to the king will record your progress.
Everyone outside of the throne room will be blissfully unaware of what transpired, and they will continue to cheer and congratulate you. If you return to the Hero's house in Aliahan, the Hero's mother will be proud, but will no longer allow him/her to stay the night and restore HP/MP for free. You will now be able to Return to all of your previous destinations, and when you exit Aliahan, your ship and Ramia will have returned to you. But where will you go next?
Return to the Pit[edit]

While no one outside the throne room seemed to notice the quake that occurred when Zoma was speaking, there is one other place where the quake was surely felt: The Great Pit of Giaga. Return there now, and investigate the pit. You will find that the pit has greatly expanded, and has swallowed up portions of the wall surrounding it, giving you direct access to the pit itself. The time has come to summon your bravery again and take a leap of faith into the pit and discover what lies on the other side.