- Green text on this page indicates that it is exclusive to the GBC and SNES versions.
| Monsters in Dhama Area |
|---|
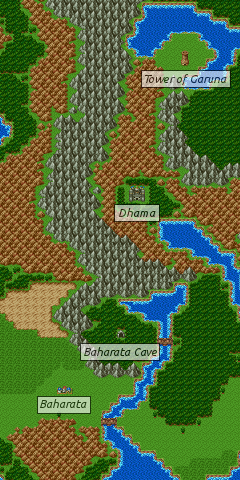
Before you go sailing all over the world, you may be ready for a career changing experience. Players who are level 20 or higher are eligible to change their profession at the Shrine of Dhama, a giant castle north of Baharata. The ability to change your profession gives you the chance to create characters with combinations of skills and stats that are otherwise unavailable. Under the right circumstances, you may even unlock the powerful class of Sage. However, such changes come at a cost. Your character's current stats will be halved, and they will begin their new profession at level 1. Any spells previously learned are remembered, but magic points will no longer increase unless the new profession is entitled to them. Should you wish to unlock the Sage class for one of your characters, you will have to embark on a quest to find the Book of Satori (Zen Book) from the Tower of Garuna. How you proceed is up to you.
Dhama (Dharma)[edit]
Reaching Dhama is actually quite easy. Return to Baharata, and cross the bridge to the east as though you were going to return to the nearby cave. However, instead of crossing the second bridge back to the west, continue north through the wilderness and the hills. It won't take you long at all to reach the shrine, but watch out for attacks from powerful Simiacs and the Firebal casting Rammores.
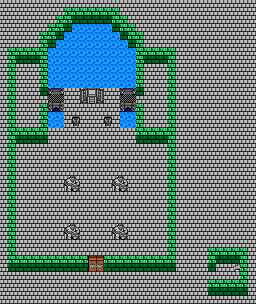
Once you reach Dhama, you will be greeted by a man standing outside of a locked door. This man will actually inform you of how many experience points you need to reach the next level, and offer to record your progress just like a king! This makes Dhama the most efficient place in the world to Return to and save your game. The shrine is small, but it's very easy to overlook one of its better features. Instead of proceeding through the door, walk off to the right and you will come to a staircase. Climb the stairs to find a House of Healing, as well as an Inn which costs only 8 gold per person to sleep in and recover. Or walk off to the left and up along the wall to meet a old woman who can change the names of your party members.
You can unlock the door behind the man who saves your game with the Magic Key. Inside the shrine, you will find people milling about during the day, trying to decide upon what profession they should change to. Check the topright Statue for a ![]() TinyMedal /
TinyMedal / ![]() Small Medal. At the very top is a man standing on an alter, with two bridges on either side of him. The men standing on the opposite sides of the bridge provide you with a few helpful hints about what changing your professions will be like.
Small Medal. At the very top is a man standing on an alter, with two bridges on either side of him. The men standing on the opposite sides of the bridge provide you with a few helpful hints about what changing your professions will be like.
Changing classes[edit]

The man standing on the altar is the one who performs the profession changes. If you speak to him, he will ask you if you'd like to change your profession, and which character will be changing. If the character you choose is not at least Level 20, or you select the Hero, he will refuse to perform the change. If the character is Level 20 or above, you will be provided with a list of professions to choose from. Hero and Jester/Goof-off will not be available, nor will Sage unless the character in question is a Jester/Goof-off, or is holding the Book of Satori (Zen Book) in his or her inventory.
Once a new profession is chosen for a player, all of the characters stats are halved, including his or her maximum health and magic points. They will begin their new class at Level 1, although they will be substantially more powerful than a Level 1 character generated at Luisa's place in Aliahan, thanks to the built up experience of their previous class. Characters who learned spells can continue to cast them, although their magic points won't increase if their new professions does not gain magic points, such as a Soldier (Warrior) or Fighter.
These are all important aspects to take into consideration when thinking about changing classes. It means that if you change your entire party at once, you will need to find an easy location to battle monsters and slowly raise their level, so that you can battle competently. Many characters have around 40,000 experience points when they reach Level 20, and you will need to accumulate that many more points to return to Level 20 in your new profession. In addition, it's not necessary to change as soon as you reach Level 20. Just because you can change your profession doesn't mean you have to, or even that you should. You may wish to remain in your current profession for quite a while longer before changing. Some players may even choose to wait until after they have defeated the Archfiend to change professions.
- Reasons to wait
- Waiting longer allows you to learn more spells that you can still cast in your new profession. For example, you may wish for a Pilgrim (Cleric) to learn more powerful healing spells before becoming a Soldier (Warrior), or you may wish for a Fighter to become even faster and stronger before becoming a Wizard (Mage). Even a Jester doesn't need to become a Sage right away at Level 20. Though they are hard to use, their luck continues to climb dramatically, and you may not want to interrupt that growth immediately. A luckier Jester will result in a luckier Sage (however, luck growth slows down beyond 200 and can't exceed 255.)
- Reasons not to wait
- One problem that people often have is with earning magic points. A level 10 Wizard, who started out as a Soldier (Warrior) and changed professions, will likely have far less Maximum MP than a level 10 Wizard that you created at Luisa's place in Aliahan. The reason has to do with how MP is earned through level growth. When you rise in levels, you may earn Intelligence points. Anytime you earn Intelligence points, your MP is likely to increase by roughly twice as much (give or take a few points). However, when you change professions, it takes a while before stat growth kicks in. This will mean reduced amounts of Intelligence increases until around level 10, which means reduced amounts of MP. This can be frustrating to player who switch to the Sage class from a Jester (especially a very intelligent Jester), only to see their maximum MP grow incredibly slowly. Therefore, you shouldn't wait too long, or your Intelligence will be so high that it will take a very long time before you earn many more magic points. If one wants a character's final class to be a Fighter, it is recommended to change into that class as soon as possible: Fighter benefits from raw level (it gains increased critical rate at higher levels) where other classes do not, and its growths are high enough it will naturally cap its Strength and Agility by the early 40s if it has a beneficial personality, so it has little need to inherit higher values in those stats, and it primarily needs increased vitality/max HP (starting as a Warrior with a beneficial personality will be enough to cap this as well at level 32+42) and any spells you want them to have.
- How long to wait
- Stat growth is at its highest between the early teens and the mid-thirties, with the exacts varying between classes (for example a Soldier (Warrior) gains twice as much Vitality each level between 12 and 34 as they did between 4 and 11) so redoing low levels won't provide as much as a smaller number of mid-levels. The rate of stats growth also decreases at higher levels, so redoing mid-levels is more effective than pushing for ever higher levels. The exact level once again varies by class and stat, but this drop typically occurs at the late 30s or early/mid 40s (for example after level 46, the same Soldier (Warrior) will gain only a fourth as much strength per level). This is close to the point you can defeat the final boss and don't need to bother about long term planning anyways unless you're playing a remake, then you have a bonus dungeon or two after that where the overall stats increase is helpful. Another reason to avoid higher levels is they take much more XP than repeating mid levels: A character can reach level 32 three times with the experience needed to bring a character to level 42 once.
- Other factors
- One major factor in determining the path to take is that the five main stats can't go above 255. That number is low enough that classes can reach that high in their primary stats before level 45, well before if they've been boosted with seeds and/or equipment and/personality (naturally agile classes equipped with the Meteorite Bracelet may reach the cap on that stats as low as level 20). Stats gains for a capped stats are wasted and should be avoided. Another factor to consider is which spells are obtained. While damage spells deal fixed damage and become useless later, buff and utility spells remain forever useful. For a Wizard (Mage), their obtaining the ability to double attack power gained at level 21 and ability to reflect enemy spells at level 24 remains useful in several boss fights throughout the game, even on a non-caster. One final factor to consider is how ease of gaining experience quickly, which reaches its apex once you can enter Baramos's castle and fight a particular enemy type that gives 40200 experience per kill.
Becoming a Sage[edit]
Sages are an incredibly valuable class to add to your party, and they are unavailable through normal means. In order to become a Sage, one of two things must be true; either the character in question must be a Jester/Goof-Off, or the character must possess the Book of Satori (Zen Book). Getting a Jester to Level 20 is not the easiest task. It can be made easier with the assistance of three higher level companions, but with enough patience, you can raise a Jester from level 1 to 20 right alongside your Hero if you like.
Obtaining the Book of Satori (Zen Book) is no easy feat either. On top of being difficult to collect, there's only one in the game and the other mean to obtain one is to fight Blue Beaks and hope they drop one, although the chance for that is 1/2048 and zero in the remakes, though unlike the original a character can now be turned into a Jester and become a Sage that way. There is a second Book in Rimuldar and with luck you can get one as a random drop on 3. Pachisi Track. The last Possiblity is to beat Divinegon/God Dragon and request Zen Book as a Wish. To obtain the Book of Satori (Zen Book), you must journey north from Dhama until you reach a tower. This is the Tower of Garuna.
Tower of Garuna[edit]
| Monsters in Tower of Garuna |
|---|
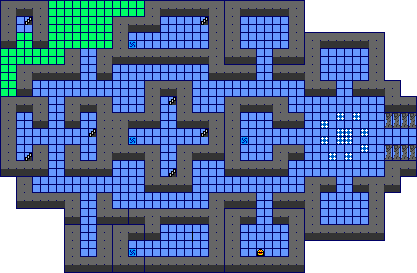
After the short hike to the tower, you will arrive through the right side. The tower is actually more long than it is high, and you'll have to traverse a long hallway in order to climb the stairs to the next level. There's a lot to discover along the way. The tower is crawling with powerful beasts, including Simiacs/Killer Apes, Rammores/MadOxs, and the large bird known as Great Beaks who can attack twice per turn. As you climb to higher floors, you will also encounter Sky Dragons and Stingwings.
Right by the entrance are two alcoves, above and below. You'll find women who provide information in each one. Straight ahead of the entrance, you can enter a room that contains a Travel Gate. If you step on it, you'll be transported to another location on the first floor. It's a closed off room that leads nowhere except for a man who is upset that you disturbed his meditation. Simply return through the gate. Directly below that room, you'll find a small alcove with a chest that contains an Intelligence Seed (![]() INTseed /
INTseed / ![]() Wisdom Seed). There's a similar room above, but it's empty.
Wisdom Seed). There's a similar room above, but it's empty.
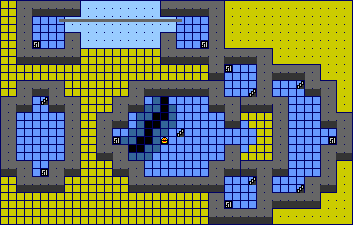
As you move to the back of the tower, you'll begin to pass more Travel Gates and stairs that you can't access at the moment. There's a set of visible stairs that you can climb. If you do, you'll arrive in the middle of the second floor, to the left of a large crack the separates you from a treasure chest. Falling through the crack will deposit you right besides the same set of stairs. Across the hall from those stairs you'll find another flight of steps inside a covered room. These stairs will allow you to climb up to the second floor, across a small room, and up again to the third floor before it simply dead-ends.
The only way to truly advance through the tower, is to walk to the back of the first floor, and explore an exit that leads north. You'll walk across some grass to a small building that has a staircase. Climb the stairs, and you'll arrive in a room with a large gap in the right wall. Leading away from the room is a tightrope that your party can walk across with a surprising amount of ease. Just don't veer off in the wrong direction, and you will make it across, where you'll find another staircase that leads back down. You'll arrive in another closed off room, with a Travel Gate in the back. Step on the gate, and you'll be transported to the central room in the first floor with three staircases to choose from.
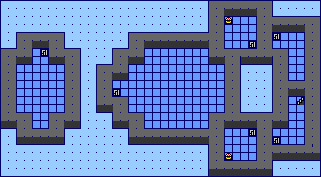
Both the top and the bottom staircases lead to small rooms on the second floor with another staircase to climb. These lead up to the third floor where you'll find treasure chests. The chest that you arrive at through the bottom set of stairs is actually a deadly Man-Eater Chest (![]() TinyMedal /
TinyMedal / ![]() Small Medal), but the chest that you find by climbing the top stairs contains 248 gold (448 gold).
Small Medal), but the chest that you find by climbing the top stairs contains 248 gold (448 gold).
Ultimately, to continue, you'll have to climb the stairs opposite from the Travel Gate. They will take you back up to the second floor, and into a large room with two sets of stairs, one above and one below. The top set of stairs leads to a dead-end on the third floor, but the bottom set will allow you to continue climbing up to the fourth floor.
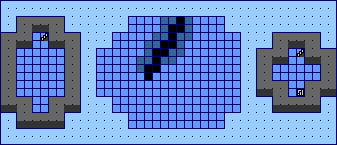

On the fourth floor, you'll arrive in a small plus-shaped room with a flight of steps that lead to the fifth floor. Climb them, and you will find yourself on the right side of another tightrope. This one is longer than before, and you may encounter the hawk-like Garudas as you walk across. If you walk to the other side, you'll reach a room with stairs on the bottom that leads up, and stairs on the top that leads down. The staircase at the top deposits you in an empty room on the fourth floor. The staircase on the bottom climbs up to a small room on the sixth floor where you'll find a treasure chest. Inside, you'll find the Iron Helmet (![]() Silver
Silver ![]() /
/ ![]() Silver Barrette), the unusual item which can only be bought by haggling with a shop owner in Assaram.
Silver Barrette), the unusual item which can only be bought by haggling with a shop owner in Assaram.
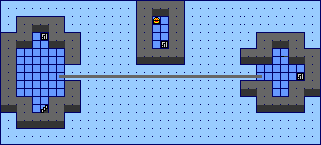
It may seem as though you've examined every option at this point, yet you still haven't found a way to reach the treasure chest that was beyond the crack on the second floor. You've checked out the far left and right sides of the tower, yet the center remains unexplored. If you truly wish to explore the center, you'll have to summon a little courage and make a leap of faith. Walk to the center of the tightrope, and plunge off either side of it when neither edge of the rope is visible.
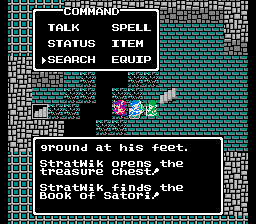
If you jump correctly, you will land in the middle of the fourth floor, in a room that contains a crack through part of the floor. Fall through the crack, and you'll land in another closed off room with some stairs leading down. Climb down to the second floor and you will arrive in the room with the treasure chest that you previously could not reach. Only now, you'll be on the proper side of the crack. Walk up to the chest and open it, and you will find the Book of Satori (![]() Zen
Zen ![]() /
/ ![]() Zen Book). With the book claimed, you have accomplished your goal. You may now leave the tower and return to Dhama, with the ability to transform one of your party members into a Sage.
Zen Book). With the book claimed, you have accomplished your goal. You may now leave the tower and return to Dhama, with the ability to transform one of your party members into a Sage.

