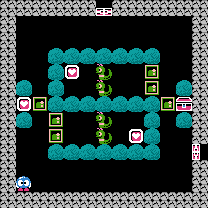
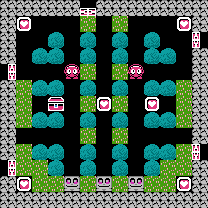
Push the left Emerald Frame out of the way and collect the left Heart Frame to get 2 egg shots.
Walk around to the highest Emerald Frame, push it to the Snakey, egg the Snakey below that, then shoot it again to remove it, and collect the top Heart Frame to get 2 more egg shots.
Walk back around to the lowest Emerald Frame, push it to the Snakey, egg the Snakey above that, then shoot it again to remove it, and collect the bottom Heart Frame.
Start by pushing the leftmost and rightmost of the top Emerald Frames down one space and push the center block aside. Push the left block left until it lines up with a tree and traps the Alma inside. Repeat the same step with the right block and right Alma. Then collect the three Heart Frames.
Collect the left and right Heart Frames from the center row of the room.
Push the Emerald Frame up or down and stand there long enough for the Alma to see you and roll to the right. After the Alma rolls out of the section with the Heart Frame, head inside and collect it.
Then stand at the entrance to the chamber and attract the Alma to roll back inside. When it has passed you run back out and across to the other side of the room to collect the key. Don't stop as the Alma will likely be rolling right behind you.
All you are required to do here is have the Leepers touch you and fall asleep so that they do not block your progress through the rest of the stage. The best place to put them to sleep is to the left and right of the area just above the treasure chest.
Once both Leepers are asleep and pose no threat to you, collect the Heart Frames and then grab the key.
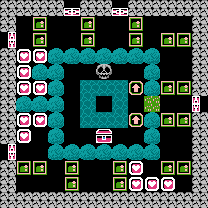
A chamber door will appear which leads to an extra room which you must complete in order to collect a large key.
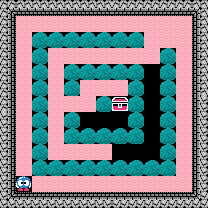
The sand in this room will force Lolo to run at a slower pace. There are only 20 seconds on the clock, and you will only reach the treasure chest in time if you take the shortest possible route.
Start by heading up, and then to the right.
After the last boulder along the top, head straight down through the empty space, and continue to the left, and back up.
Enter the inner chamber, and take the lower route around the center boulder to reach the chest in time. You will collect a large key.
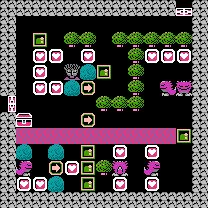
Solution: There are two ways to complete this stage; the way it was meant to be completed or the easy way.
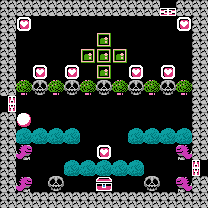
The proper way to complete this stage is to collect all of the Heart Frames from the top of the stage, and double shoot one Skull at a time to remove them from the stage. Push an Emerald Frame into the place of each Skull's original position so that the Skull reappears somewhere below the line of trees. When all five Emerald Frames are in the original Skull positions, a special egg will appear on the left. Collect it, and every enemy will turn into an egg, allowing you to safely run and collect the last Heart Frame, shoot one of the eggs blocking your access to the key, and collect the key before the enemies hatch.
The easy way is to simply collect all of the Heart Frames from the top of the stage, all of which give you egg shots, egg one of the skulls, and push it down so you can access the lower half of the room. Then egg two of the Gols on one side of the treasure chest and blow away the bottom skull on the same side, then collect the last Heart Frame, and run towards the safe side of the room and around to the key. At full speed you will collect the key before the other Gol's flame hits you.
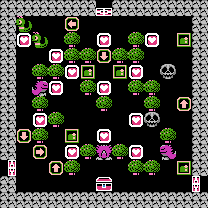
Heart Frames on this stage are, by definition, either internal or external to the circle of trees and Arrow Tiles arranged in the middle of the stage. Start by walking over to the lower right Emerald Frame, and push it up until it lies on top of the Arrow Tile.
Proceed to collect all of the external Heart Frames in a counter-clockwise direction. You should collect six of them.
Approach the internal Heart Frames by passing through one of the Arrow Tiles in the lower left corner. Push the Emerald Frame up one space, and proceed to collect the remaining Heart Frames in any order, but save the top central Heart Frame below the down Arrow Tile for last.
When you are ready, collect the final Heart Frame, move up one space, and push the right Emerald Frame out to the right. Wait until the nearby roaming Skull begins to move out of the way, and push the frame all the way out so that you can proceed down the right side of the stage and to the key.
Walk to the trio of Emerald Frames to the right of the treasure chest. Push the outer pair in, and the center frame to the left. Collect the two Heart Frames, and push the right Emerald Frame back up one space.
Of the trio of Emerald Frames to the right, push the top and bottom two in, and push the center frame to either side and collect the three Heart Frames within.
Walk back to the left of the Treasure Chest, and push the left most Emeral Frame all the way down. Collect the glowing Heart Frame to earn the Ladder Power and use it right there to move south. Collect the Heart Frame on the other side.
Of the trio of Emeral Frames below the ladder, push the top and bottom two in, and push the center frame down, and collect the three Heart Frames within.
Pass through the two Arrow Tiles, and push the Emerald Frame that you reach over one space, and up to the left of the Snakey. Then of the trio of Emeral Frames below the Snakey, push the left frame all the way down to the Heart Frames and collect them.
Finally, push the two remaining Emerald Frames up to the Snakey so that the Snakey is surrounded by Emerald Frames. This will cause the screen to flash, and a transparent Lolo to appear between the Arrow Tiles. Use your recently obtained Arrow Power to change the closest Arrow Tile and touch the transparent Lolo. This will put in you control of a Green Lolo that can walk anywhere on the screen. Get him close to the key and press to return to normal and collect the key.
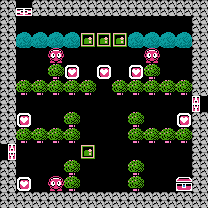
This stage has more to do with reflexes than planning. Collecting the five Heart Frames is relatively easy, since they are all to the right of the Medusa. The hard part will be crossing from the left side to the right side, and back again, and collecting the key.
The grass will protect you from all of the Almas, so you shouldn't worry too much about them. When you start the stage, from the upper right corner, immediately run to the right, and you will likely reach the right side of the stage while the nearby Alma is running toward you, blocking the Medusa's sight. Now collect all five Heart Frames when it is safe to do so.
Two things you will want to prepare for the return trip is the position of the right Emerald Frame, and getting any Almas along the left side of the screen down and out of there. When it's safe, push the right Emerald Frame to a location above the Medusa so you can easily cross back. Lure any Almas occupying the left section of the stage down and into the right section so that the left Emerald Frame is left alone.
Once you do this, you can cross back to the left side via the grass at the top, and push the left Emerald Frame down to the left side of the Medusa, so that you can safely collect the key and exit the stage.
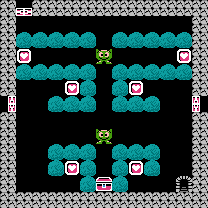
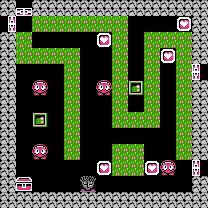
Like Room 7, this room relies more on reflexes and less on planning. All you have to do is avoid getting hit by the Almas, or pinned by the Rockys.
It is a little easier to collect the outer four Heart Frames first before collecting the two inner frames. Remember to rest on the grass if an Alma is approaching, but don't get pinned in by one or two Rockys.
Once you have collected the four outer Heart Frames, you can run in a straight line from the right Heart Frame to the center Heart Frame, and beyond to the Treasure Chest to clear the stage.
This room can only be successfully completed by entering through the east entrance. When you arrive, you must begin pushing blocks aside in an alternating fashion so that you can create pathways to the hearts found at either end of the alleys found along the top and bottom of the stage. If you make a mistake, you can exit back out of the room and retry.
The difficult part starts once you collect all of the Heart Frames. The Skull in the center will block your access to the key, and it is trapped in there due to the grass. The only way to successfully obtain the key will be to lure it all the way into the lower right corner of the center. When it is there, you can enter into the center through the up Arrow Tiles, and let it chase after you, as you wind around the center in a counter-clockwise direction. Make sure that the Skull trails behind you and does not double back or you will be trapped.
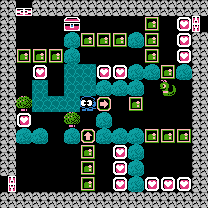
Begin by collecting the Heart Frame up and to the right of the Medusa. Then walk below the nearby Emerald Frame, and push it into position above the Medusa.
Next, collect the top two Heart Frames to your left, and push the nearby Emerald Frame into position to the left of the Medusa. The collect the remaining Heart Frames, and you will earn the Ladder Power.
Use the ladder one space to the right of the Treasure Chest, and cross over the lava to collect the two Heart Frames below, but do not pass the Arrow Tile. Instead, return over the ladder before it dissolves in the lava.
Next, pass through the Arrow Tile above the lava, and collect the three high Heart Frames above the two Gols.
Push the far right Emerald Frame down two spaces, and then stand beneath it and push it all the way back up against the Gol. Collect one of the two Heart Frames near the right Gol on the bottom, but not both. Collect the Heart Frames above and below the next Gol, and push the Emerald Frames beyond them in. Then push the remaining frame aside and collect the second to last Heart Frame.
When you are ready collect the final Heart Frame, and make sure you exit by passing between the two Gols and above the right Gol. Then walk back around the lava and up to the Arrow Tile, and use your newly acquired Arrow Power to change the direction of the arrow so that you can successfully reach the key on the other side.


 to return to normal and collect the key.


