Key Room[edit]
Once you complete room F-3, you will open a door to this room. When you step inside, you will see four doors, one along each wall. Each door is locked with a large key, so you will need four large keys to open every room. Inside the treasure chest of each room is one of four corners to a tablet. In order to proceed to King Egger's maze, you must collect all four pieces of the tablet. Once you have done this, a door to the first room of the final maze will appear.
Click on any image in the map below to be redirected to the solution section:
| Tablet Maze map | ||
|---|---|---|
 |
||

|

| |
 |
||
Top Room[edit]
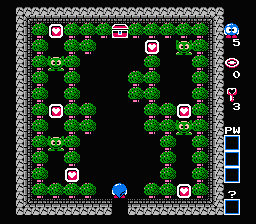
| Strategy | ★ | Agility | ★★ |
|---|
- Solution
Start by collecting the Heart Frame in the lower left corner, and luring the Leeper out. Stand near the trees on the right and let it touch you and fall asleep. Step back into the alley on the left and collect another Heart Frame, luring another Leeper out. Put this one to sleep close to the first one. Then step back in the left alley to collect the last Heart Frame. You should now have four egg shots. At this time, make your way to the top of the room and prepare to sweep through the right alley. Since you have four egg shots, its recommended that you shoot both of the remaining Leepers twice to remove them from the screen, and make it easier to clear the room faster.
Right Room[edit]
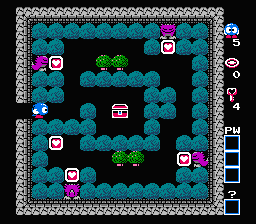
| Strategy | ★ | Agility | ★★ |
|---|
- Solution
Working your way around the room in a clockwise direction, collect each of the Heart Frames that sit directly in front of each Gol, saving the Heart Frame closest to the entrance for last. Collecting this last Heart Frame will give you two egg shots, which you will need to survive your escape from this room. When you're ready, stand half of a space between the two boulders to your left and approach the first Gol against the bottom wall. When you are lined up with him, face down, shoot one egg shot to block the fireball, and run to the right. The Gol on the right wall will shoot a fireball at you, but you can easily dodge it, and get past the trees to start heading up before the first fireball reaches the end. Next, you will approach the Gol along the top wall the same way that you did with the Gol on the bottom wall, shooting one egg shot at the Gol as you line up with him, before quickly ducking into the path on the left. Watch out for the left Gol's fireball and collect the tablet corner.
Bottom Room[edit]
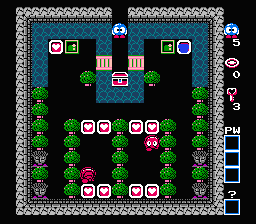
| Strategy | ★★ | Agility | ★★★ |
|---|
- Solution
- Collect both Heart Frames near the top of the room for two egg shots. Then approach the pair of Heart Frames blocking the left Alma in. Collect them when the left Alma is moving down, and then stand up by the bridges when the Alma chases you. Turn around and shoot the Alma, and push the egg straight up to the left side of the left Emerald Frame. Hop on the egg, and when you are above the Emerald Frame, push it down one space.
- While you are waiting for the Alma to respawn, push the Emerald Frame to the left half of a space, and then down one more space. The Alma will reappear and head up to the Emerald Frame. After touching it, it should move down into the left alley with the two Medusas. At this time, push the Emerald Frame down to trap the Alma in the alley. Then push the frame over to the left, and push it down until it half blocks the lower portion of the higher Medusa. The Alma will serve to block the lower Medusa's sight.
- Repeat the same exact process on the right side with the right Alma. When you have the Emerald Frames and Almas in place, you may collect the remaining Heart Frames along the bottom wall, and collect the next tablet corner.
Left Room[edit]
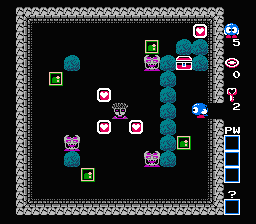
| Strategy | ★★ | Agility | ★★★★ |
|---|
- Solution
- Start by moving the Emerald Frame near the entrance down two spaces, and over to the left two and a half spaces. Once again, you must run along side the Don Medusas in order to survive being seen by the Medusa in the center. Do this along the outer edge of the room, leaving all of the remaining Emerald Frames in there place for the time being. Collect the Heart Frame in the upper right corner of the room.
- Come back to the highest Emerald Frame and, when it's safe, push it to the left one and a half spaces. Then, when the highest Don Medusa is to the right side, push the Emerald Frame down, trapping him in, but not pinning him. Then watch the movement of the other two Don Medusas, and collect the Heart Frame above the Medusa.
- Come down along the left side, pushing the left Emerald Frame down one and a half spaces as well, and then to the right one space to trap the Don Medusa in above you. Carefully dash in to collect the Heart Frame to the left of the Medusa.
- Finally, come down along the bottom, push the low Emerald Frame on the left one and a half spaces to the right, and then up to trap the lower Don Medusa in on the left. Collect the last Heart Frame, and the tablet corner.
Maze Rooms[edit]
The Maze rooms are not necessarily as difficult as some of the other rooms you have faced. In fact, a few contain various changes to the rules that help make solving the rooms a little easier. If you have asked for assistance from all four gods, you will be able to proceed through the tougher challenges. If not, you will likely be unable to complete the maze.
In addition to collecting the key in each room, you must also figure out which of the eight doors positioned around the room is the correct door to pass through. You can only access each room through the correct sequence of doors. If you happen to die, and are returned to room F-3, you must still remember the sequence of doors that you traveled through in order to reach the next room.
If you choose the wrong door, you will be sent to a particular room with five Heart Frames and eight Almas. It is entirely possible to solve this room and survive, but it's particularly challenging to complete safely, and it may just be faster to sacrifice yourself and return to try a different door. To solve this room, collect the bottom Heart Frame and lure the Almas out of the inner chamber. They should follow you around the outside of the room. Once all eight Almas are chasing you, time your approach to the rest of the Heart Frames in the middle, and finally to the chest.
Click on any image in the map below to be redirected to the solution section:
| King Egger's Maze map | ||||
|---|---|---|---|---|
Start V |

|

| ||

|

|

| ||

|

|

| ||
1st Room[edit]
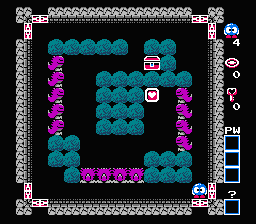
| Strategy | ★ | Agility | ★★ |
|---|---|---|---|
| Proper Exit | The left door along the bottom wall. | ||
- Solution
The East goddess will grant you super speed here. This speed should allow you to dash right into the heart of the room, collect the Heart Frame, and immediately turn around to get back to the key. While you have enough speed to avoid getting hit by the fireballs, if you hesitate for just one moment, you will get burned. Be sure to turn the corners just as soon as you hit the boulders.
2nd Room[edit]
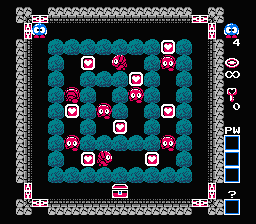
| Strategy | ★ | Agility | ★★ |
|---|---|---|---|
| Proper Exit | The top door along the right wall. | ||
- Solution
The South god will grant you infinite eggs, so you can collect each Heart Frame, and immediately shoot the Alma that's standing behind it twice to remove it from the screen. While it would be nice if you didn't have to worry about them coming back, you do. However, you can continue to remove them from the screen whenever they threaten you, or simply egg them in place if they're not in your way.
3rd Room[edit]
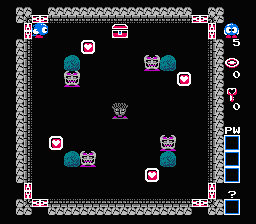
| Strategy | ★★ | Agility | ★★★★ |
|---|---|---|---|
| Proper Exit | The bottom door along the right wall. | ||
- Solution
This is fairly similar to the west room described above. You must move with the Don Medusas to avoid getting caught by the Medusa in the center. This time, you must aim to collect each Heart Frame as you move. You can safely collect them while running with the Don Medusas, and they won't be able to see you when they hit the boulder and bounce back. Start by collecting the Heart Frame closest to the entrance first, then begin moving with the Don Medusas in a counter-clockwise direction around the room until you reach the top wall. Then move with the top Don Medusa to safely collect the key.
4th Room[edit]
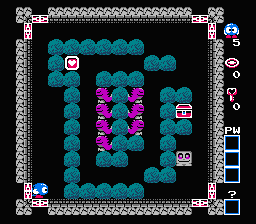
| Strategy | ★ | Agility | ★★ |
|---|---|---|---|
| Proper Exit | The right door along the top wall. | ||
- Solution
You need to lure the Rocky into the center of the room, and you need to do this so that he goes in ahead of you. Stand in the upper right corner of the room to lure him there. Then walk left one space, and down towards the chest. Rocky should follow behind you. When you split off to the right and go up, he should head into the tunnel to the left. Now you must very carefully follow behind him, never lining up with him vertically, or he will turn around and come back out. Wait near the bottom of the tunnel for Rocky to reach the top and turn right before running up to the top and collecting the single Heart Frame before coming back out and stopping just shy of the first Gol. Stand there until Rocky comes along behind you and shoves you down the corridor, blocking every fireball that the Gols shoot at you. Come back up along the right side of the tunnel and let Rocky push you again so that you can safely escape and collect the key.
5th Room[edit]
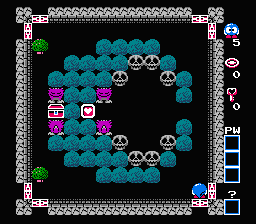
| Strategy | ★ | Agility | ★ |
|---|---|---|---|
| Proper Exit | The left door along the top wall. | ||
- Solution
With Gols and Skulls everywhere, this room may look to be simply impossible. And without the North god's help, it is. However, he will make good on his promise to vanquish all of your enemies. Once you collect the Heart Frame, all of the enemies will be suddenly blown away. Don't sit around though, they will come back, and if they do, you won't have any chance of surviving. Grab the key as quickly as possible.
6th Room[edit]
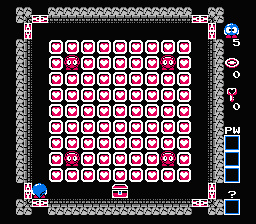
| Strategy | ★★ | Agility | ★★ |
|---|---|---|---|
| Proper Exit | The bottom door along the left wall. | ||
- Solution
As a precaution, you should collect every Heart Frame except for the four Heart Frames that surround each Alma. If you do this, you will have 32 egg shots, and only 16 Heart Frames to collect. As you approach each Alma, collect one of the Heart Frames surrounding it, and immediately shoot it with an egg shot. If you're worried about the timing, tap ![]() rapidly as you approach each Alma. You'll waste a few egg shots, but you shouldn't miss the Alma. You don't have to remove them, but you have plenty of egg shots, so you can afford to. Do this with all four Almas, and you should have no problem collecting the key.
rapidly as you approach each Alma. You'll waste a few egg shots, but you shouldn't miss the Alma. You don't have to remove them, but you have plenty of egg shots, so you can afford to. Do this with all four Almas, and you should have no problem collecting the key.
7th Room[edit]
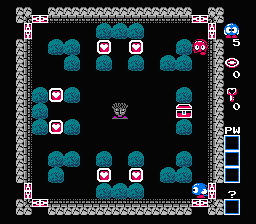
| Strategy | ★★ | Agility | ★★★ |
|---|---|---|---|
| Proper Exit | The right door along the bottom wall. | ||
- Solution
- Your timing has to be very precise here, or you will lose control of the Alma. As soon as the action begins, run left and up in order to attract the Alma to roll across the screen, protecting you from the Medusa's gaze while you collect the two lowest Heart Frames.
- Stand down near the bottom wall to lure the Alma to the right, and then head up, running into the path with the two left Heart Frames while the Alma runs up. You cannot move to the left after you move up until the Alma is moving up. If you don't do this correctly, and lure the Alma to the left, it won't protect you, and is likely to collide with you, so you must move very quickly.
- When the Alma walks around the upper left corner, stand just below the top boulders to lure the Alma into rolling to the right, and then head up to collect the top two Heart Frames while the Alma protects you from the Medusa.
- You're not finished with the Alma yet. You need to get him to run down in the same fashion that you got the Alma to run up in step 2. Stay along the left side until the Alma is moving down before running to the right to collect the key from the other side. When you stop to collect the key, the Alma will tuck up and roll toward you, but collecting the key should remove it before you collide.
8th Room[edit]
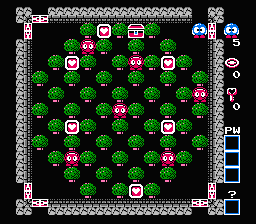
| Strategy | ★★ | Agility | ★ |
|---|---|---|---|
| Proper Exit | Either door along the top wall. | ||
- Solution
The West god said he'd teach you how to yell so that your shout could cut down trees. And that's exactly what you can do here. Press ![]() when in front of a tree to remove it. The trick is that you don't want to free any Almas. That should be very easy to figure out with every Heart Frame with the exception of the one along the top wall. In order to reach this Heart Frame without freeing the Almas closest to it, you should walk through the treasure chest, and approach it from the right side. Then grab the key and leave.
when in front of a tree to remove it. The trick is that you don't want to free any Almas. That should be very easy to figure out with every Heart Frame with the exception of the one along the top wall. In order to reach this Heart Frame without freeing the Almas closest to it, you should walk through the treasure chest, and approach it from the right side. Then grab the key and leave.
Final Battle[edit]
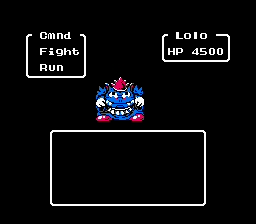
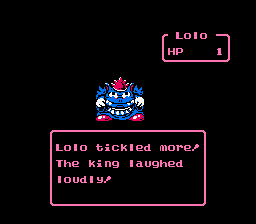
Once you complete the eighth maze room and take one of the north exits, you will arrive in the throne room of King Egger. What takes place now is a mock turn-based RPG-like battle. This is meant to be a light hearted joke that lampoons several popular Famicom RPGs, most notably the Dragon Quest series.
In addition to the "Fight" command which remains at the top of the menu, various other commands appear as well. At first, they are typical RPG commands like "Defend", "Run" (which never works) or "Magic" (Lolo doesn't know any spells!), they start becoming a little more bizarre as the battle goes on. The list of possible commands includes: Dance, Laugh, Glare, Sleep (which puts both you and King Egger to sleep), Shout, and Joke (the first two make King Egger laugh, but the third joke bombs). Eventually, a final command, "Tickle", will appear, but only once you have reduced King Egger's health points by a certain amount.
Lolo will get hit during the battle, but he will only ever lose all but one health point. Once Lolo is down to one health point, he will never take any more damage for the rest of the fight.
Once the Tickle command is available, you must use it three times to defeat King Egger and rescue Lala. Congratulations on making it all the way through this very difficult game.