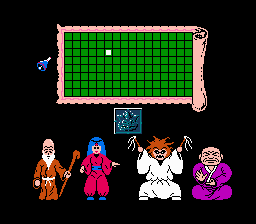
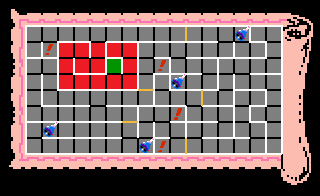
Eggerland Meikyuu no Fukkatsu continues with the non linear progression established in the original Eggerland. However, compared to the first game, this version is actually far more linear. Very rarely are you given the opportunity to choose from more than one exit, and when a second one exists, one of the two paths will end up in a dead-end, typically in a room that contains a large key. You must navigate through King Egger's dungeon, clearing each room one by one. You begin your quest in the lowest room of the right column of the dungeon. Only after you collect the map can you see your current progress through the castle by pressing ![]() , which brings up the screen shown to the right. As you clear each room, a set of doors will open up, allowing you to choose which direction to travel in. Unlike the original game, you no longer have to worry about choosing between multiple doors for one room, or which entrance allows you to properly solve the puzzle, with one single exception later in the game. In some stage descriptions, one of the exits may be highlighted to indicate which direction is recommended.
, which brings up the screen shown to the right. As you clear each room, a set of doors will open up, allowing you to choose which direction to travel in. Unlike the original game, you no longer have to worry about choosing between multiple doors for one room, or which entrance allows you to properly solve the puzzle, with one single exception later in the game. In some stage descriptions, one of the exits may be highlighted to indicate which direction is recommended.
Room difficulties[edit]
You should also be able to determine the relative difficulty of the room. For each description, a room is ranked on two levels of difficulty; strategy and agility. The rankings range from one star for easy for four stars for difficult. Consult the following charts for more information.
| Rank | Strategy | Agility |
|---|---|---|
| ★ | The room requires little to no strategy, allowing you to collect the Heart Frames in roughly any order you please. | You can take your time clearing this room, as there are little to no physical threats that pose a danger. |
| ★★ | A little planning or forethought is required to get through a few of the steps in this room, but you are not bound to only one method of clearing the stage. | A Skull, Alma, or Don Medusa may be present in the room, but you should be able to deal with them and prevent them from becoming a nuisance. |
| ★★★ | The steps to clearing this room must be planned out or some specific knowledge is required, such as where removed monsters might reappear if you put an Emerald Frame over their original location. | A good number of moving threats must be avoided as you move through the room. Multiple Almas must be dealt with, or you must bravely tread where Don Medusa's might be able to see you. |
| ★★★★ | In order to clear this room, you must carefully follow a long set of specific instructions. One mistake will prevent you from clearing this room, and you will have to start over. | These rooms typically contain many threats with few restrictions or safety zones. These rooms are the ultimate test of your reflexes. |
In addition to these rankings, some rooms have a unique feature that must be exploited in order to clear the room. These features show up under the "?" in the lower left corner of the screen. For example, if a treasure chest is shown in the "?" box, the solution will involve performing some action on the chest, such as touching it, or shooting it with an Egg shot. Always be on the lookout for these unusual rooms (there are only a handful of them), and keep your mind open to unusual clear methods.
Clearing the dungeon[edit]
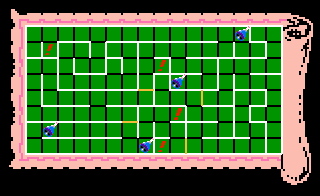
Shown to the right in an enhanced view of the King Egger's castle map. The white walls indicate sections where passage between two rooms is impossible. You begin in the lower right corner, and progress is fairly linear throughout the dungeon. Some of the rooms contain doors that are locked with a large key. You must typically find these large keys in a room at the end of a path, and return to these rooms to unlock the door and continue. These doors are marked by a yellow line.
In order to defeat the game, you must reach the room that gives you access to King Egger's final challenges. Along the way, you may discover a bell which rings whenever a secret entrance can be discovered by pushing Emerald Frames together in a straight line. These rooms are indicated on the map by the bell. The secret entrances lead to the North, East, South, and West dungeons, where a god is being held captive. If you rescue these gods, they will bestow a special power to you when the time is right that will help you complete one of the final challenges. In addition, four rooms simply contain people who provide you with hints. These rooms are indicated on the map by a red "!".
Once you open the door to King Egger's final challenges, you will need four large keys to open all four doors that lead from a central chamber in different directions. After you complete all four of the rooms off the chamber, another door will appear which leads to a final set of puzzles within a maze. You must discover which of the eight doors to take in order to advance all the way through the maze and to the final showdown against King Egger.
Labyrinth areas[edit]
In Eggerland 2 (the previous title in the series), 80% of the rooms had three or more doors, and only 20% were "linear" (one entrance door and one exit door). There were no dead-end rooms at all.
Not so in Eggerland: Revival of the Labyrinth, where 80% of the rooms are linear. The remaining ones are either "dead-ends" (one door only) or "forks" (one entrance door and two exits). No room has more than two exit doors. Furthermore, each single fork room is connected (directly or through some rooms) to one dead-end room, and in each dead end a special item can be found.
The walkthrough is organized so that every guide page includes one fork and ends with the corresponding one dead end (with one exception, that is a loop). In every dead end Lolo gets an important item or two, that give the title to the guide page.
|
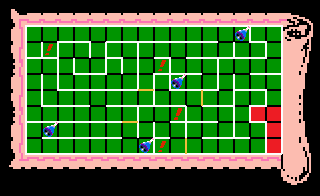
Lolo starts in the south-east corner of the labyrinth. After few rooms, there is the first fork: to the north, the labyrinth continues; to the west, there is the first dead end with the map. |
|
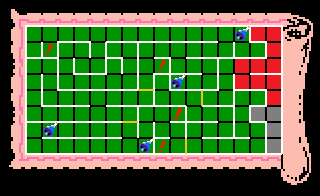
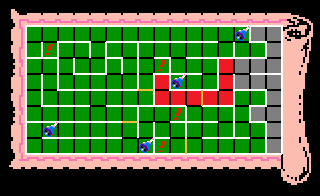
From the first fork, let's take the north exit. After some rooms, there is the second fork: to the west, Lolo will get to a double-locked gate; to the east, he will reach a second dead end with the 1st big key. |
|
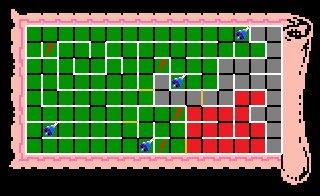
From the second fork, let's take the west exit. After some rooms, there is the third fork: to the south, the labyrinth continues; to the west, Lolo will reach the third dead end with the 2nd big key. |
|
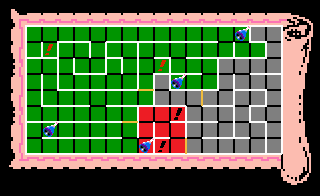
From the third fork, let's take the south exit. After some rooms, there is the fourth fork: to the west, the labyrinth continues; to the east, Lolo will reach the fourth dead end with the bell. |
|
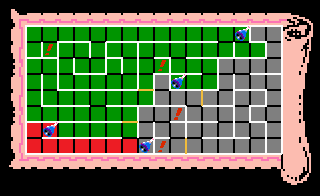
From the fourth fork, let's take the west exit. After some rooms, the bell will ring: this is the fifth fork. To the west, the labyrinth continues; in the secret door, Lolo will reach the fifth dead end with the South god. |
|
From the fifth fork, let's take the west exit. In the next room there is the sixth fork: to the north, the labyrinth continues; to the west, Lolo will enter a loop that leads to the 3rd big key and the East god, that is in the sixth dead end. |
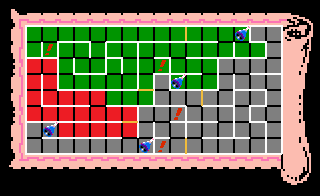
|
From the end of the loop, let's take the north exit. After some rooms there is the seventh fork: to the east, the labyrinth continues; to the west, Lolo will enter another loop (replacing the seventh dead end) that leads to the 4th big key. |
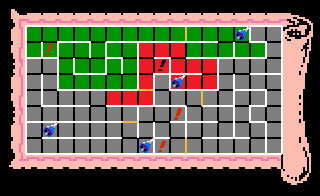
|
From the seventh fork, let's take the east exit. After some rooms, there is the eighth fork: to the west, the labyrinth continues; to the east, Lolo will reach the eighth dead end with the 5th big key and the North god. |
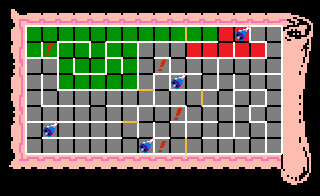
|
From the eighth fork, let's take the west exit. After some rooms, there is the ninth fork: to the west, the labyrinth continues; to the east, Lolo will reach the ninth dead end with the 6th big key and the West god. |
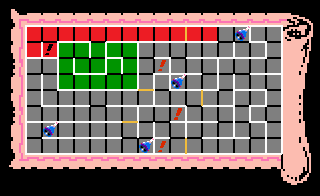
|
From the ninth fork, let's take the west exit. After some rooms, there is the tenth fork: to the south, the labyrinth continues; to the west, Lolo will reach the tenth dead end with the 7th big key. |
|
From the tenth fork, let's take the south exit. After some rooms, there is the eleventh fork: to the north, the labyrinth continues; to the east, Lolo will reach the eleventh dead end thus collecting the 8th and 9th big keys. After that, Lolo can go back to the eleventh fork and continue to King Egger Rooms. |