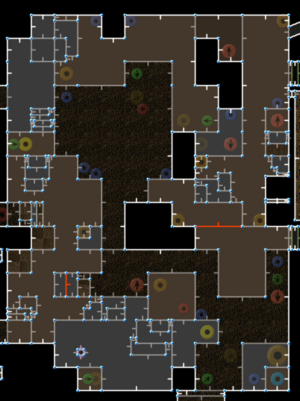
The storage facility has the player starting to the north of a large warehouse, and has him run around the outside of the building before entering. In deathmatch, the action is strictly contained within the warehouse, with the outdoors being permanently sealed.
Outdoor run[edit]
Collect the shotgun and eight extra shells.
The northern building contains several few sergeants and imps, as well as a blue armor.
The building immediately south contains fewer monsters, but provides the super shotgun. There are also monsters waiting to the south of this building.
A chain gunner is in the tower just west of these two small buildings. You can retrieve a computer map from this tower.
A revenant will try sniping rockets at you, but they are easily dodged. You can either kill it with the super shotgun, or run past them.
On easy difficulty, you can collect invisibility in the southwest corner.
On the southern end, there are imps, and a rocket launcher within a 5-pointed star. Collecting the rocket launcher will release the arch vile. The mega sphere is visible, and can only be reached by a damage boost from the arch vile.
The south east corner contains a berserk pack, and a chainsaw. If you explore the buildings, destroy any barrels you see before they become an issue.
When you are finished your work outside, enter one of the two usable doors (located on the center and left) to the central building. When you enter, collect either the red or blue key before heading to the exit.
Blue key[edit]

The blue key is located in the center section of the facility. To reach it, simply climb the crates.
First, climb onto the brown crates either from the central connector or by following the left wall from the entrance of the center section.
Note that the center section has two traps, both marked by red lines on the map. When crossed, they will allow monsters to teleport into the area.
The first trap is avoided simply by using the central connector rather than climbing the crates from the ground. The second trap is after the crate-stair to the southern red-key door, and is avoided by jumping across the corner. The second trap can also be ignored by choosing the northern red key door.
Red key[edit]
The red key is located in the left section of the facility.
To reach it, you need to pass through either the northern or southern connector between the left and center sections. The southern connector provides direct access, while the northern connector requires you to travel through the room first.
Exit[edit]
If you only have the blue key, you must use the door to the south of the eastern section. If you only have the red key, you must use the red-key doors within the facility. From inside the exit area, you can pass through the doors without the red key, but you must have the blue key to return outside.
If you fall down (or enter by the blue key door), you can climb back to the upper area by using the crates in the south-west corner of the room.
The most direct path to the exit is from the northern connector from the central section. However, a plasma gun is reachable if you choose the southern connector (or climb the crates).
Secrets[edit]
There are two secret sectors, in the same area.
When you enter the center building, there is a floor-level connector between the west and center sections. On the wall opposite of the lights, open the door to reveal a hidden room. The second secret is further in, accessed by lowering the lift and stepping on the lowered lift.
While not technically a secret, walking through this room will open a door in the southern connection corridor. It's difficult to reach when arriving from the north, and easier if you cross the center line from the south. If you can get through this door, you can collect a megasphere.