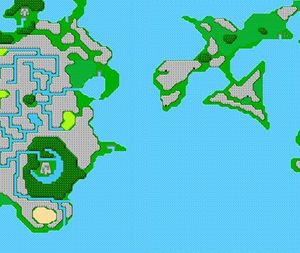
Now the Light Warriors have passed beyond the inner lands to the great Western Sea. Here they will encounter the first of four elemental forces and enemies far stronger than any they have met up to now. The once beautiful town of Melmond is a source of information, magic, weapons and a place to recover strength.
Melmond[edit]
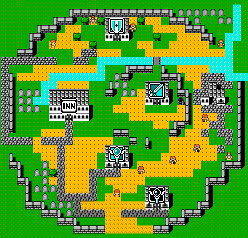
Melmond, a town near the port just west of the canal, is your next destination. Talking to the townspeople will reveal stories of Vampires plaguing the streets, and the existence of a Titan. Learn about Sarda the Sage, and meet Dr. Unne, who likes to study ancient languages. His skills may be of use to you later in the game.
Stay at the inn to restore your party's HP and MP, buy spells, and supplies. If you utilized the Magic Key fully, you won't have much need to purchase weapons. Buying and equipping Silver Armlets (Bracelets) however, will prove useful for raising Defense. The Knight's Armor is expensive and probably not worth it. Use your money on the powerful black and white spells available in Melmond. You may be unable to learn some of the spells until your character class has been upgraded.
When you're ready, head southwest to the formidable Cavern of Earth. In the western region of this continent, the rot of the land is evident. Much of the area is covered in vast swamps, and the monsters you encounter here can cause various status ailments, such as darkness or poison.
| Inn: 100 Gil | Sanctuary: Unavailable |
|---|---|
| L5 White magic: 8000 (5000) Gil | L5 Black magic: 8000 (5000) Gil |
| Curaga, Diaga, Life, Healara | Firaga, Scourge, Teleport, Slowara |
| Weapons | Armor |
| Crosier: 200 (160) Gil | Knight's Armor: 45,000 (36,000) Gil |
| Saber: 450 (360) Gil | Silver Armlet: 5000 (4000) Gil |
| Long Sword: 1500 (1200) Gil | Grand Helm: 450 (360) Gil |
| Falchion: 450 (360) Gil | Bronze Gloves: 200 (160) Gil |
| Steel Gloves: 750 (600) Gil |
Note: At this point, the town nestled in Crescent Lake is also available to you if you sail south of Elfheim and follow the continent to the east. You can buy a wealth of more powerful equipment there, although you are likely to have to save up for it first. If you find that your offense and defense is not where you wish it to be, consider taking a detour and visit Crescent Lake to do some shopping, and return to Melmond to resume your quest.
Cavern of Earth[edit]
Tucked between two large mountain ranges lies the entrance to the Cavern of Earth (aka the Earth Cave). Two major tasks await you inside, but the dangers are countless. You won't be able to explore its depths fully until you gain the Earth Rod from Sarda—but to find Sarda, you'll need to defeat the Vampire located three levels down.
Floor 1[edit]
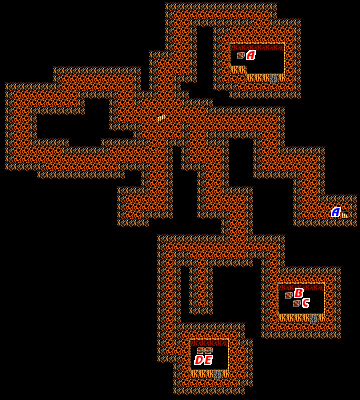
- A: 1975 Gil
- B: NES - Pure, GBA - Antidote
- C: 795 Gil
- D: 880 Gil
- E: NES - Heal, GBA - Potion
An area called the Hall of Giants lies just left of the entrance. In this branching corridor you will encounter Hill Gigas (Giants) and Lizards (Iguanas) at every step. Avoid it unless you want to fight large monsters and level up quickly. With each victory, you will earn 219 experience points and 879 Gil per Gigas! (Fighting Gigas is easiest with the Great Sword (Giant Sword), which you find in the Mt. Gulg Volcano.)
To reach the second floor, simply head right from the cave entrance, and follow the path until you reach the staircase at A.
Floor 2[edit]
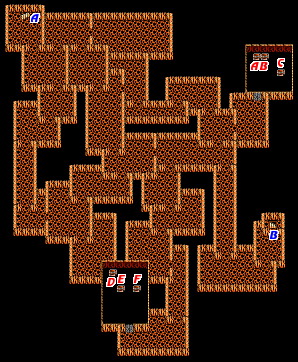
- A: Coral Sword
- B: NES - Cabin, GBA - Tent
- C: 330 Gil
- D: 5000 Gil
- E: NES - Wooden Shield, GBA - Leather Shield
- F: 575 Gil
Enemies in the Cavern of Earth are strong, so come prepared with the basic necessities: Tents and Potions. Keep an eye out for Cockatrices—though they're weak, they have the ability to turn your party members to stone. Bring extra Gold Needles (Soft) to avoid long detours in your quest.
By now, you will have also noticed that many of the treasure chests are guarded by Earth Elementals. Don't underestimate the power of these creatures. Though they appear few in number, they are powerful and resistance to many types of magic. They are, however, weak to Fire magic, and they provide great amounts of experience points when defeated.
When you're done exploring for treasure, you will find the staircase to the third floor, B, in the lower right corner of the dungeon, opposite from the corner you entered.
Floor 3[edit]
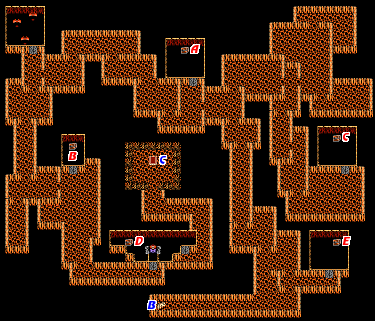
- A: 3400 Gil
- B: 1020 Gil
- C: NES - Heal, GBA - Gold Needle
- D: Star Ruby
- E: NES - Tent, GBA - Sleeping Bag
While exploring this expansive floor, be prepared for ambushes by Piscodemons and Cockatrices. Remember to heal up before examining every chest; you never know when you'll be ambushed by a fight that you can't run away from. Once you make it all the way around to the lower left side of the floor, you will reach a small chamber, whose inhabitant is none other than a Vampire.

- HP: NES - 156, GBA - 280
- Experience Points: 1200
- Gil: 2000
Though he is powerful, you can defeat the Vampire quickly by using Fire and Dia spells. Hit him hard right off the bat before he has a chance to try out his nasty attacks on you. The Vampire's magic can stun a warrior and put him out of action.
Defeating will earn you the Star Ruby, which you'll need to take to the Titan's cave before going any farther into the cavern. If you explore the region behind the Vampire's chamber, you will discover an immovable Stone Plate C. You won't be able to access the floor below, so head out of the Cavern of Earth for now.
Titan's Cave and Sage's Cave[edit]
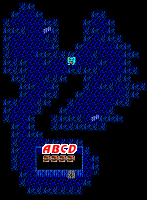
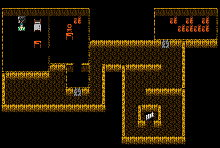
The next destination is the Titan's Cave, which is west of the isthmus that leads to the Cavern of Earth. Titan's Cave is very small and guarded by a giant titan. It is impossible to fight your way past the titan. He won't allow you to pass unless you feed him with the Star Ruby. Be sure to collect the treasures before you pass through to the Sage's cave.
- A: NES - Silver Helmet, GBA - Mythril Helm
- B: 450 Gil
- C: 620 Gil
- D: Great Axe
Having won the Ruby and passed through the Titan's Cave, you will find the cave of Sarda and the old sage inside. As a reward for your hard journey, Sarda the Sage will give you the Earth Rod. Take the item back to the Cavern of Earth to gain access to its lower levels.
Terra Cave revisited[edit]
After the quick detour, head back to the Cavern of Earth with the Earth Rod to open the passageway that leads deeper. You may want to stop in Melmond for supplies and healing—there is much left to explore in the cavern. When fighting monsters, try equipping different swords during battle to use their special abilities. If your HP or MP is getting low, return to the surface, use a Tent and save.
With the Rod, return to the section behind the Vampire's chamber, and use it on the Stone Plate. You will pry the plate from the ground, granting you access to the floor below.
Floor 4[edit]
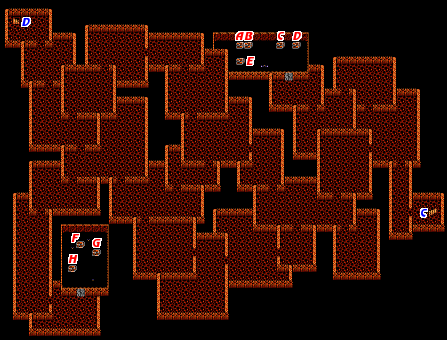
- A: 5450 Gil
- B: 1520 Gil
- C: NES - Wooden Staff, GBA - Staff
- D: 3400 Gil
- E: 1455 Gil
- F: 1250 Gil
- G: NES - Silver Shield, GBA - Mythril Shield
- H: NES - Cabin, GBA - Tent
Now you're entering the depths of the Terra Cave, drawing closer to the true source of the earth rot. Some tougher enemies will be waiting for you down here. Earth Elementals won't be the only source of treasure-searching ambushes. You will also encounter groups of Ogres and Hyenadons, and the occasional high-experience point granting Sphinx.
Gather the valuable items from the treasure chests that you find as you explore the floor. The Mythril Shield (Silver Shield) is a particularly good find; it will raise a party member's Defense significantly. Equipping your party with the strongest weapons and armor possible will aid you greatly in the upcoming battle.
Head for the staircase in the upper left corner, D, to descend deeper into the cavern.
Floor 5[edit]
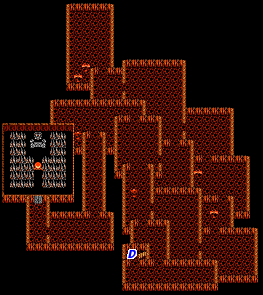
You've made it down to the deepest level of the cavern. There are many powerful foes here, and not one treasure chest to be found. Don't waste any time exploring the chambers to the right. Make your way quickly to the top until you can move left and down again, and follow the path until you arrive at a chamber. Heal up your party, and prepare to face the true boss of the Cavern of Earth.

- HP: NES - 400, PS - 800, GBA - 1200
- Experience Points: 2200
- Gil: 3000
Lich's bag of tricks includes a wide variety of attack spells. Lich can use a wide assortment of powerful black magic. Your best move is to enter his room with full health and boost your fighting warriors with Haste (Fast). NulBlaze or NulFrost may also protect you against his elemental attacks.
Because of his large amount of HP and high Defense, you'll need to be patient. Hit him with your most powerful Fire spells using Black or Red Mages. When your White Mage (assuming you have one in your party) isn't healing or protecting other members, use Dia spells to exploit Lich's status as one of the undead. Equip the Rune Blade to a compatible party member to do extra damage using physical attacks.
Defeating Lich causes a portal to appear in the back of this room, which is a welcome sight. Once you have defeated the abominable beast and lit the Earth Crystal, head into the portal for a free ride back to the overworld.
With the first crystal lit, return to Melmond, rest, save, and buy whatever supplies you need. Then hop on board your ship, and set sail for Crescent Lake.

