With new powers and resolve, the Light Warriors open the door to their greatest challenge yet. From the towns on Onrac and Gaia comes many rumors of fantastic machines, of a shrine that sank with the coming of the Fiend of Water, and of robots that fall from the sky.
Gaia[edit]
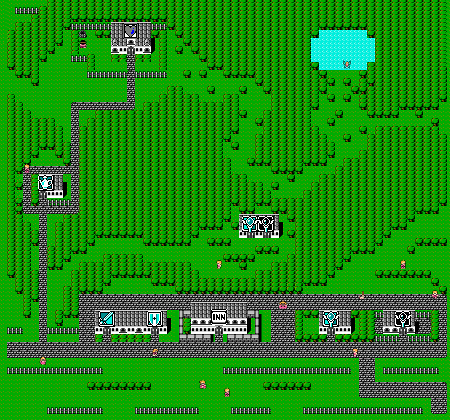
Nestled in a narrow mountain valley, the town of Gaia is well protected from the troubles of the wide world beyond as it is accessible only by airship. If you haven't visited yet, you'll learn from the townspeople that outsiders call it the Eye of the Hawk, because the continent is shaped like a hawk's head. Some of the most powerful magic that the game has to offer is sold in this town.
If you have a Black Wizard in your party you will have noted that he has no great strength for fighting. The Cat Claws, the only weapon for sale in town, can help change that. It is arguably the best weapon in the game for Black Wizards; it increases their physical attacks substantially. The Protect Ring protects against instant Death spells. Many of the creatures you'll soon meet use such magic and the results can be devastating. Equip as many warriors as you can afford to with a Protect Ring.
Buying magic spells is starting to get expensive, but with all the loot you've collected from the Volcano, Ice Cave, and Citadel of Trials you should have plenty. All of the available Level 7 spells are valuable. Holy (Fade), NulAll (Wall), Stop, and Warp (Zap) are all good buys in the Level 8 shops. Stop will freeze time for some enemies including one powerful fiend whom you've already met.
Gaia is home to a spring once inhabited by a faerie. At one time, a faerie lived in the quiet pond in the back of town, but by the time the Light Warriors arrive on the scene she is gone. Clues are given both here in Gaia and in Onrac. Buy new weapons and spells in Gaia, but save some Gil. You'll need 40,000 for your next objective: recovering the faerie from the Desert Caravan.
| Inn: 300 Gil | Sanctuary: 750 Gil |
|---|
| L7 White magic: 45,000 (30,000) Gil | L7 Black magic: 45,000 (30,000) Gil | L8 White magic: 60,000 (40,000) Gil | L8 Black magic: 60,000 (40,000) Gil |
|---|---|---|---|
| Curaja, Diaja | Blizzaga, Break | Holy, NulAll, Dispel | Stop, Warp, Kill |
| Weapons | Armor | Items | Items (DoS/AE) |
| Cat Claws: 65,000 (52,000) Gil | Ruby Armlet: 40,000 (20,000) Gil | Potion: 60 (40) Gil | Hi-Potion: 150 Gil |
| Protect Ring: 16,000 (10,000) Gil | Antidote: 75 (50) Gil | Ether: 150 Gil | |
| Tent: 250 (125) Gil | Tent: 160 Gil | ||
| Cottage: 3000 (2000) Gil | Cottage: 2000 Gil | ||
| Phoenix Down: 500 Gil |
Onrac[edit]
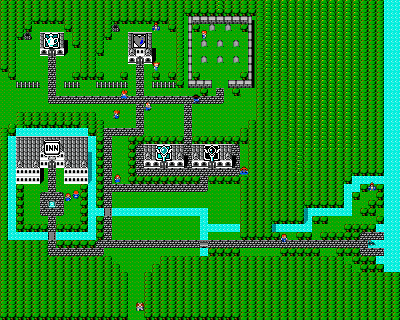
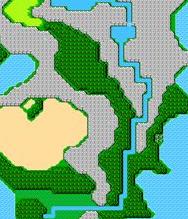
Onrac can be seen to the west of the Cardia Island chain. However, there is no safe place to land nearby. Follow the river south until it leads to a grassy plain where you can land the Airship, and then follow the river back up to Onrac. There, the Light Warriors hear much about mermaids and robots and other fantastic beings. The townspeople tell stories of a shrine that sank into the sea long ago and is now inhabited by mermaids. At the port, you will find a submarine that can take you to the Sea Shrine where the mermaids live. You'll also meet Dr. Unne's brother from Melmond. There are no weapons or armor for sale in Onrac, but there are item and magic shops. Check out the magic shops, being sure to pick up the white spells Healaga and the black spell Saber.
As people both in Onrac and Crescent Lake tell you, until the coming of the Water Fiend 200 years ago, Onrac was part of a great civilization. Part of that power was derived from the good will of the mermaids who lived nearby in a shrine, but now the shrine has been lost beneath the waves. Onrac is still the place to hear news of the world though. In speaking to the citizens, you will learn that there was something very strange being offered for sale at the Caravan. The Caravan Master's daughter reveals the location of the Caravan. It is at the oasis in the Western Desert. Make sure you have lots of Gil when you go to buy the faerie.
One man insists that he saw a shiny object fall from the sky and others have seen a robot to the north near the Great Waterfall. Near the inn in Onrac you'll come across Dr. Unne's brother. He tells the Light Warriors that Unne has been unraveling the mysterious language of Lefeinish, but that a stone tablet with valuable translations is needed to finish the work. A woman in town says that many treasures sank with the Sea Shrine and that one of them was a stone plate.
| Inn: 300 Gil | Sanctuary: 750 Gil |
|---|---|
| L7 White magic: 45,000 (30,000) Gil | L7 Black magic: 45,000 (30,000) Gil |
| NulDeath, Healaga | Saber, Blind |
| Items | Items (DoS/AE) |
| Potion: 60 (40) Gil | Hi-Potion: 150 Gil |
| Antidote: 75 (50) Gil | Ether: 150 Gil |
| Tent: 250 (125) Gil | Remedy: 1500 Gil |
| Cottage: 3000 (2000) Gil | Cottage: 2000 Gil |
| Gold Needle: 800 (500) | Gold Needle: 500 Gil |
Desert Caravan[edit]
In the northern part of the desert west of Onrac, near the green oasis, a caravan has set up a camp for business (note: there is no visible caravan, only about 10 steps of desert surrounded by grass, isolated from the larger desert). One specialty item is for sale that is of utmost importance to the Light Warriors. Land your airship in the small spot of grass southeast of the desert west of Onrac. On the north end of the desert, walk onto the isolated piece of sand to enter the caravan. It may be a bug, but you can land on the caravan with the Airship in the original NES version. When you reach him, he only has one item to sell. Although unmarked, the Bottle commands a stiff price. Its contents must be very rare and valuable. In fact, the Bottle contains the faerie from Gaia. You'll have no choice but to pay the asking price.
Once you have possession of the bottled faerie, take it to the faerie's spring in the northern part of Gaia and open it by selecting Bottle from the item subscreen. The faerie, once released, will give you a supply of Oxyale, which is an essential part of the submarine in Onrac.
After selling the faerie, the caravan disappears from the NES version. In later versions, he sticks around to sell items. In the Dawn of Souls version and beyond, he sells a variety of tonics that temporarily increase stats while engaged in battle, and which can't be purchased anywhere else.
| Items | Items (DoS/AE) |
|---|---|
| Potion: 60 (40) Gil | Giant's Tonic: 1500 Gil |
| Antidote: 75 (50) Gil | Faerie Tonic: 1500 Gil |
| Gold Needle: 800 (500) Gil | Strength Tonic: 1000 Gil |
| Protect Drink: 1000 Gil | |
| Speed Drink: 1000 Gil |
Sunken Shrine[edit]
To review, since the Sea Shrine sank there is just one way to reach it: by using the Submarine in Onrac. But to do that you'll need Oxyale, and Oxyale must be given to you by a faerie. Unfortunately, since the faerie has been sold to a caravan, she can't help you unless you buy her back. If you go to the Western Desert, near an oasis, you'll find the Caravan. Buy the Bottle, as it contains the faerie inside, and take the Bottle to the faeries spring in Gaia. Release the faerie and receive the Oxyale. Now take the Oxyale back to Onrac. Finally, you'll be allowed entrance to the submarine. Simply enter the submarine and you'll be taken to the Sea Shrine.
After a short submarine ride from Onrac, you'll find yourself in the middle floor of a shrine inhabited by monsters and mermaids. Above, stories from Onrac of mermaids in distress will become a reality in the Sunken Shrine. Below you'll need to defeat Kraken, the Fiend of Water, to light the Water Crystal. Seek out the mermaids first. They have many treasures that will help you in the battles in the lower part of the Shrine. The lightning-based spell Thundaga will also be helpful against the area's aquatic foes.
Floor 1[edit]
|
|
Beneath the sea your most potent magic is lightning. Thundaga will give your watery foes a jolt few can withstand, but lesser Thunder and Thundara will also give them quite a charge. The Zeus Gauntlet will also be a substantial help, giving the user the ability to cast Thundara every turn for free. By now, you should also have purchased the Exit spell in Crescent Lake.
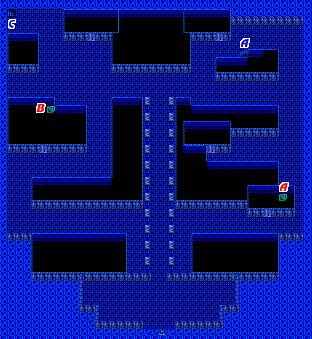
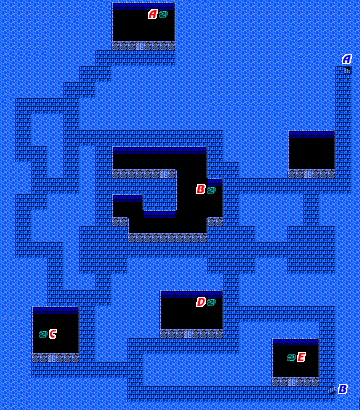
The entrance to the shrine contains two staircases. The staircase on the right, A leads up to the second floor, while staircase C on the left leads down to the basement. The mermaids await you on the top floor, and can provide the Light Warriors with some assistance. Take staircase A first.
Floor 2[edit]
|
|
Even before you arrive at the top floor, you'll find a surprising amount of useful items on this floor. The Diamond (Opal) Armor at the top is one of the strongest armors available for Fighters and Knights. The Light Axe and the Mage Staff are usable items like the Zeus Gauntlet and Healing Staff. The Light Axe is capable of casting Diara. Now anyone can cast this White Mage-only spell. The Mage Staff will cast Fira when used. It's not especially powerful, but it's useful when you're up against multiple enemies. Gather up these treasures, and head over to staircase B to climb up to the top floor.
Floor 3[edit]
|
|
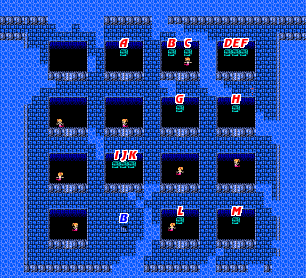
Visit each mermaid and collect the treasure. Most important, however, is that you find the Rosetta Stone that Dr. Unne needs to understand Lefeinish. Follow the corridor at the upper left hand corner of the top floor. It will shoot you across to the upper right hand corner where you can reach an isolated room. This room houses the Stone and other useful items.
One of those useful items is the Diamond Armlet (NES: Opal Bracelet); the only one in the game. This piece of equipment seems uniquely designed for the Monk/Master. It raises his Defense without dramatically lessening his Evade %. Your Master can wear very light items without negatively affecting his natural evade and defense abilities (-1%/item). Having him equipped with the Opal Bracelet, the Protect Ring and the Ribbon give him maximum absorb, death protection and elemental/status attack protection respectively. It's worth the trade off. This combination (plus the Protect Cloak (NES: ProCape)) is optimal for the Ninja or Red Mage. If you are using 2 warriors, a good strategy is to give the Diamond Armlet to your Black Wizard and then place him in the 3rd position with your White Wizard in the 4th and most protected position.
Once you're done here, it's time to head down to the basement. Make your way all the way down to the first floor where you entered the shrine and cross over to the left to reach staircase C. Take it down to follow a confusing sequences of staircases up and down throughout the shrine. If you're having a tough time keeping your health high, you may wish to exit the Shrine and rest up in Onrac before you continue.
Shrine floors[edit]
|
|
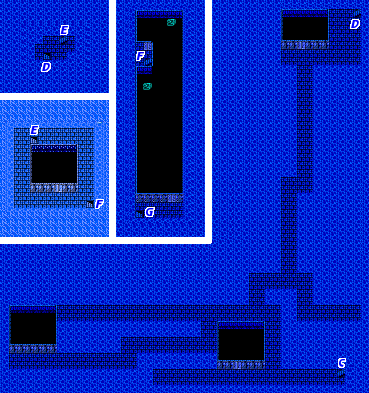
The following sequence will take you through three different floors in your effort to advance deeper into the shrine. You start by arriving at the top of the first basement through staircase C. While the lower portion extends out to the left, you won't find anything of interest, just more enemy encounters.
Head down to staircase D, which actually climbs up to a tiny isolated portion of the first floor. Cross the tiny room to staircase E and climb up to the second floor. This room is only slightly bigger than the last, with a big empty room in the beginning. On the opposite corner of the room is staircase F which begins to take you back down. You'll wind up on another new and isolated portion of the first floor. Here you'll actually discover two treasure chests, both of which contain small amounts of Gil. Head down to the bottom of the room to find staircase G which will bring you down to another portion of the first basement.
Basement 1[edit]
|
|
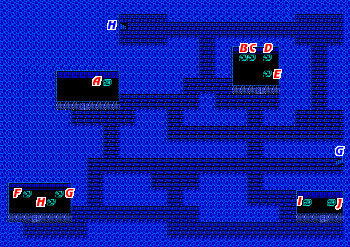
The Sunken Shrine houses vast treasures, including three new weapons with spellcasting abilities. The Giant's Glove (Power Gauntlet) will be particularly helpful in the upcoming battle with Kraken. Select them from your Items list during battle to cast Saber, a spell that raises the caster's Attack and Accuracy. Previously, you could only cast Saber on Black Mages or Wizards. Use the Giant's Gloves to cast Saber on a Knight or Ninja, then have your Black or Red Wizard cast Haste on that character to multiply his Attack many times over. You'll also have a second chance to obtain the Light Axe on this floor if you missed it earlier. The Ribbon doesn't offer a lot of defense from physical harm, but it will dramatically improve the wearer's magical resistance.
As stated earlier, Lighting spells work wonders against the monsters of the Sunken Shrine. With Thundaga, you should have no problem taking out large parties of aquatic enemies in one shot. However, Water Elementals are not very common in the Sunken Shrine. When you face them, exploit their weakness by using Ice spells. Unlike the other enemies in the dungeon, they are not weak to Lightning.
Basement 2[edit]
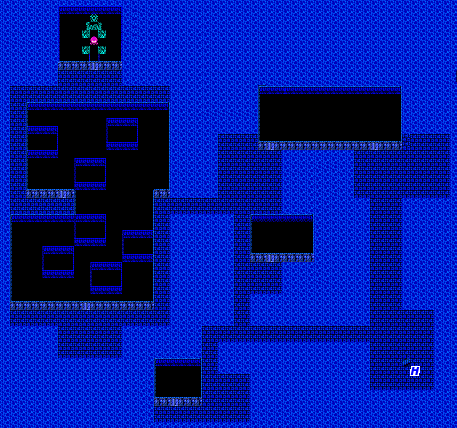
When you reach the final level of the Sunken Shrine, take the shortest route possible to Kraken. There are no treasure chests on your route, nor anything else worth exploring. Before entering the battle with Kraken, heal your party members and equip your strongest weapons and armor. Aside from the original NES version, organize your Items list for easy access to weapons that have casting abilities. The Giant's Gloves, for instance, have useful spellcasting abilities when selected in the Item menu, so be sure not to equip them to a party member.

- HP: NES - 800, Origins - 1600, DoS - 1800
- Experience Points: 4245
- Gil: 5000
Your physical attacks will need a boost to cut through Kraken's high Defense. Cast Haste on your fighters—it will increase their attack strength greatly. Thundaga will wreak the most havoc on Kraken because of his weakness to Lightning.
Protective spells like Protera and Invis will be helpful in lessening the effect of Kraken's attacks. Surprisingly, Kraken will fight back with lightning spells of his own, so NulShock is another good protective spell to cast. If things are going well, and your White Mage or Wizard has nothing in particular to do, make sure she uses the Zeus Gauntlet to add a little lightning damage to the battle.
Once Kraken is defeated, step on the tile in the back of the room to light the water crystal, and pass through the portal to be transported back to Onrac.

