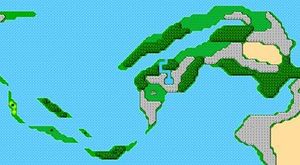
Now that they're aboard the Airship the Light Warriors move quickly to new lands and adventures. Before them lies a great challenge. The first stop is a chain of green islands. Here in the Cardia Islands is the home of Bahamut's Dragons. Bahamut, the King, can bestow a great gift, but first you must prove your courage.
Cardia Islands[edit]
|
|
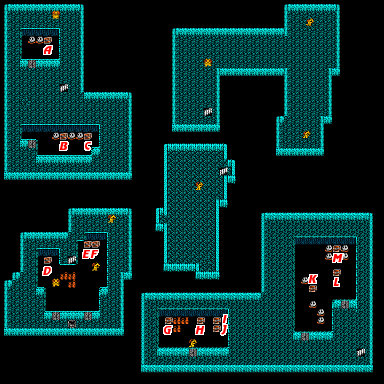
There are six entrances to the Dragon Caves, located on the chain of islands between the two northern continents. This is the home of the Dragons of Carida. Talk to the friendly dragons and obtain the many treasures the caves have to offer. The dragons seem to have courage on their minds. Everywhere you go there is talk of testing and ordeals. That is the way of the dragons; they respect bold and courageous humans and despise weakness. The Light Warriors must seek out King Bahamut and learn that task he has set for them.
The Light Warriors are bidden by Bahamut to go to the Citadel of Trials and return with proof of their courage. But what is that proof? None of the dragons are willing to speak of it. Surely it must be a very terrible thing if the brave dragons will not even mention its name. Or perhaps part of the trial is to discover the object. In fact, that is exactly what is expected. The real trial lying ahead is to penetrate the castle and poke into every nook and cranny. Then bring back what you find.
Citadel of Trials[edit]
The Citadel of Trials is your next stop, though you may want to explore some of the newly accessible towns via your airship. Gaia, for instance, sells powerful but expensive armor, and the best weapon for a Black Mage. To reach the Citadel of Trials by airship you'll have to find a safe place to land. The small green patch just across the water to the north may seem like a good choice, but you'll have a long walk ahead of you to reach the castle. A closer landing site is actually far to the east of the castle. Take several Tents with you to avoid having to march back to the Airship every time your HP runs low. (Alternatively, you can access the castle with your boat by docking in front of the short river, and it will only be a very short journey away.)
Also known as the Castle of Ordeal, it is aptly named—the inhabitants are fierce, the mazes are devious and the goal is unclear. Three floors of constant danger and battle await those who enter, but you have no choice, Make sure your HP is full and that you have 99 Potions.
Floor 1[edit]
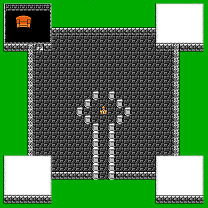
When you arrive at the castle, an old man will require proof of your eligibility to enter, in the form of the Crown that you obtained by defeating Astos. This should be no problem, and you will be allowed to enter the castle. He will instruct you to visit the throne, which you can find in the room in the upper left corner. Sit on the throne to be warped to the dungeon's second level.
Bear in mind that many powerful magic users dwell in this castle. Against some of these you'll have little defense, but the right spells can make a difference. The Protera spell helps the warriors dodge attacks. Silence works on many enemies, such as the Medusas. NulBlaze is a must against fire-casting Rakshasa (Mancats). Use these defensive spells at the start of an attack, and bring along a good supply of Gold Needles (Soft) in case you are turned to stone.
Floor 2[edit]
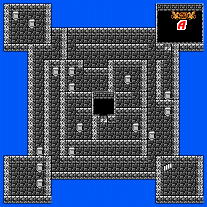
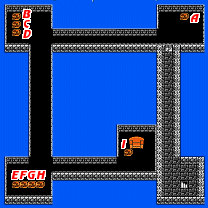
The second floor of the Castle is a maze of closed rooms. When you touch a column, however, you'll be teleported to one of the other rooms. You'll need to warp from room to room in a specific order to reach the staircase in the lower right corner. In some cases, there will only be one column to touch and you won't have to figure anything out. In other cases however, you will have to choose between two or even three columns. But there's one rule that will help you reach the third floor quickly and reduce the number of attacks you face while in the Citadel: always choose the lowest column. The lowest column will advance you to where you need to go; any other choice will send you in circles and force you to repeat steps. Along the way, do not forget to collect the item in treasure chest A: the Zeus Gauntlets (Potion in Pixel Remaster) (although in truth, if you miss it, you'll have a chance to obtain it again on the third floor.) Read on for more information about this powerful piece of equipment.
Floor 3[edit]
|
|
Within the citadel, you will find a new kind of weapon and armor. The Healing Staff and the Zeus Gauntlets, when equipped, don't seem much different from other weapons and armor. Their true value comes to light when you select them in the Items menu during battle. The Healing Staff will let you cast Heal on your party members, while the Gauntlets will cast Thundara on your enemies. Any class can use them, creating new strategic options while fighting. Place these types of weapons and armor at the top of your item list for quick access during combat.
The Rat's Tail, the key item you're looking for, is in a chest next to the throne. Approaching the throne will warp you back to the first level—but not before forcing you into battle with Dragon Zombies.

- HP: 268
- Experience Points: 2331
- Gil: 999
- Rare Drop: DOS Megalixir
Since you are forced into this fight, you cannot run away, but there is little reason to worry. Though they are dragons, they are still undead, and therefore very susceptible to magics that all the undead are weak against. A combination of Fira and Diara will practically destroy them in one round. Casting Haste on your fighters will also help them cut right through the dragons' defense.
When they are defeated, sit on the throne to be transported back to the first floor of the citadel. Exit and trek back to your airship in order to return to Bahamut. He rewards your courage by promoting the Light Warriors to a higher status.
Bahamut's cave[edit]


Upon seeing the Rat's Tail, Bahamut will recognize your courage and reward your bravery by enhancing the abilities of your party members. Once the Dragon King has upgraded your character classes, all party members except Masters will be free to learn new magic. Travel the world, returning to old towns to buy new spells. Assign lower-level spells to Knights and Ninjas, neither of whom could use magic in their previous class. Your Wizards may need to discard spells (not possible in the original NES version) from certain levels to learn new spells like Teleport and Exit.


