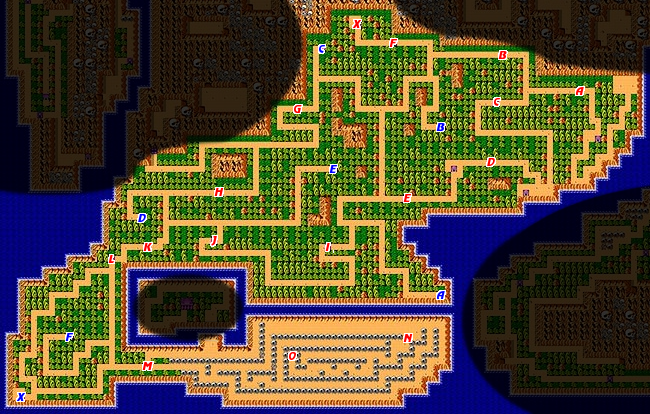
- Red letters indicate action zones. Blue letters indicate shops or help.
Main objectives[edit]
- Pass through Zones A, C, D, and E to reach shop A.
- Collect up to 200 gold, and purchase the Rock Sword from shop A.
- Optional; Enter zone B to retrieve the Defense Drum.
- Optional; Purchase the Defense Gem and the Curse Clothes.
- Pass through Zone F and defeat the demon at Zone X to collect the first devil pass.
- Reach Zone K by passing through Zones G and H, or through Zones I and J.
- Proceed through Zones K and L to reach the skull maze on the south peninsula.
- Defeat the wandering enemies around regions M and N in the skull maze.
- Reach the gates at zone O to advance to the next map.
Walkthrough[edit]
You begin the game in the upper right corner of the map. Follow the path until you reach the first hut, where a woman will inform you of your quest to reclaim your family's Hadouken swords from the Dragon Master. Then proceed to zone A.
Zone A[edit]

Zone A will introduce you to the mechanics of the side-scrolling action sequences, as well as several enemies. You will first encounter the large floating demon heads. They are most easily taken out by proactively jumping toward them and slashing your sword as you rise. Next is a walking demon that drops a white ball that rolls toward you. Jump over the ball and slash the demon. In the beginning of the game, it will take two hits to defeat him. Next is a knife wielding skeleton. When they sense that Fuuma is nearby, they dash forward to stab him. They will also take two hits to defeat until you raise the strength of your sword. Proceed along the path, climbing up and down the hills, and defeating the enemies that you encounter along the way. Beyond the hills, you will encounter the skeleton of a fish that can fly through the air. They are slow and only take one hit to defeat, so they are easy targets. The last enemy that you will encounter toward the end of the zone are large bat skeletons. They move a little faster than the floating demon heads, but they are defeated just as easily.
You may wish to proceed to Zone B from here, but you will quickly discover that you can't get very far since a set of blocks prevent you from advancing. You will need to purchase the Rock Sword in order to break through the blocks. You can also see a Defense Drum beyond the blocks, so do remember to visit this area when you have the Rock Sword. Instead, advance to Zone C.
Zone C[edit]

You won't encounter any new enemies in Zone C, but you will discover some new features. Shortly after you arrive in the zone, you will find a vial of Medicine just waiting for you to collect it. Grab it, but do your best to avoid the need to use it by defeating weak demons and collecting the spirits they release instead. Halfway through the zone, you will encounter a surprisingly difficult jumping section for such an early zone. You must navigate over a series of small islands while you are attacked by floating demon heads and bat skeletons. Two strategies will keep you alive as you attempt to avoid falling through the pits. If you feel that you are going to get hit, be sure to get hit while standing on the ground, as you are far less likely to be knocked into a pit than if you are hit in mid-air. The other is to try to time your jumps so that you can attack the enemies while you fly through the air. A knife wielding skeleton awaits you on the other side of the jumps, followed by a ball rolling demon.
Follow the path, and you will reach another hut, where the woman inside will inform you that she's seen a sword like yours in a cave to the south. Proceed along the path to Zone D.
Zone D[edit]

As soon as you start this zone, you will encounter a new enemy, a small green pod-like enemy that swoops through the air. They take only one hit to destroy, but you must anticipate their arrival in order to attack them before they hit you. There are puddles of water between rocks along the floor. Standing in these puddles will drain your health so avoid spending any time in them. Beyond the puddles, you will encounter three new enemies. There are hopping plants that bounce back and forth, insects that fall from the sky rolled up in a ball and land before stretching out and spitting projectiles at you, and large frogs that take giant leaps. This early in the game, they will take two hits from your sword to defeat unless you've spent time powering it up. If you are cautious and fast, you can defeat most of them before they touch you. During the next sequence of pools, gigantic wasps will fly down and fire a stinger at you. They remain out of reach of your sword, so focus on avoiding the stinger. You may find the need to use the Medicine that you collected from Zone C. Don't fear using it, there are other opportunities to collect Medicine.
The lady in the hut beyond Zone D informs you that you can buy new weapons from shops on the island. Proceed to Zone E.
Zone E[edit]

Once you arrive, the first enemy that you encounter will be a new one; a demon that tosses a never ending supply of axes up into the air. You'll have no choice but to get in close and slash him until he is defeated. If you are quick, you can avoid getting hit by the falling axes. Knife skeletons and flying bat skeletons quickly join the fight in this zone. A series of platforms float above the floor which is covered with a gas that will damage you if you wade through it. Furthermore, the floor will dead-end, forcing you to backtrack through the gas and climb back up to utilize the platforms. You will have to leap over more short platforms while flying bat skeletons attack, but the fall to the floor below is not as costly. You can easily leap back up. An ax thrower and knife skeleton signify that you are close to the zone's exit.
Upon completing Zone E, you suddenly have a lot of choices before you, including four different zones and three shops. Each of the three shops sell two common items and a third unique item. The unique item in Shop A is the Rock Sword, and you will absolutely need to purchase it. It is twice as much as any other item in all three shops. If you have not acquired 200 gold by this time, you can collect more money from Zone E. The best location is between the two sets of small floating platforms, where a floating demon head will attack you from either side. Run back and forth to attack them continuously until you have enough money.
| Shop A | Shop B | Shop C | |||
|---|---|---|---|---|---|
| Item | Price | Item | Price | Item | Price |
| Medicine | 100 | Medicine | 100 | Medicine | 100 |
| Blue Charm | 100 | Blue Charm | 100 | Blue Charm | 100 |
| Rock Sword | 200 | Defense Gem | 100 | Curse Clothes | 100 |
Purchase the other two unique items, the Defense Gem and the Curse Clothes when you are conveniently able to. Once you have purchased the Rock Sword, proceed to Zone B from the left side.
Zone B[edit]
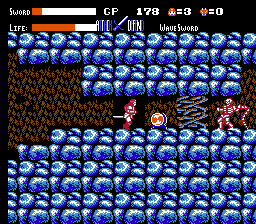
After approaching this zone from the left, you will proceed right and encounter two new enemies. Snakemen walk slowly, but advance very quickly toward you once they detect you. If you swing early enough, they will likely dash into your sword and be defeated. The next enemy is a large innocent looking animal that spits bubbles. This animal has an immense amount of health and will take several swings to defeat. It is difficult to simultaneously attack this enemy and avoid taking damage. However, if you manage to defeat one, and if it happens to leave a pouch of money behind, you will find an incredible 100 gold inside. A poisonous liquid lines the floor below the series of small platforms, and beyond so be sure to leap over it. Before reaching a floating platform, you will encounter a skeleton with a whip. They have excellent range and strike quickly, so approach them cautiously when you attack. Ride the platform up to the ledge on the other side, and proceed to the right until you reach blocks which prevent you from continuing. With the Rock Sword in your possession, you can now strike down these blocks, so pause the game and press ![]() until the Rock Sword is displayed next to your Attack power. Use the Rock Sword to break the blocks in your way until you can access and collect the Defense Drum. At this point, even though you are very close to the right-hand exit of Zone B, it is more efficient to retrace your steps and return to the left side of the zone from which you entered.
until the Rock Sword is displayed next to your Attack power. Use the Rock Sword to break the blocks in your way until you can access and collect the Defense Drum. At this point, even though you are very close to the right-hand exit of Zone B, it is more efficient to retrace your steps and return to the left side of the zone from which you entered.
The Defense Drum can be a handy utility to have early on in the game, but it quickly loses value as your sword gets stronger. Attacking with the drum sends out a projectile that will hit enemies from a short distance. While using the drum, your sword will not increase in strength, so it is not recommended that you rely heavily on the drum, and only use it on rare occasions. If you collected enough money, you may wish to purchase the Defense Gem and Curse Clothes from shops B and C respectively. When you are prepared, enter Zone F.
Zone F[edit]

This zone contains many enemies from Zone D like the giant frogs and hopping plants. If you've sufficiently powered up your sword, you can destroy them with one hit by now. Avoid falling into the gray puddles of poisonous liquid that dot the floor. There are few surprises in this level, but there is one new enemy, a snake-like monster that hangs from low ceilings and strikes downward at unsuspecting prey. They strike twice before going dormant for a period of time. If you have increased your sword strength, you can defeat them with two hits. Otherwise, it may take three or more. For the task at hand beyond Zone F, it is a good idea to ensure that your health is as high as possible before leaving. You can walk back and forth and repeatedly destroy the final giant frog until it releases enough spirits to refuel your energy. The fact that it drops pouches with 10 gold inside doesn't hurt either. When you exit the zone proceed to the hut at the end of the path.
Zone X[edit]

When you arrive, the demon that occupies this hut will inform you that you need a devil pass to proceed. He will challenge you to a fight, which you can accept or refuse. Accept when you are near full health. You will then initiate a fight with a very tall demon. This demon walks slowly left and right, but it will leap fast and far if it feels it is too far away from you. It spits a set of three projectiles at you every so often. The screen that you fight on does not scroll, and if you are pushed off either side of the screen, you will return to the map. Damage sustained by the enemy will not be remembered, but yours certainly will, so stay as close to the center of the screen as you possibly can. You have two tactics to fight the demon with; attack with your sword or attack with the Defense Drum. The drum has the advantage of allowing you to strike at a distance, but the disadvantage of a slow attack. The sword allows you to strike faster, but you must do so at a closer range. You also may be able to defeat the demon with fewer sword hits depending upon how strong your sword has become.
Once you have collected the first devil pass, you must pass back through Zone F. Then you have a choice to make. Ultimately, you must reach Zone K. You can do so by traveling through Zones G and H, or through Zone I and J.
Zone G[edit]

As soon as you arrive in Zone G, you will be greeted by a new enemy, a squat demon that likes to hurl boulders into the air. They are strong, and even with a good amount of sword power, it may take two hits to defeat them. They are accompanied by a new type of spinning demon head. They travel across and move down to attack you at your level, although some will travel over you and try to attack you from behind. Shortly after you encounter another new enemy, a floating head of a bull that spits fire, you will see a 1-Up doll in a pit. It is possible to collect it, but you must be very careful. You must fall off the ledge while running, and press ![]() +
+![]() just as you are collecting the doll. If done correctly, you will leap in mid-air back to the previous ledge. If not, you will fall in the pit, but since you collected an extra life, it won't be a terrible loss. Whether you collect the first 1-Up doll or not, there is another one which is much easier to collect shortly after a very easy Medicine. Jump into the poison to collect the second 1-Up doll. The zone ends with a large number of demon heads followed by a group of boulder throwers.
just as you are collecting the doll. If done correctly, you will leap in mid-air back to the previous ledge. If not, you will fall in the pit, but since you collected an extra life, it won't be a terrible loss. Whether you collect the first 1-Up doll or not, there is another one which is much easier to collect shortly after a very easy Medicine. Jump into the poison to collect the second 1-Up doll. The zone ends with a large number of demon heads followed by a group of boulder throwers.
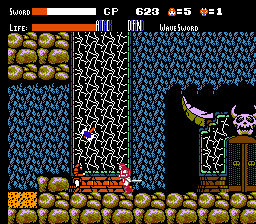
Once you leave Zone G, if you follow the path all the way to the west, you will arrive at a gate which you are unable to pass through yet. You must collect the first Hadouken sword before you will be allowed entry. Instead, head south to Zone H.
Zone H[edit]
A large number of skeleton bats greet you through the first half of this zone while you jump on platforms and over poisonous regions of sandy liquid below. A variety of other enemies can be found throughout the remainder of this level, including the previously seen ax throwing demon. Large floating demon heads frequently pass through the zone as well. Be on your guard as you make your way to Zone K. See the end of Zone J for more exploring options.
Zone I[edit]

At the start of this zone, you will have to jump up to a high ledge across a gap. There is a boulder tossing demon waiting for you at the top. Continue to run into it or it will knock you off the ledge. This demon may be new to you, and you may have to hit it twice in order to defeat it if your sword strength is not high enough. He is accompanied by a floating bull demon head, which shoot fire at you. Remaining boulder tossing demons may jump off the ledges and into the gaps below after tossing one stone. These demons leave pouches behind with 20 gold inside. You will be set upon by trios of spinning demon heads, at least one of which will attack you from behind, so you will have to defend yourself in both directions. Afterward, you will have to activate your Rock Sword to break down the block barrier in your path. Beyond the barrier, two giant wasp enemies will attack you.
Zone J[edit]

If you approach this zone from the southern direction, you will be running through it from left to right. Familiar enemies from Zone D like the giant frogs and flying pods will attack you. This zone also features a variety of vine that hangs from the ceiling. If you pass through it, it will harm you just as the poisonous liquid does along the floors of certain zones, so stay out of it as much as possible. You can activate your Rock Sword to destroy the two blocks that would otherwise force you to walk through the vines above. Defeat the frogs and the insects along the path (you should be strong enough to beat them with one swing by now) and carefully leap over the platforms to avoid falling into the gaps below. On the other side, a new enemy wielding a sickle will be waiting for you. Dispatch him, but watch out for the sickle projectiles he throws at you. Another one waits after a series of hopping plants. As you climb close to the ceiling, three hanging snake-monsters will attack you as a group.
Once you exit Zone H or Zone I, you have a couple of choices, including two shops and two other zones. Although you can't access Shop F until after you clear Zone L, it is listed here for your convenience.
| Shop D | Shop E | Shop F | |||
|---|---|---|---|---|---|
| Item | Price | Item | Price | Item | Price |
| Medicine | 150 | Medicine | 150 | Medicine | 200 |
| Blue Charm | 150 | Blue Charm | 150 | Defense Gem | 200 |
| Defense Gem | 150 | Curse Clothes | 150 | Curse Clothes | 200 |
Once you have finished shopping and restocking on supplies, your next obvious destination is Zone K.
Zone K[edit]

Zone K is populated entirely by whip wielding skeletons. Test your sword strength out on the first skeleton. If you cannot defeat it in one hit, it is highly recommended that you go back and revisit some of the previous zones and train until your sword strength increases. Without the ability to destroy these skeletons with one strike, they will pose a serious threat to your health, and you risk losing lives as you attempt to pass through the zone. In order to diminish the amount of damage the skeletons do to you, it is best to try to attack from above by swinging your sword as you are about to land from a jump. Note that if you are one ledge height below them, you have the advantage since you can strike their feet, but their whips go over your head. However, if you are one ledge height above them, they have the advantage since they can whip your feet and you have to get relatively close to hit them. Do not spend any more time in this zone than you need to.
Zone L[edit]

Immediately after entering this zone, you will encounter a new enemy. These large semi-transparent demons (which slightly resemble Metroids from the Metroid series) hover in the air and occasionally drop a tentacle down to the floor. Avoid the tentacle at all costs, and jump up to attack them. You should be strong enough to remove them with one strike. Further in, you will notice that the ceiling of the zone contains poisonous vines. In addition to the vines, there are also branches that rise from the floor which have the same poisonous effect on you. You will meet a demon that swings a double-edged ax at you. Be careful to defeat it as you land, and not fall down into the poisonous branches that line the floor. After a series of ax demons, you will reach two blocks which can be broken with your Rock Sword so that you can avoid walking through the poisonous vines above. After you break them and defeat the floating demon nearby, one last new enemy awaits, an armored demon with a ball and chain. Defeat it the same way as you defeat the whip skeletons; by striking from above.
Once you are through Zone L, there are two destinations you can visit before your next battle. One is Shop F, whose wares are listed above. The other is Hut X. The occupant there will refill a portion of your life as a gift. When you are prepared, walk east towards the skeleton maze. When you first approach region M, you will see skeletons wandering along the map. When you encounter one, you will be thrown into a side-scrolling battle, much like in Zelda II: The Adventure of Link. Your goal is to reach the gate marked O on the overworld map at the top of the page. To do so, you will have to navigate to region N. There, you will see demons wandering along the map, but the result of running into one is the same as running into a skeleton.
Regions M and N[edit]
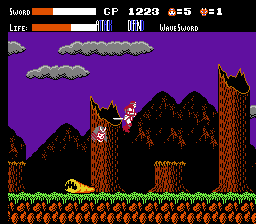
When you run into the skeletons or demons that wander the map around the skeleton maze, you will be thrown into a side-scrolling battle. In each case, you begin in the middle of the zone, and you must travel left or right to escape. Each direction has a slightly different set of enemies. If you head left, you will be attacked by a group of spider skeletons, and one floating samurai skull, followed by a bone throwing skeleton. If you go right, the enemies are one hopping demon, a walking ghost, a floating samurai skull, a fast moving worm, and a bone throwing skeleton. None of the enemies in either direction should be tremendously challenging for you, with the exception of the worm. The worm can be deceiving because it stretches out and covers a lot of ground very quickly. Try to swing your sword in advance of when you would ordinarily attack it, and you are likely to kill it. Neither direction really offers any advantage.
Gate at Zone O[edit]
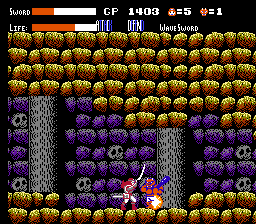
In order to gain access to the gate, you must possess one devil pass. Otherwise you will be turned away. The entire path beyond the gate is occupied by club wielding demons. These demons are quite strong, and even with sufficient sword training, you may have to swing twice in order to defeat these demons. Fortunately, they're not very fast, although they tend to attack two at a time. If they drop a pouch, they leave 30 gold behind. They are also likely to leave spirits behind for you to collect energy. Pass through this tunnel to arrive at you next destination, the island where the first Hadouken sword is located.