

Ray has reached the end of his story. In the end, von Karma won the trial - despite the defence having enough evidence to prove Master's innocence, von Karma's dirty tactics caused the trial to run for an entire year. Von Karma produced a fake autopsy report to defeat Gregory's argument that the body was never found and Master confessed. Then, Gregory played his "trump card" - he had obtained a recording of Master's interrogation from Detective Badd, in which Master could be heard being forced to confess by the police. The detective in charge of the case was fired and von Karma received the first and only penalty of his career. Unfortunately, Master had given up entirely and was found guilty anyway. Edgeworth's copy of the case file states that he was found guilty of murder. Ray remembers differently, however - in reality, Master was only found guilty of being an accomplice. Von Karma had altered the case file to make it appear as though he had solved the case. Ray shows you his copy of the case file, which clearly states "accomplice to the murder".
Ray gives you the evidence and files from the IS-7 incident that he has collected: the IS-7 Incident File (IS-7号事件の資料), Angel's Recipe Book (究極のレシピ), Frame Fingermarks (額縁の指のアト), Rock Salt Lamp (凶器の岩塩ランプ), and Family Photo (家族の写真). You plan to investigate further, in case there are any clues left behind from 18 years ago, but Debeste and Courtney object, since they're trying to identify the body Kay found in the fountain. You already know who it is, though... Present Isaac Dover's profile (氷堂 伊作). Debeste has never heard of him, but Courtney has, and she even knows about the IS-7 incident. Debeste receives a phone call - the body is confirmed to be that of Isaac Dover. This proves once and for all that Manfred von Karma forged the autopsy report presented during Master's trial, and Ray uses this to convince Courtney to allow you to investigate the Fountain Patio.
Investigation: Zodiac Art Gallery - Fountain Patio / 捜査 ~12星座美術館・噴水広場~[edit]

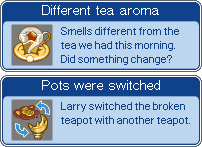
Your priority is to identify the source of the Normallium. As you may recall, it has a distinct minty aroma (ミントの香り Minto no kaori). Move to the left side of the area and examine the tea cart. Kate's tea set is set out on it. Examine the crescent moon-shaped Teapot (ティーポット tīpotto) to add it to the Organizer. Larry shouts at you and tells you to be careful with it. Kate comes over and serves you some more tea. However, this tea seems different... You receive the Different tea aroma logic (紅茶の香りがちがう Kōcha no kaori ga chigau). Larry seems upset about something...

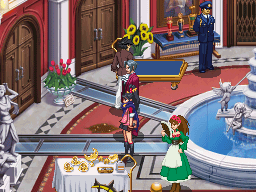
Examine the stain on the ground near where Ray is standing. It's a tea stain, with a Pottery Shard (陶器の破片 tōki no hahen) in the middle. The design on it looks familiar... Go to the opposite side of the room and talk to Larry. Present the Pottery Shard (陶器の破片) to him. He finally agrees to talk to you.
- Hiding something? (何を隠しているのか? Nani o kakushite iru no ka?): He tried to pour a cup of tea for Judge Courtney, but he dropped the teapot and it broke. Larry grovels to Kate and apologises. She goes to tidy up the mess and also takes your Pottery Shard. Larry says that when he broke the teapot, he swapped it with another, identical, one. You receive the Pots were switched logic (ポットを入れ替えた Potto o ire kaeta). Larry agrees to show you what he was doing: sketching "beauties".

- Sketching beauties (美女のスケッチについて Bijo no sukecchi ni tsuite): It's a drawing of Kate, Courtney, and Delicia. Larry says he drew it exactly as he saw it, which makes Edgeworth notice a contradiction between the drawing and Kate's service cart. The Sketch of Beauties (美女のスケッチ bijo no sukecchi) is added to the Organizer.
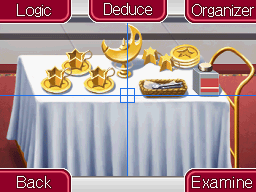
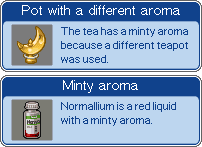
Examine the service cart again and deduce from the Sketch of Beauties (美女のスケッチ) that the colour of the cart's tablecloth has changed. Larry says that when he broke the teapot and was cleaning up the mess, Kate came out of the Winter Palace with another service cart - one that had a light blue tablecloth. She went to the Summer Palace with it and came out with the lift trolley. Now that you've collected some Logic, it's time to tie it up. Connect the Different tea aroma (紅茶の香りがちがう) to Pots were switched (ポットを入れ替えた). The different aroma of the tea is probably because Larry swapped the pots. Kate agrees and says that she served mint tea with the second pot yesterday. You receive the Pot with a different aroma logic (香りのちがうポット Kaori no chigau potto). Connect this to Minty aroma (ミントの香り). Kate seemed more concerned with the fact that the pots were swapped than that a pot was broken. Maybe she was trying to hide the existence of the second pot? She may have hidden some Normallium in it. You speak to Debeste, who says he's had the entire museum overturned but still hasn't found the Normallium. You have an idea of where it might be, though - the teapot. Kate asks if you suspect her of setting the poison gas trap, and says others could have done it as she wouldn't have known how to create the poison gas.
Talk to Kate:
- Two service carts (2台のサービスワゴン Ni-dai no sābisu wagon): She says she only uses tablecloths that are pure white. At the time when Larry drew the sketch, she was doing her job, as normal.

- Kate’s job (緒屋敷の仕事 Oyashiki no shigoto): At the time of Larry's sketch, she was handing out chocolates to the people helping with the investigation. She gives you some Chocolates (チョコレート) as well. Like father, like son - they're a little too sweet for Edgeworth's liking.
- The poison gas trap (有毒ガス事件 Yūdoku gasu jiken): She used her photos from 18 years ago to create replicas of Dover's sculptures. She's still hiding something, and you need to prove it with evidence... which you don't have yet.

Examine the fountain. The forensics officer reports that Normallium and Fatallium were both detected in the water. There was also a large quantity of sugar. Just then, Edgeworth receives a call from Gumshoe. He informs you that the Gemini case contained less water than the Taurus case. The Taurus case contained only sugar, but the Gemini case contained sugar, salt... and blood. The sugar found in the fountain matches that in the cases in the Winter Palace. The Liquid Analysis Results (ふたご座の成分結果 Futagoza no seibun kekka) are noted in the Organizer. Also, a Rainbow Light Device was found, which was used to disguise the Autumn Palace as the Winter Palace. You should hear what Delicia has to say about that. Talk to her:
- The decorations (美術館内の装飾 Bijutsukan-nai no sōshoku): The fluorescent cloths and Rainbow Light Device were presents that she gave to Kate. She gave Kate four sheets of fluorescent cloth, but you've seen another one somewhere recently... Present the Fluorescent Cloth (光る布) and she agrees to tell you more about it.
- Setting off poison gas (有毒ガスの発生方法 Yūdoku gasu no hassei hōhō): Everyone familiar with Megatoxin X knows not to mix it with Normallium. But anyone who has seen the Angel's Recipe would also know how to set off the poison gas. You receive the Contained in the book logic (レシピにのっていた Reshipi ni notte ita).
- Fluorescent cloth (光る布 Hikaru nuno): Delicia found a fluorescent cloth floating in the fountain. She says that this cloth is the one that vanished 18 years ago.
Next, talk to Ray:
- About the two cases (2つの事件について Futatsu no jiken ni tsuite): Nobody realised Dover's body went missing because the only family he had was a son who also vanished after the incident. He was found years later, and his inheritance was delivered to him.
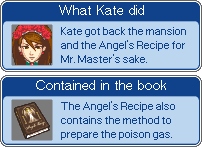
- Katherine Hall (緒屋敷について Oyashiki ni tsuite): Ray describes Kate as an "admirable" woman who has waited for the last 18 years for Master to be freed. She was evicted from the mansion by Master's relatives but went on to become a successful actress. Eventually, she had enough money to buy both the mansion and the Angel's Recipe. You receive the What Kate did logic (緒屋敷の行動 Oyashiki no kōdō).

Go to your Logic and connect Contained in the book (レシピにのっていた) to What Kate did (緒屋敷の行動). The method for setting off the poison gas is contained in the Angel's Recipe, and the current owner of the Angel's Recipe is Kate, so she would have been able to learn how to set off the gas. Finally, examine the lift trolley next to Ray. Ray says that it was in Dover's room during the IS-7 incident. Just one trolley like this would be enough for one person to be able to transport Dover's sculptures. The surface of it appears to be wet, indicating that it was used recently. The Lift Trolley (リフト rifuto) is added to the Organizer.
With that, your investigation is over. Now, you just have to wait for the results of the tests on the teapot...


