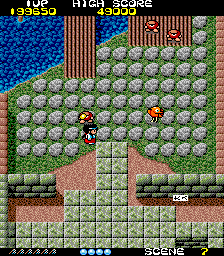
As you begin moving to the left, Puka Pukas appear almost immediately. Be sure to remove them as they appear before you advance further into the stage. The start of this stage will resemble the staircase area where you collected the key from in the last stage.
As you travel further to the left, many Rumurus will begin to appear. If you have a three or four blue crystals in your inventory, it might not be a bad idea to use one up here. If you can't afford to stop time, just be sure to use the built-in barriers of the stage to your advantage and destroy the Rumurus before they have a chance to get close to you, grab you, and slow you down. You might be a little safe on the top portion of the screen, but if you are sufficiently powered-up, you can blast the enemies just as easily from anywhere. Be sure to fire diagonally as you move across.
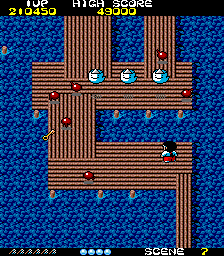
When you reach the far left side of the stage, it will begin to scroll upward. If some Rumurus do attach themselves to you, you can use the gap in the wall up above to try and separate them from Sayo. After a short walk, you will be forced to walk along dock planks which will really restrict your movement, especially over the bridges. The Rumurus will not stop trying to slow you down here, so you'll have to continue to be vigilant against them. Always prioritize Rumurus that are on the same bridge or plank as you, and then attack those who are separated from you by water before you move on. As you walk upward, try to shoot diagonally across the cover the dock that you will be arriving on next.

When you reach the top of this portion, the screen will begin to scroll back to the right. Still on dock planks, you must carefully navigate over the narrow bridges. Bake Chouchin will appear in this section in large numbers. Try to defeat as many as you can before they start spitting fire at you. You will have a difficult time dodging all of the flames if you don't shoot a good portion of them down. Puka Pukas will continue to interfere through this section.
After covering a short distance to the right, you will begin scrolling upward again. This time as you do, you will see a few Otama floating around over the dock along with some Puka Pukas. Don't worry too much about defeating them all unless you are significantly under-powered. What you should keep your eyes open for is the key hanging over the edge of the dock on the left side. Be sure to clear the area above you first before advancing to collect the key.

After collecting the key, you will have to make it across the remainder of the bridges until you are back on dry land. In the process, you will face row after row of Puka Puka. It is a good idea to take the left bridges, and walk straight up. The ghosts will fire down and to the left at you. After you safely pass their bullets, you can fire up and to the right to remove most of them. Whatever you do, do not stop moving, as this will increase the likelihood of you getting hit.
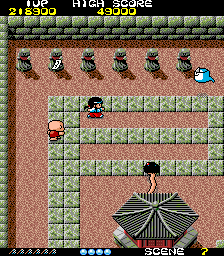
Pretty soon, you will be back on dry land with many of your familiar enemies, such as Minojiis and Rin Rins. You will pass a well with Bake Uri inside, and reach a hut with an Ogei. Defeat the Ogei, or simply walk around her on the far left side. When you reach a row of statues, two of them will have special Ofuda for you to collect. The second one from the left has a yellow Ofuda, and the fourth from the left has a double Ofuda. Remember that only one can be visible at a time, so if you reveal both before collecting one, you will lose the first one.
Once you see these statues, the screen stops scrolling up and begins scrolling to the right for a short distance. You won't face much danger through here, but soon the stage will stop scrolling right and begin scrolling up one last time. At this point, you must walk between two wells, with a third above it. Beyond that is another Ogei hut. The safest strategy is to walk up along the right side of the screen, waving your purification wand in case you are attacked by any Bake Uri. Stay along the right side until you reach the wall above, and squeak past the enemies into the gap above to face the stage boss.
Boss[edit]


The boss of the 7th stage is a tanuki named Manuke. As animals, tanukis carry historical and cultural significance in Japan. They are thought to have mystical powers, and this tanuki is no different. Manuke has the power of disguise. He can transform himself into a near perfect replica of Sayo-chan! However, there is one obvious difference in his disguise: the presence of a tanuki tail. While you won't have any difficulty discerning the real Sayo from the fake one, fake Sayo is still a dangerous foe.

When disguised as Sayo-chan, Manuke throws black Ofuda cards at Sayo. If these cards hit, Sayo will be frozen in place. Manuke's favorite strategy is to freeze Sayo with these black Ofuda cards, and then whack her with his own Gohei wand, which will send Sayo flying into a wall, and sadly to her death. However, Manuke is just as susceptible to Sayo's Gohei, and Sayo can send Manuke flying if she hits him with it. When Manuke takes enough damage from Sayo's Ofuda cards, or if he is sent flying into a wall, he transforms back into a Tanuki. At this point, he will either try to run into you to kill you, or run away if he is getting hit by too many Ofuda cards. After a brief rest, he will transform back into Sayo. Focus your attack on him no matter what form he takes, and he will be defeated.
Bishamonten is the seventh and final god of wealth that you rescue from Manuke. Bishamonten is a protector of the righteous and a symbol of authority. He is the god of prosperity (symbolized by the 'treasure tower'), the god of war and patron of warriors (symbolized by the defensive armor and offensive weapon). He brings good luck in both battle and defense.
Note: After the adventures that take place here, Manuke reforms and joins the side of good. He then becomes a partner of Sayo-chan in subsequent adventures. American players will come to know Manuke under his Western name, Rocky.