Big Forest introduce more enemies, more power-ups and a new Animal Friend, Coo the Owl. Once again, there are three stages here, but the stages themselves are slightly longer, as well as being vertically larger. The box of Big Forest is Nruff, a nasty boar with many smaller boars, known as Nellies, as minions.
Stage 1[edit]
Section 1[edit]

The first level of Big Forest is another straightforward one. There is no significant increase in difficulty, and the terrain is actually a bit flatter than the levels in Grass Land. You will encounter the Cappy for the first time here. You can inhale these bouncing mushrooms to leave the living stalk, which you must attack again to defeat. However, you can defeat them in one hit if you just spit something at them or use a copy ability.
(1) The fast, dashing Waddle Dee makes another appearance here. You won't have to worry about it if you're standing on one of the thin platforms though.
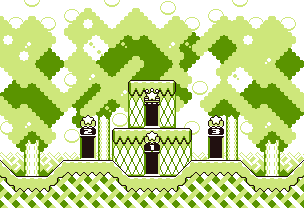
Section 2 - Mini-Boss: Scarfy[edit]

Although this room is laid out like a mini-boss room, complete with the wriggling bag hanging from the ceiling, the mini-boss you will face is actually a common enemy later in the game. This cute, flying creature is called a Scarfy. Unlike Efreeti, Scarfy does not give you a copy ability if you inhale it. In fact, if you even try to inhale it, it will turn into a menacing monster that will chase after you until it self-destructs. Your best bet here is to use a copy-ability to attack it, or inflate yourself and spit an air puff at the Scarfy if you don't have one. Note that when the Scarfy is defeated or if it self-destructs, it will go out in an explosion that can harm you if you're too close, so be extra careful if you're using an ability like Burning.
Once the Scarfy is defeated, the bag drops to the ground, releasing another one of Kirby's friend, Coo! While Rick performs better on the ground, Coo enhances Kirby's abilities in the air. When partnered up with Coo, you can now inhale and use copy-abilities while flying about. However, if you are already accompanied by Rick, the bag will drop Gooey instead of Coo. This benevolent blob of Dark Matter only appears if you already have an Animal Friend with you, and will restore one bar of health when collected. If you're lucky, you might also encounter Gooey's girlfriend, Blob. She gives Kirby an extra life, and encountering her counts towards 100% completion.
Section 3[edit]

The final section of the level is still quite simple, but there are now also several bottomless pits that you have to avoid falling into. You won't have to deal with the terrain if you have Coo though, as you can easily soar across the entire level without touching the ground. You will have to contend with the many flying enemies if you choose to do so.
(2) There is another new enemy that you will encounter in this section. These spiky balls are called Gordos. They cannot be defeated through any means and serve more as obstacles than enemies, as they will mostly ignore you and move along a set path. It's best to completely avoid them whenever you run into them in the future.
(3) Yet another new enemy will be introduced right before the exit, but this one actually gives you a new copy ability! Sir Kibbles are short knights that throw boomerang blades. Swallowing them nets you the Cutter ability, which lets you do the same thing.
Stage 2[edit]
Section 1[edit]

This section of the stage is much larger than the previous stages you've been through, containing a lot more vertical space. Since you will need to maneuver around this vast open space, having Coo will be very helpful, as it lets you control better in the air. There are a lot of enemies flying around or stationed on the treetops, including a fair amount of Gordos, so you're really going to need to make your way across the stage with care. If you drop down from your starting location, you can find the door to the Big Forest's Rainbow Drop room. You can't collect this Rainbow Drop the first time you play through this level, so you might want to explore it later once you have the required copy-ability.
(1) The frequency of Gordos greatly increase from this point, moving vertically along the tree trunks. There will be one Gordo for every platform leading to door C. If you're not confident that you can dodge all of these Gordos, try flying to the door instead.
Section 2 - Rainbow Drop[edit]

This is the Rainbow Drop room for Big Forest. You need the Needle ability to pierce through the blocks obstructing you from getting the Rainbow Drop. You can get one from a Spikey later in the stage, but you can't return to this room once you do. You will have to replay the stage with the Needle ability and go straight to this room to collect the Rainbow Drop. You can also do this with Coo, as your modified Needle ability shoots straight down, which easily lets you break the blocks below.
Section 3[edit]

The last stretch of the stage is a completely flat path to the exit. These are still some enemies and Star Block formations along the way, but they aren't too hard to overcome.
(2) There is a Health Drink wedged between two Gordos. Destroy the Star Block that the drink is resting on to make the Health Drink drop down, letting you safely reach it.
(3) The Spikey is a new enemy that also gives you a new copy-ability, the Needle. With the Needle ability, you can extend spikes from your body, taking out enemies close by. You also need it to get the Rainbow Drop from the section before, so be sure to replay this stage again while you have the Needle ability.
(4) The Gordo here is mostly confined to moving between the Star Blocks, but destroying them means it can move more freely. Another Gordo also moves near the exit door. Using the same principle, destroy the Star Block to the left of the exit means that the Gordo can move further to the left, making it safer to reach the exit.
Stage 3[edit]
Section 1[edit]

This stage starts off in another straightforward way, being a horizontal scrolling stage straight through to the door. Every copy-ability you've used thus far can be obtained from the enemies in this area, with Floaties, Flamers, Load Kibbles and Spikeys wandering about. Compared to the parts of the stage you will soon have to cross, this section is quite basic, other than the high concentration of enemies in the area.
(1) As you cross the Star Block bridge, rotating heads called Kabus will materialize around you and swoop at you. Be careful not to fall into the pit below as you fight them.
Section 2[edit]

This section is a very high vertical climb up the trees in the forest. While you can simply float straight up, it is safer to jump from platform to platform and deal with the enemies at a steady pace. A Health Drink will appear on the penultimate platform from the door, which will be quite handy if you've taken some damage from the climb.
(2) Two Bouncy Tys will fall on both sides of the leaf platform as you near it. They are manageable if you approach the platform from the sides, but they can catch you off-guard if you opt to fly between the gaps of the platform instead.
Section 3 - Mini-Boss: Jumpershoot[edit]

You will face a true mini-boss this time around. This living parasol is called Jumpershoot. It has two attacks. It can spin rapidly and swoop down at you to the other side of the room, which can be quite difficult to dodge due to its speed and the limited space in the room. He can also toss a sandal at you, which will bounce a few times when it hits the ground. If you don't have a copy-ability, you must inhale the sandals and spit it back at Jumpershoot to damage it. After its defeat, you will free Coo if you're alone, or Gooey if you already have an Animal Friend.
Section 4[edit]

This section is the opposite of section 2, in that you must get back down to the ground. The blocky and thick platforms mean that there are no shortcuts to take. You must simply descend bit by bit to the door at the very bottom. There are a lot of Spikeys in this area, so if you descend to hastily you could end up getting pricked. There is another Health Drink you can get halfway down the area, which is great if you were hurt from fighting Jumpershoot.
Section 5[edit]

The final section of the stage is a vast area, but you really only need to advance up the stairs to reach the end goal. There are a lot of Bronto Burts flying around the area and a variety of enemies on the ground, but they can all be tackled if you patiently move towards the exit.
(3) If you fly to the upper-left corner of the screen, you will find three small stars and a very unusual enemy, the Propeller Bomb. If you approach it without an Animal Friend, it is mostly harmless and immobile. However, if it sees you with an Animal Friend, it will become immune to inhalation and chase you down, while becoming more resistant to most of your attacks. If it succeeds at hitting you, you will instantly lose your Animal Friend. Carefully consider whether three Small Stars are worth losing your companion before going to get it.
Boss: Nruff[edit]
Nruff is a large boar assisted by smaller boars called Nellies. He will fight you in a room with three different levels with doors at the ends of them. Nruff will mainly attack you by running into you by himself or with Nellies, but he can also throw bombs around the arena. He will emerge from any of the doors and run across the level, accompanied by several Nellies. You must directly attack Nruff to damage him, attacking the Nellies aren't necessary. If you lack a copy-ability to use against Nruff, you must inhale the Nellies and spit them back at Nruff to damage him.
Nruff's attacks are easy to dodge, but hitting him can be difficult due to how unpredictable he is. Nruff will often jump to a lower or higher level halfway through his run to throw you off. He can even use Nellies as shields, having one in front of or behind him to take an attack otherwise aimed at him. Be fast and decisive when fighting Nruff, as a moment of hesitation can quickly lead to him leaping to another ledge or ducking into one of the doors. Once Nruff's health drops below a certain amount, he will briefly send Nellies running across all three levels while he rests. Once he returns, Nruff gets even more unpredictable, shifting between levels frequently, as well as throw bombs around more. Keep actively moving around the arena and attack him until you finally defeat him.
With Nruff out of the picture, a third island emerges: Ripple Field! Move your Warp Star toward it and press ![]() or
or ![]() to enter the third level.
to enter the third level.
Bonus Chance[edit]
For this Bonus Chance, Nellies will run around along the various levels of Nruff's arena. You have to dodge or defeat the Nellies while collecting the Small Stars that float across the screen. Hitting any of the Nellies will end the minigame early.