Think of the second stage as a vertical presentation of the first stage of Gradius. Rather than dealing with terrain above and below you, it will be to the left and right of you. Enemy releasing domes and walking cannons will dot the landscape on either side, including the occasional rock spewing volcano. You are given the opportunity to shoot down 11 squads of Beruberumus. You can collect ten power up capsules; the second to last squad on the left will provide a blue Crash capsule that destroys every enemy on the screen. With the number of bullets that get fired in this stage, it would be a wise idea to invest in a Force Field if you don't have one already.
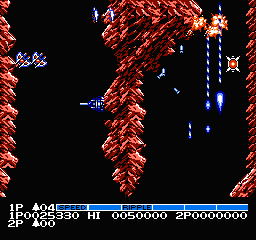
When the terrain begins, you won't have any difficulty navigating the early portion of it. Continue to fire your main weapons and missiles to get rid of the majority of enemies, and fly out of the way of any bullets that get fired at you. You will eventually encounter the first volcano on the right side. The rocks they emit are easily destroyed with Lasers. However, you can stop the volcanoes from spewing rocks entirely if you concentrate your fire on the peak of the mountain. If you hit it enough you will see and hear an explosion and the rocks will stop appearing. The screen will divide into two paths. The right path contains fewer enemies, but it also has a volcano. On top of that, it sets you up poorly to stop the next volcano beyond it, so the left path is a little easier to deal with.
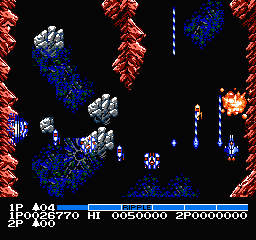
Once you get beyond the dirt, you will pass through a small open section before a hail storm of gray rocks fills the screen. A few other enemies will fly around and attack, but you should generally focus on the rocks. Stay near the bottom of the screen, and fire constantly. While the NES is often criticized for the slowdown that one experiences when a large number of objects flood the screen, this can actually work to your advantage in this section. Slowing the screen down will provide you with more time to adjust your position and navigate a safe path through the falling rocks.
The next threat you must deal with comes in the form of giant boulders that slowly float down the screen. By themselves, they are large but easy to dodge and rather harmless. However, if you are recklessly firing all over the place, you are likely to damage these boulders to the point where they fracture and fill the screen with more indestructible rocks which become difficult to avoid. Furthermore, the path through the stage begins to split up, forcing you to choose one side of the other. The right side is blocked by a boulder, so you are better off staying to the left. Don't fire unless you have to, or you risk fracturing more boulders.
After the last boulder flies by, you will be presented with the choice to go down three different paths. Each path will contain a series of stationary and mobile cannons, some of which offer power-up capsules when destroyed. During the first part, the middle path is the widest and safest to navigate. After you shoot a path through some dirt, the right path is the widest.
The last obstacle you must face before you reach the first boss, is a screen-wide patche of dirt that you must blast your way through. Just before the patch, a formation of ships will fly up to meet you and then dive down to the bottom of the screen. As you blast through the dirt, you may reveal some hidden power ups. Don't get distracted by them, or over prioritize collecting them, or you might crash into the dirt. A few more cannon's and flyign craft await you on the other side as you reach the fortress.
Just as in the arcade game, when you reach the end of the Volcano stage, you arrive at a fortress containing three blue cores. However, this extremely difficult to defeat boss from the arcade is drastically easier to fight on the NES. Due primarily to technical limitations, this fortress won't have the opportunity to flood the screen with quite so many blue orbs. They are still a threat and must be avoided at all costs, but you'll have an easier time doing so, as they won't literally fill the available space. Do your best to destroy the three barriers in front of the cores before the cores actually appear. This way, when they do appear, you will be ready to attack them immediately. Monitor the position of the orbs carefully, and position yourself in front of a core whenever it is safe to do so. The fortress will be defeated when you destroy all three cores.
If your familiar with the arcade, you may be surprised when the stage continues to scroll along after the three fortress cores are destroyed. You must pick one of the core alleys as the screen scrolls, and blast your way through pink dirt (shown left) until you are clear. Then the Tetran, the boss from the second stage of the arcade, will also appear. The Tetran shares a feature in common with the Fortress cores you just fought; it possesses a power core protected by three shields. You must remove the shields and blast the core to destroy it. Aside from this similarity, the Tetran is very different. Nearly round, it has four tentacles made of spheres that rotate around the ship while the ship itself moves in clockwise circles. One touch from its tentacles will kill you. While the Tetran moves rather close to the edges and corners of the screen, it is possible to safely remain in one of the lower corners of the screen early on, and then fly back underneath it when it begins to rise on the screen. Blast it from underneath for as long as you can, and then retreat to the safety of one of the corners again. However, the Tetran slowly progresses down the screen, so if you wait too long, the lower corners will no longer be safe, and you'll have to fly around to the top of the screen to avoid harm.
2nd loop changes: The orbs that compose the tentacles will periodically reverse direction and spin the opposite way around.