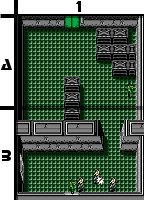
B1: Three soldiers will notice your arrival as soon as you enter, and they will summon backup. Clear them out until they stop appearing. You will get another call on the transceiver from Big Boss. He will instruct you to open the door on the left. It opens with card 1, and if you step inside, you will see an empty room. If you move a little further in to investigate, a pitfall will open up! Clearly, this is not the best place for Snake to be, and your suspicion of Big Boss may be increasing. Back in the main room, proceed north through the gap in the wall to A1.
A1: Be aware that as soon as you enter the room, a pitfall will open to the right of the crates in the lower center of the room. It's safest to enter this room far to the right. Run up to the crates above, then come back down a little to the edge of the pitfall that just opened up. Start running to the left. The next pitfall to be concerned with opens up just below the elevator, but there is plenty of safe space to run around it without being in danger of falling in. Approach the elevator and hop inside.
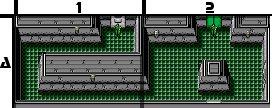
As Dr. Pettrovich explained, Metal Gear is 100 floors deep inside building 3. Fortunately, you won't have to watch the elevator drop 100 floors, but it will take a while before you reach the bottom where you can actually exit. The map of the floor (as far as you can explore) is shown below to the right.

A2: When you reach the floor, all you will see are two cameras mounted along the north walls, a door to the east, and an open path to the west. However, the cameras are not cameras at all, but laser defense systems. If you cross their path, they will shoot a rather quick laser beam which is capable of removing nearly half of your health with one hit. It is possible to avoid it by standing directly beneath the lasers where you can't be seen. To make matters worse, it's difficult to figure out what access card opens the east door. As it turns out, none of your cards will work. However, if you have four stars when you arrive here, you you can call Jennifer on your transceiver. She claims that an oxygen tank can be found beyond a door. The door on the south wall can be opened with card 7. Indeed, you will find an oxygen tank inside. Now you will be able to safely traverse through the deep sections of water that were previously harmful too you.
If you like, you can explore A1, but you will simply find it to be a dangerous room with another door that you cannot unlock for the time being. Simply return to the elevator, ride it back up to the surface, escape the building, and return south through the scorpion desert. If you already rescued Dr. Pettrovich, you can head back to building 2 to explore the water tunnel on the first floor. Otherwise, you'll have to navigate the north forest to make your way to building 5.
Part 2[edit]
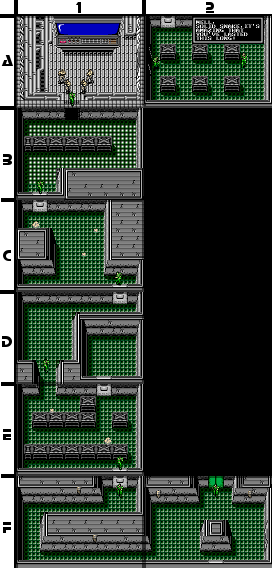
Once you obtain card 8 from Coward Duck, you should return to building 3 and ride the elevator to the bottom. The map below is an extended view of the entire floor plan.

F2: You will arrive back in this room. Jennifer will still be calling about the oxygen tank, so you can ignore the call. Now that you have card 8, you can open the east door, but watch out for the laser that fire at you when you pass the camera. Inside, you will find a prisoner who will finally reveal that the leader of Outer Heaven has been your commander, Big Boss, all along. Now you know that you cannot trust any instruction that he gives you. Exit the room, carefully pass beneath the two laser-firing cameras, and head west to F1.
F1: When you arrive, you will receive a call from Big Boss on your transceiver. He will tell you that the mission is over, and order you to return. Assuming you choose to continue, you must now pass below the two wall-mounted cameras roam back and forth. Like the other cameras in this building, they shoot lasers, but like all other cameras, they can't actually "see" you when you stand directly below them. Hug the walls as you progress through the room. When you finally make it to the door at the top, open it with card 8 and proceed to E1.
E1: This room is filled with poison gas. Put on your gas mask and you run through the room. You will see a door to the right, and an open path on the left side of the wall. You can pass through the door by using card 8, and if you do, you will enter a blocked off portion of D1 where a pitfall will open and threaten to swallow you. Do not enter through that door. Instead, take the open path on the left to D1.
D1: If you enter through the left side, you will find a route to the door above. Approach the north door and open it with card 5 to reach C1.
C1: This is yet another room filled with gas, so put on your gas mask. You may be thinking that there are pitfalls to worry about, but there is in fact a different danger: land mines. The problem is, you can't activate your gas mask and the mine detector at the same time. What you can do is keep your mask on most of the time, and briefly switch on the mine detector to get an idea of where the mines are. Then you can take a few steps safely until you are unsure, and activate the mine detector again to double check your route. Alternatively, you can leave the mine detector activated, breath in the gas, and fill your health with rations, but don't use too many rations up, or you may find the end of the game difficult. Reach the door and open it with card 1 to proceed to B1.
B1: Unfortunately, you will now be in a room with an electrified floor… and no panel to blow up with a missile. If you have four stars, Jennifer will encourage you to simply run across the floor and use rations to heal your wounds. You have little alternative, so do just that. Run across the floor as quickly as possible. You can actually make the entire trip in one run without rations if you start as far to the right as possible. But don't take any chances; if your health drops too low, use a ration. Pass through the door to room A1.
A1: You've finally arrived in the room where the super computer is kept! Now is the time to put all the information that Dr. Pettrovich gave you to use. The super computer remains motionless on the north side of the screen. Four soldiers guard the room, and they will attack as soon as you enter. Take them out with your gun as quickly as possible. Then approach the console of the computer. Continue to plant explosive after explosive on the machine until you have used 16 of them. As soon as the computer blows up, the security system will announce an emergency and state that the self destruct sequence has been initiated. A timer countdown will appear on the bottom of the screen indicating how much time you have left to escape. There's one final door to the east, so head through it to A2.
If the super computer remains alive despite dropping all 16 explosives on it, then you either forgot to rescue Ellen or speak with Dr. Pettrovich after the rescue. Return to Building 4 or 5 before attempting to destroy the computer.
However, you can bypass the Supercomputer by pressing ![]() as soon as you enter the room. This starts the battle against Big Boss, without the countdown timer.
as soon as you enter the room. This starts the battle against Big Boss, without the countdown timer.
A2: Waiting for you in this room is none other than Big Boss himself. He will explain that he assigned a rookie to this mission in order to report false information, but that you have gone too far. If he must die, he plans to take you with him. As the fight between you begins, Diane will call you and confess that she does not know how to defeat Big Boss. Then she will begin to confess something else about the way she feels about you, but then retract the statement and wish you luck.
Once Big Boss is defeated, you'll have to choose the correct elevator door, as the wrong ones continue rising endlessly. If you remember the advice that Jennifer's brother told you, you should try the left elevator. If you are having trouble and feel that you will not make it out in time, read the spoiler below for a secret trick that you can perform for more time. If you make it up to the top before the timer runs out, you will have successfully completed the game, and will get to view the ending and the credits. Congratulations.
Would you like more time to fight Big Boss and safely escape from the building? There's one item that you have in your inventory that can help you get more time. It's an item you've had nearly all along, but may not have had a use for until now. Examine your items, and highlight the cigarettes. Use them as you would use your rations. They will disappear from your inventory, and 1000 extra units of time will be added to the timer, providing you with plenty of time to beat Big Boss and make it all the way up the elevator.