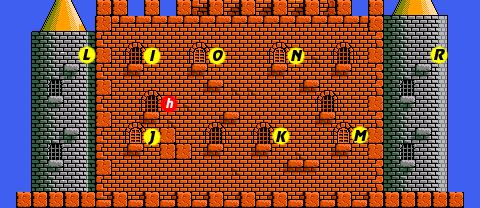
Recommended order:
- Enter Room I, collect the money, and purchase the Super Shoes.
- Enter Room J and collect honeycomb and music box. Purchase the Feather if desired.
- Enter Room K and purchase the Paint.
- Enter Room M, collect the music box, and purchase the Blimp.
- Enter Room N, collect honeycomb and music box, and purchase the Excalibur.
- Enter Room R, fall to the bottom, defeat the boss, and collect the Canteen.
- Return to Room M and enter the fire place. Defeat the boss to reach the Right Shrine.
- Defeat the fake Princess/Crow in the Right Shrine and collect the Cane.
- Enter Room L and reach the lower left corner by taking the secret passage in the upper right corner. Drop through the floor and defeat the boss to reach the Left Shrine.
- Defeat the fake Princess/Crow in the Left Shrine and collect the Crown.
- With the Crown and the Cane, enter Room O and defeat Kama to reach the fourth floor.
Room I[edit]
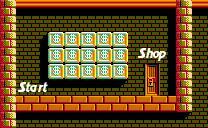
- Money: $15
- Shops: Super Shoes - $60
The door to Room I simply leads to the previously inaccessible upper left corner of Room A that you saw back in the beginning of the game. In here, you can collect $15, and enter the shop where the Super Shoes are sold. The Super Shoes is one of the items that, when used together, makes the boss fights much easier to complete. The money here can be collected three times total, but since the shop also provides full healing, which costs exactly $15, it is suggested to save this "free" healing unless needed. When you exit the shop, you will find yourself back on the ground outside the door to Room A.
Room J[edit]
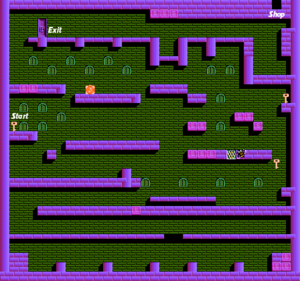
- Money: $17
- Enemies: Gyoros, Agu-agus, Katchinshas, Brain Totos
- Shops: Feather - $35
This stage can be a little frustrating, as most of it is designed to prevent you from reaching where you would like to go, either by dropping the floor out from under you, or putting springs on every block of a platform. The good news is there isn't a whole lot that you need to accomplish, so you can visit this stage once and never return.
The key objectives are to collect the honeycomb and the music box. They are both near the middle level of the room. The honeycomb is surrounded by blocks that will drop out from underneath you, but only if you shoot them. The shop in this room contains the Feather, which will only be of help to you in Room N. Not only that, it's not required to beat the game, so only purchase it if you feel that you have the $35 to spend.
Room K[edit]
In this shop, you can purchase the Paint for $40. The Paint is needed to help you make your way through the spirit shrines, so don't miss it. You can also get some units of health back and read a hint.
Room M[edit]
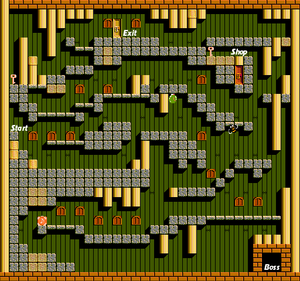
- Money: $21 ($16 of which is recoverable)
- Enemies: Eye-eyes, Shims, Gerubos, Maduras, Voodoos, Fire
- Shops: Blimp - $40
This is an interesting stage for many reasons. You will very likely visit it more than once, since all of the money tiles that are revealed by shooting stone blocks (but not the columns) will reappear whenever you enter this stage. If you collect every such tile, you can obtain $16, leave the stage and return for $16 more as many times as you like.
The next point of interest is the fact that this stage contains a music box, but no honeycomb. No matter how hard you search for it, you won't find one. The shop in this room sells a rather valuable item, the Blimp, which allows you to slow the descent of your falls. This ability is particularly useful when fighting against a boss.
Last but certainly not least, is the fireplace that you have no doubt heard about if you've been reading the hints. This fireplace is the key to reaching a boss and one of the secret spirit shrines. However, it is not recommended that you approach the fireplace until you have at the very least collected the Canteen, as you'll have to negotiate a Fire just to get to the Boss Room, and you can't harm the Fire without the Canteen. The Super Shoes, Blimp, and Excalibur are also recommended, both against the Fire and against the boss after it.
Room N[edit]
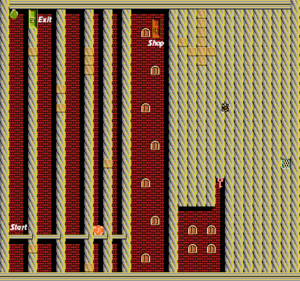
- Money: $18
- Enemies: Tanbos, Agu-agus, Hard Tarus, Flying Eyes
- Shops: Excalibur - $50
This room is divided into three sections; the column section on the left, the elevator shaft in the middle, and the destroyable block section on the right. You begin on the left. In order to navigate the column section, you must shoot out portions of each column in order to create a series of platforms that you can jump from to climb higher. One of the blocks along the platform above the floor can be destroyed, which will allow you to access the other two sections, as well as the Music Box.
The center section has a platform which serves as the elevator. You can only ride the elevator if you purchased the Feather from room J. If not, you will simply pass through it. At the top of the elevator is the shop, where you can purchase the Excalibur for $50. While not required to beat the game, it makes the remaining boss fights substantially easier by reducing the number of bubbles you need to hit with in half. If you don't have the feather, you can still reach this shop fairly easily by jumping from one of the sides.
The last section on the right is the destroyable block section. Here, a majority of the blocks can be shot out, with a few that remain as platforms to help you get back up and out. The only objective here is to clear out enough of them in order to find the honeycomb.
Room R[edit]
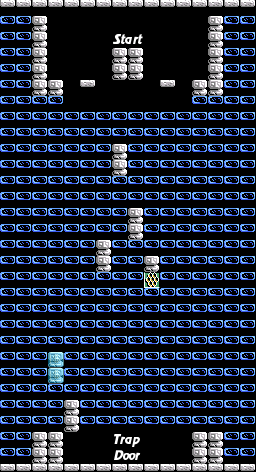
The right tower consists of many blocks of ice. The ice will melt away quite rapidly under your feet, cause you to fall lower into the tower. That's fine since you need to drop down anyway, but you don't want to miss your opportunity to collect the honeycomb along the way. Don't even worry if you miss the two coins far to the left. All the while, Flag enemies will flap and make their way up and down the tower. Once your reach the floor, a trap door will take you to the second half.
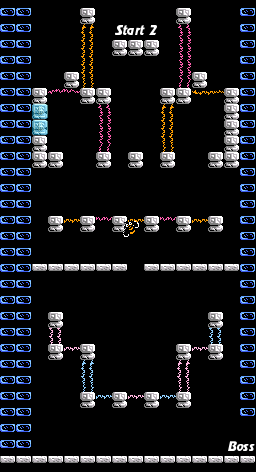
The second half involves navigating through electrified fences between blocks. If you choose to, you can simply fall between the electric gaps and sustain damage to get to the bottom, but since a boss fight awaits you there, you should avoid doing that as much as possible unless going a safe route will make you hit an enemy. Plan your route to the bottom carefully and prepare for the upcoming boss fight.
You will have to face the boss Red Barukama. If you have obtained the assortment of items that were recommended, you should be able to adapt to an all new, and much safer, boss fighting strategy. With the Super Shoes and the Blimp, you can jump very high and stay in the air for quite a while. Stand just to the right of the entrance, and jump into the air as the boss begins to bounce to the right. Keep the jump button held so you float, push down on the direction pad to aim your bubbles down, and fire rapidly. Let the boss withdraw and jump up again when it resumes its approach. When you defeat the boss, you will enter a shop where you will be given the Canteen.
Room L[edit]
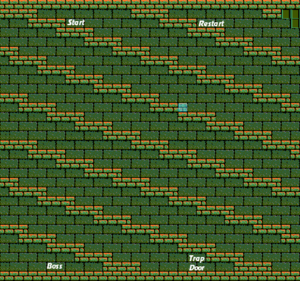
When you enter the left tower, you will be presented with a kind of maze. This spiral staircase wraps around the tower, and you must climb down from the top to the bottom. However, once you reach the bottom, you will enter a trapdoor that will send you back to the top. This is fine the first time, but every time after, you will become stuck in a loop.
None of the stairs that you run down will break, except for one single tile that reveals a money tile. The trick to this stage is to figure out how to break out of the loop and access the boss. Read the spoiler below to learn how to reach the boss. When you escape, you will be up against the boss Blue Doma. Defeat him using the same strategy that you used against Red Barukama, and you will gain access to the left Spirit Shrine.
In order to escape the left tower, you must reach the bottom of the tower and drop through the trap door just once. When you reappear at the top of the tower, fire bubbles at the blocks in the upper right corner of the screen to create a new access to the edge of the screen. Jump through the broken blocks to gain immediate access to the lower left corner of the room, where you can drop down a trapdoor to a boss fight.
Left Shrine[edit]
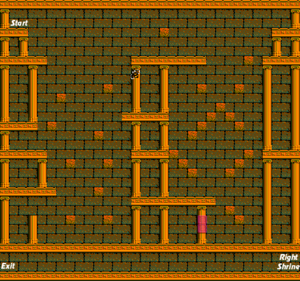
When you escape the left tower room, you will end up in the left Spirit Shrine. The two shrines are connected via a pathway along the floor. However, once you drop to the floor, you can only exit from one shrine to the other, or to the outside of the castle. Be sure not to drop down until your objective in each shrine is finished.
Also note that there are secret blocks that can be activated by your bubbles. They can help or hinder, but they will be invisible unless you got the Paint earlier. Once you have the Paint, any blocks you reveal in the Spirit Shrines will become visible, making them much more useful.
In the spirit shrine, you will see the visage of the capture princess of Hudson Land. Naturally, you will try to reach her, and you should. But as soon as you touch her, she will reveal herself to be a Crow in disguise. You must fire your bubbles at the Crow, but in order to hurt it, you must possess the Canteen. If you have the Canteen, you can beat the Crow in 16 shots (or 8 if you have Excalibur). The Crow will drop a Crown, one of the items needed to face Kama. Collect it and drop to the floor and leave the shrine.
Right Shrine[edit]
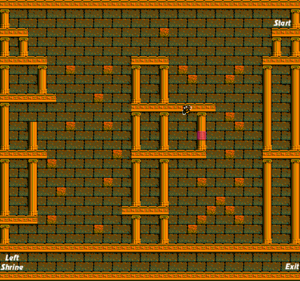
To access the right shrine, you must first visit room M. Drop down to the lower right corner and visit the fireplace. Shoot two of the blocks on top of the fireplace and jump on top. A Fire will appear and begin to attack you. If you have the Canteen, you can destroy it. Either way, push the remaining block over the fireplace to one side and you will fall into the fireplace. Move over a block and you will fall down to a boss fight.
This time, you must fight against the boss Red Homa. Once again, use the hover jump technique that you used against Red Barukama to fire downward at his head as he is approaching you to defeat him. When you win, you will gain access to the right Spirit Shrine. The right shrine is nearly identical to the left. Simply find the fake Princess, touch it to reveal its true Crow form, and defeat the Crow to obtain the Cane, the other item required to face Kama.
Room O[edit]
This is where you will fight the boss Kama. This is the last boss fight of this nature, as Kama is holding the final crystal. Kama will only appear if you are in possession of the Crown and the Cane. Use the same techniques that you used against every boss on this floor. Stand just to the left of the door, jump up high, hover in the air, and fire downward as Kama is approaching you. But be mindful that Kama shoots much more aggressively, often having two or even three projectiles on screen at once. Once Kama is defeated, you will gain access to the fourth and final floor of the castle.