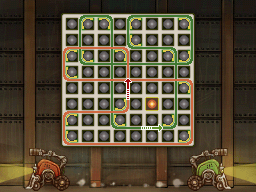
Caution! This page contains all the hints and solutions for every puzzle from 101 to 125. Scroll carefully or you might spoil the answer of a puzzle for yourself. The solutions are hidden behind spoiler tags, so only take a peek if you're desperate.
Puzzle 101[edit]
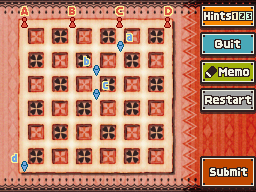
- Name: Shy Guys and Gals (US) / Shy Lads and Lasses (EU)
- Trigger: Talk to Misha
- Location: Chinatown Gate
- Chapter: 10
- Picarats: 30
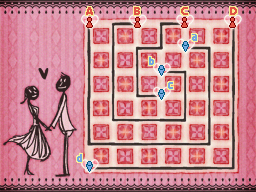
Description: Four shy couples are depicted below by red and blue symbols. They would all like to meet up with their respective partners for a date without running into anybody else in town. Draw lines between couples A-a, B-b, C-c, and D-d without crossing any of their paths.
- Hint 1: Think carefully about the detours the couples need to take to avoid crossing paths. They can't all just take the shortest route to each other.
- Hint 2: Couple D-d's path to each other takes only one turn.
- Hint 3: Couples B-b's and C-c's paths to each other take four turns. Couple A-a's path takes three turns.
- Super Hint: Couple D-d's path to each other follows the right edge and the bottom edge. A walks straight down until just before D, then takes a left. B and C both start out by going one block to their right. Couple B-b's path wraps around beneath couple C-c's. Couple A-a's path is below B-b's. Give it another shot will all that in mind!
Puzzle 102[edit]
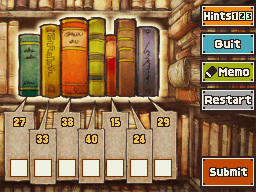
- Name: Balance Your Books
- Trigger: Talk to Maya
- Location: Bookshop
- Chapter: 10
- Picarats: 30
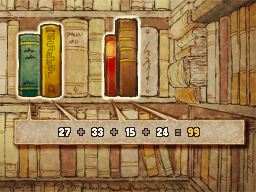
Description: You recently bought several rare books at a used-book store. The total you paid, before tax, was 99 pounds. The image below shows the shelf you purchased your books from. Below each book is a tag listing its price, also before tax. Which books did you buy? Mark all the books you bought before submitting your answer.
- Hint 1: The last digit of 99 is nine, so figure out which book prices add up to a number starting from 9.
- Hint 2: Once you've figured out some combinations that add up to a number starting from nine, focus on finding a combination that results in a number ending in nine.
- Hint 3: You bought four books. If your solution is more or fewer than four books, check your math and try again.
- Super Hint: If you choose only those books that are priced as multiples of three, you'll have the right answer.
Puzzle 103[edit]
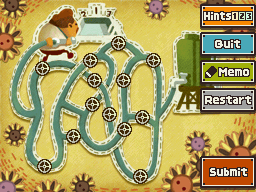
- Name: Pool Problem (US) / Fill the Pool (EU)
- Trigger: Talk to Hardy
- Location: Behind the Casino
- Chapter: 10
- Picarats: 25
Description: You want to fill up your pool, but all of the valves between the tank and the nozzle are rusted shut. You only have three extra valves to work with. Tap the three valves you will replace to get the water flowing.
- Hint 1: You need to replace one of the three valves that stop the water when it first leaves the tank. The one you're looking for is either the middle valve or the bottom one.
- Hint 2: The next valve you need to replace is the one closest to the correct option from Hint One.
- Hint 3: After you've replaced the valves in Hint One and Two, finding the last one should be easy. Find the path to the nozzle with the least amount of valves in the way.
- Super Hint: If you've replaced the correct valves from Hint One and Two, the last valve is the one at the bottom left. That's three valves now. You're done!
Puzzle 104[edit]
- Name: The Cake Gobbler
- Trigger: Talk to Raleigh
- Location: Statue Plaza
- Chapter: 10
- Picarats: 30
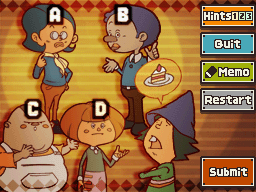
Description: "Hey! Somebody ate my piece of cake! I was saving that for later!"
A: "I didn't eat it!"
B: "Neither A nor D ate it."
C: "I didn't eat it, either!"
D: "C is telling the truth."
Somebody isn't telling the truth. That person is the cake gobbler. Who is it? Circle the answer, then tap Submit.
- Hint 1: Compare all the statements carefully. Did you notice that if A is lying, then B would also be lying?
- Hint 2: If D is lying, then C would be lying. If C is lying, then D would be lying. Also, you'll soon realize that if B is lying, there is more than one cake eater and therefor more than one liar. Are they all liars?! No. Only one person involved in this puzzle is lying.
- Hint 3: Out of A, B, C, and D, maybe nobody is lying... But somebody ate the cake!
- Super Hint: A, B, C, and D are all telling the truth. But somebody is definitely lying. Who else is there?
Puzzle 105[edit]
- Name: The Fingerprint
- Trigger: Talk to Inspector Chelmey
- Location: Flatstone St. 2
- Chapter: 10
- Picarats: 15
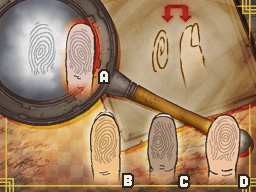
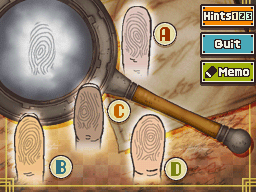
Description: A fingerprint was recently discovered at the scene of an unsolved crime! Four prime suspects have been rounded up and brought into the station. Compare the fingers of suspects A, B, C, and D to the fingerprint shown beneath the magnifying glass, and identify the guilty culprit!
- Hint 1: Don't jump to conclusions. Consider all of the options carefully.
- Hint 2: C looks completely wrong.
- Hint 3: A fingerprint left on a wall is actually a mirror image of the finger itself.
- Super Hint: C and D are clearly wrong. Either A or B is a match. Remember Hint Three?
Puzzle 106[edit]
- Name: Four Stamps
- Trigger: Talk to Dupree
- Location: Arcade East Exit
- Chapter: 10
- Picarats: 20
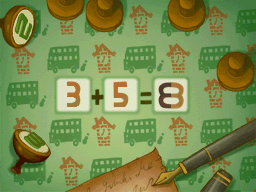
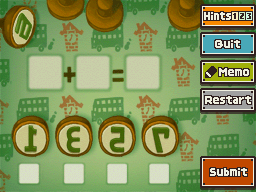
Description: The four numerical stamps shown below are designed to fill in the three blank squares and complete the equation. Only one digit can be used in each square. Your task is to make a valid equation using the fewest number of stamps to fill all three blank squares. Pick the stamps you'll use by checking the boxes below them, and then tap Submit.
- Hint 1: Think of all the equations with a one-digit answer that you can make from the four stamps provided. There aren't that many combinations, so you should be able to figure out the results in no time.
- Hint 2: Using only one, three, five, and seven won't allow you to create a valid equation. This calls for a shift in your thinking. Pay close attention to the shape of each stamp.
- Hint 3: The key to this puzzle is that you're using stamps. One of the stamps can be used twice in the same square to create a single digit. Picture how you might rotate the stamps, and see if you can figure it out.
- Super Hint: If you use the three stamp twice in a single blank square, you can make a different number and it only counts as one stamp. Use that number as the answer to the equation. Now just figure out what else you need to use and you'll be done. But don't forget that you're trying to use the fewest number of stamps possible.
Puzzle 107[edit]
- Name: Chicken Race (US) / The Henclucky Derby (EU)
- Trigger: Talk to Family Goon
- Location: Southern Street
- Chapter: 10
- Picarats: 60
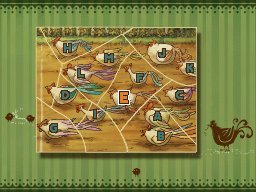
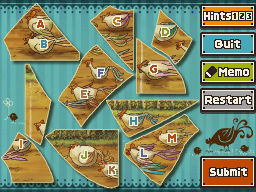
Description: Somebody's been racing chickens! Looks like it was a photo finish, but the photo's been torn to pieces... I need to know which chicken came in seventh place. Think you can figure it out? Circle the correct answer.
- Hint 1: Starting with the finish line, examine carefully how the pieces fit together. Also, the pieces don't rotate.
- Hint 2: Because the pieces don't rotate, the finish line marks the left edge of the photo. This means the piece with chicken G and the piece in the far-left middle go together to form the left side of the picture.
- Hint 3: If you think about Hint Two, you can find the pieces that make up the right edge of the photo. That's right, the pieces with chicken K and chicken C. Now find the pieces that connect to those ones.
- Super Hint: Here's the finishing order through sixth place: G, D, H, L, I, and M. With the candidates narrowed down, the answer should be a bawk in the park!
Puzzle 108[edit]
- Name: Dogs and Cats (US) / Dog, Dog, Cat (EU)
- Trigger: Talk to Catanova
- Location: Black Market
- Chapter: 10
- Picarats: 30
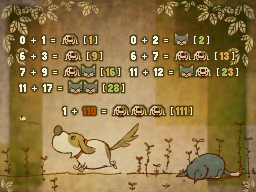
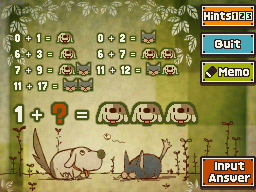
Description: 0 + 1 = dog, 0 + 2 = cat, 6 + 3 = dog, 6 + 7 = dog dog, 7 + 9 = dog cat, 11 + 12 = cat dog, 11 + 17 = cat cat. If the above is true, then what is the smallest value for ? that will make the following equation true: 1 + ? = dog dog dog
- Hint 1: Since you're dealing with equations here, the dogs and cats undoubtedly have something to do with numbers.
- Hint 2: Try adding up the left side of each equation and looking at the results. Are you starting to see what the cats and dogs represent?
- Hint 3: A dog stands for an odd number, and a cat stands for an even number...
- Super Hint: Dog means an odd number. Cat means an even number. If you need a three-digit number made up of three odd numbers, what's the smallest value possible for each digit?
Puzzle 109[edit]
- Name: Three Blocks
- Trigger: Talk to Segal
- Location: Black Market
- Chapter: 10
- Picarats: 40
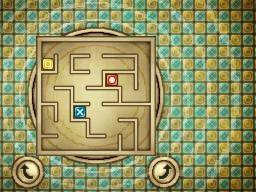
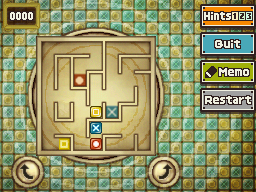
Description: Maneuver the three colored blocks into the matching goal squares on the board. All three blocks must be in place at the end of this puzzle to complete it. To move the blocks, rotate the board 90 degrees left or right by tapping the arrow buttons below.
- Hint 1: There are three blocks this time?! It might seem complicated, but it's nothing to freak out about. Just stay calm, and you'll get the hang of it.
- Hint 2: Are the red and yellow blocks ending up in the opposite spots from where you want them to be? If you take a close look, you'll see that you easily switch them around.
- Hint 3: Here's the first seven moves: Press the right button five times, the left button once, and then the right button one more time. Watch the movement of the blocks carefully, however. The next step is a tricky one.
- Super Hint: Continuing on from Hint Three, press the right button once and the left button once. From here, you should be able to figure out the rest without too much trouble.
Puzzle 110[edit]
- Name: A Zero-Sum Game
- Trigger: Check the entrance to the tunnel
- Location: South Bank
- Chapter: 10
- Picarats: 30
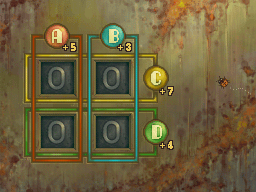
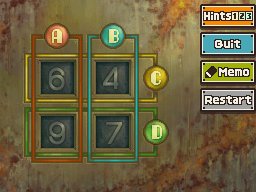
Description: For each of the four squares below, there is a way to display the numbers zero to nine. Tapping each of the four buttons, A, B, C, and D, will change the numbers according to a hidden set of rules. Figure out the hidden rules, and set all the numbers to zero.
- Hint 1: Notice that when a number reaches nine, it flips back to zero. In other words, the numbers are on a loop. So push the buttons as many times as you like. It won't mess up anything. If you restart the puzzle several times and pay close attention to what each button does, the rules should become clear.
- Hint 2: The colored rectangle connected to each button shows which two squares it affects. When a button is tapped, the two numbers within its colored rectangle increase according to a hidden rule. Study the numbers one button at a time.
- Hint 3: Button A adds five. Button B adds three. The rules for button C and D shouldn't be too hard to figure out now. But, even knowing the rules, how do you turn all the numbers to zero?
- Super Hint: Don't get too frustrated if you're still stuck. This puzzle is tricky. To solve it, don't tap the A button at all at first. Tap buttons C and D until the numbers in A's rectangle both read five. After that, you'll be able to solve it in no time.
Puzzle 111[edit]
- Name: Follow the Code (US) / Puzzling Legend (EU)
- Trigger: Check the door on the left wall
- Location: North Bank
- Chapter: 11
- Picarats: 40
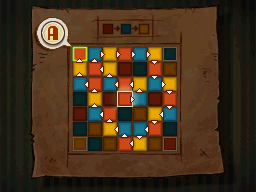
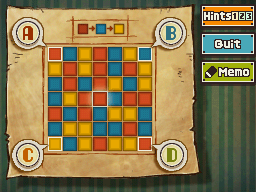
Description: One of the four corner squares below, A, B, C, or D, will unlock this door when pressed. Start from the red square in the center and follow the order code shown at the top--red, blue, yellow--to find it. Also, you can't use the same square twice. Which square will unlock the door? Tap the correct letter to solve the puzzle.
- Hint 1: Red, blue, yellow. Red, blue, yellow... Starting from the red square in the center, going from square to square in this exact order will lead you to the answer.
- Hint 2: Red, blue, yellow. Be sure to follow this color order each time you move to a new square. From the start, here are the first seven moves: Right, up, left, left, up, left, up.
- Hint 3: Follow the steps listed in Hint Two, and continue going red, blue, yellow toward the right. If you don't make any mistakes along the way, you'll end up at the right square before too long.
- Super Hint: The correct square is not the top-right or bottom-right corner. It's one of the two corner squares on the left!
Puzzle 112[edit]
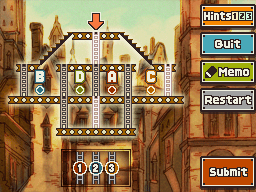
- Name: Beams and Ladders (US) / Ladder Puzzle (EU)
- Trigger: Check the underground entrance
- Location: Side of Facility
- Chapter: 11
- Picarats: 30
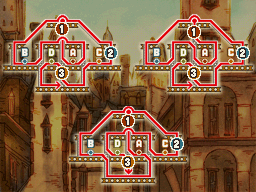
Description: To inspect this odd construction site, start at the orange arrow and pass through the points A, B, C, and D in order. Be sure to cross every beam and use every ladder, but your path can't cross except to pass over or under a ladder. In what order will you use the white ladders? Place the ladders numbered 1, 2, and 3 in the correct locations to solve this puzzle.
- Hint 1: This construction site certainly looks complicated to traverse, but it can be done. Don't overthink it.
- Hint 2: There are several routes you can take, but the order in which you'll end up using the three ladders is always the same.
- Hint 3: From the start, head straight down the white ladder to reach point A. That's ladder number one.
- Super Hint: Once again, to get from the start to point A, use the white ladder directly below the orange arrow. That's ladder number one. To get from point A to point B, don't use any of the white ladders. You should be able to figure out where to place the second and third ladders from here.
Puzzle 113[edit]
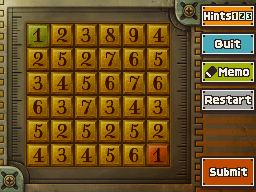
- Name: One Step at a Time
- Trigger: Check the metal gate
- Location: Service Entrance
- Chapter: 11
- Picarats: 30
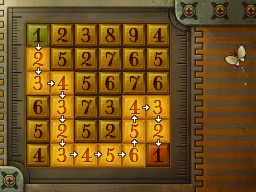
Description: Make your way from the green square to the red square one step at a time. What's the catch? Well, you can only move to numbers that differ by one from your current number. If you reach the goal following this rule, the door will open. Each number you touch will light up. Make sure all the numbers in your path are lit up before submitting your answer.
- Hint 1: There may seem like many paths at first, but there is only one correct one. Choose your steps carefully.
- Hint 2: Don't let the numbers get too large. If you reach a seven, you've made a mistake. When you reach a six, your next step should be to a five. Think you can solve it now?
- Hint 3: If you're stuck, try going from the red square to the green one. There's only one initial path from that direction.
- Super Hint: The correct path: 1, 2, 3, 4, 3, 2, 3, 4, 5, 6, 5, 4, 3, 2, 1.
Puzzle 114[edit]
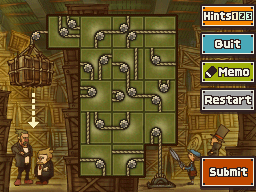
- Name: Roped In (US) / Rope Puzzle (EU)
- Trigger: Check Shmelmey or Shmarton
- Location: Facility Warehouse
- Chapter: 11
- Picarats: 60
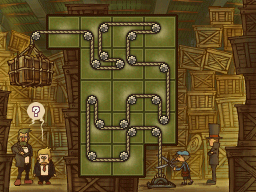
Description: Those two goons are standing right below that wooden crate! All you need to do is cut the rope, but it's all messed up... Rearrange the tiles so that the rope connects from Luke's scissors to the crate above the goons. Keep in mind that you need to use all the tiles. Now, hurry!
- Hint 1: The final section of the rope that connects to the crate is simply one horizontal length. Put that piece in place first. The section that goes right above Luke's scissors has two pulleys.
- Hint 2: The two sections that go at the very bottom have one pulley each. If you think about the direction the rope needs to go, you should be able to find these two sections right away.
- Hint 3: The top-right section has one pulley. The rope comes in and out of this pulley from the left side. The section to the left of the top-right section has one pulley, and the rope enters from the section below. This section also has a piece of rope running horizontally across the top.
- Super Hint: Here's the path of rope starting from the section next to the crate: Right, down, right, left, up, right, right, left, down, right, down, down, up, left, down, left, up, down, down, right, up, right, and down to Luke. Got all that? Great!
Puzzle 115[edit]
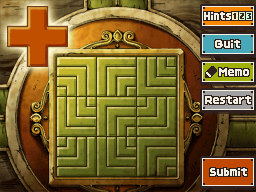
- Name: Hidden in Plain Site (US) / Plus Key (EU)
- Trigger: Check the door at the center
- Location: Central Research
- Chapter: 11
- Picarats: 50
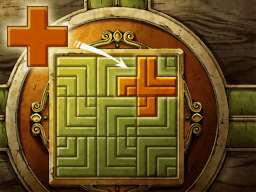
Description: The orange plus sign shown in the top-left corner below is hidden somewhere in the green grid. It's the exact same size and shape. Can you find it? Draw lines around it with your stylus, and then tap Submit.
- Hint 1: The shape is hidden in plain sight. It can be hard to find because of the contrasting patterns, but it's definitely there. Look very closely.
- Hint 2: The lines can be very distracting and help to hide the shape you're looking for. Try using the Memo function to draw several plus signs here and there, and see if it helps reveal anything.
- Hint 3: Pay close attention to the upper section. The shape is hiding in there somewhere.
- Super Hint: The plus sign is hidden in the upper-right corner.
Puzzle 116[edit]
- Name: Which Way Is Up? (US) / Which Direction? (EU)
- Trigger: Enter the tunnel
- Location: Tunnel
- Chapter: 11
- Picarats: 50
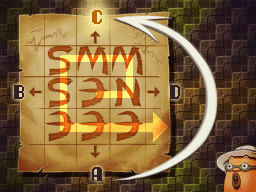
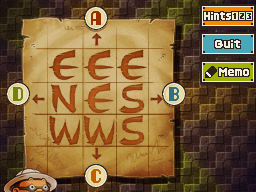
Description: Below is a chart with a cardinal direction written in each square. The top of the chart, however, isn't necessarily north. When looking at the chart from the proper orientation, you can start at a certain square and, moving in the direction written in each square, pass over all of the squares in the chart. Which side--A, B, C, or D, is north?
- Hint 1: It's a pretty simple chart, but it gets tricky if you don't know which way you're supposed to be looking at it. Try looking at it from each direction one at a time.
- Hint 2: No matter which side is north, north-south and east-west will always be opposite directions.
- Hint 3: There are three easts in a row, which means the last square you touch will be one of these, since you can't change direction once you enter this row.
- Super Hint: The three easts in a row also indicate left or right, because north-south is always opposite east-west. This means sides B and D can't possibly be north. This means the answer must be side A or C!
Puzzle 117[edit]
- Name: Where's the Arrow? (US) / The Secret Letter (EU)
- Trigger: Talk to Inspector Chelmey or Barton
- Location: South Bank
- Chapter: 12
- Picarats: 60
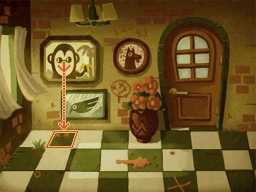
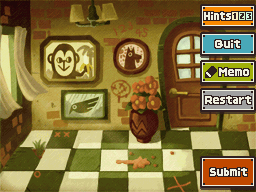
Description: There's a treasure hidden below one of the tiles in this room. The only clue is a handwritten note: "Follow the arrow to find it." Which tile should you lift to find the treasure? Draw a circle around it with your stylus.
- Hint 1: Nothing very sneaky is going on. There's actually an arrow somewhere.
- Hint 2: Rather than focusing too intently on the room, try blurring your vision and having a look.
- Hint 3: The arrow is somewhere left of center.
- Super Hint: Look closely at the paintings in the room. There's an arrow hidden in one...
Puzzle 118[edit]
- Name: Scrutinized Screws (US) / Scrutinised Screws (EU)
- Trigger: Check the Laytonmobile
- Location: Riverside Hill
- Chapter: 13
- Picarats: 40
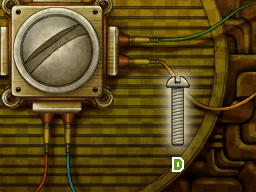
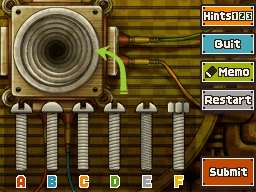
Description: Only one of the six screws shown below, A, B, C, D, E, or F, will fit properly into the threaded hole. The width of the hole matches the thickness of all the screws, so don't worry about that. Your only tool is a flathead screwdriver. Now, hurry! You don't have much time. Circle the correct screw, and tap Submit.
- Hint 1: Pay attention to the direction of the threads on the screws and on the hole.
- Hint 2: Screw C won't go anywhere no matter how much you turn it! So, cross that one of the list of possible answers.
- Hint 3: Screw B can't be turned with any tool, and screw F can't be turned with a flathead screwdriver. So cross those two options off the list as well.
- Super Hint: Screw A is threaded in the opposite direction of the hole, so it can't be the answer. That leaves only two possible choices. Take one last look, and you should have this in the bag.
Puzzle 119[edit]
- Name: Swap to Unlock
- Trigger: Check the small door
- Location: Fortress Door
- Chapter: 13
- Picarats: 60
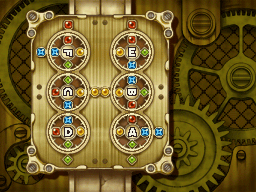
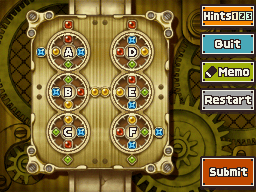
Description: The door below is sealed shut with a mysterious lock utilizing six dials that can be swapped and rotated. To open the door, arrange the dials so that gems bordering each other both horizontally and vertically are the same color. Tap and hold the center of the dials to move them, and tap and hold the edges to rotate them in either direction. Good luck!
- Hint 1: Dial A goes in the bottom-right slot.
- Hint 2: Dial F goes in the upper-left slot.
- Hint 3: Dial D goes in the bottom-left slot. The real key, though, is that all the gems on the inside--both the right edge of the left column and the left edge of the right column--are yellow!
- Super Hint: Dial E goes in the upper-right slot. If you've followed all the hints correctly so far, the rest should be a snap!
Puzzle 120[edit]
- Name: A Cryptic Combo
- Trigger: Check the door
- Location: Elevator Door
- Chapter: 13
- Picarats: 50
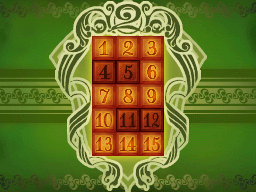
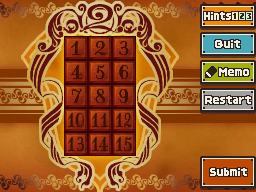
Description: To open the door, you'll need to press the numerical buttons according to cryptic instructions: "Open with a two, but leave the four." Pressing just the two button and leaving just the four button untouched doesn't work. So how, exactly, are you supposed to open this door?
- Hint 1: The door will open if you interpret the instructions correctly. There's nothing tricky going on here. You just need to approach the problem with a different mind-set.
- Hint 2: Think more broadly about the phrase "open with a two." Don't get hung up on the numbers on each individual button.
- Hint 3: "Open with a two" refers to pushing the buttons that together form the shape of a number two when lit.
- Super Hint: Press one, two, three, six, nine, eight, seven... You should start to see the shape of a certain number emerge. That's right! The trick is to press the buttons that together form a number-two shape when lit up. Pretty neat, huh? Also, see how there are four buttons left untouched? That's what the other part of the instructions refer to.
Puzzle 121[edit]
- Name: Arrow Flow
- Trigger: Check Flora's cage
- Location: Ventilation Room
- Chapter: 13
- Picarats: 40
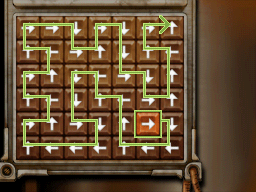
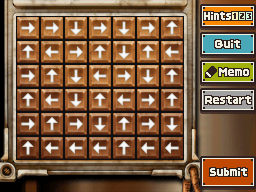
Description: How to Open. "Start from a button, and follow the arrows from one button to the next. Find the one button that will lead you through all the other buttons on the panel!" Can you figure out which button leads to all the rest? Tap to mark it!
- Hint 1: Instead of looking for the starting button, try looking for the end button and working backward. Keep in mind that the arrow on the end button won't point to any other button.
- Hint 2: The end button doesn't point to any other button, so it must be a button on the outer edge that points outward. Once you've found the end point, you can work your way backward to find the start!
- Hint 3: The end point is the button in the upper-right corner. Work backward from there to find the start!
- Super Hint: The starting button isn't pointed to by any button. Can you find it? That's your answer!
Puzzle 122[edit]
- Name: Password Pieces (US) / Key Code Puzzle (EU)
- Trigger: Enter the elevator
- Location: Elevator
- Chapter: 13
- Picarats: 60
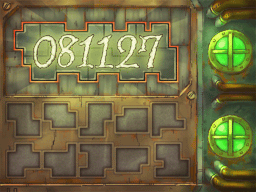
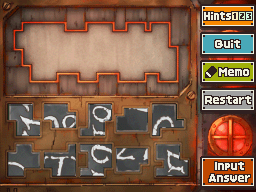
Description: "To figure out the password, all you need to do is fit together the 10 pieces below. You can move and rotate each piece with your stylus. Now, get to it!"
- Hint 1: Start by fitting the pieces into the ends or the really unusual spaces.
- Hint 2: You can rotate each of the pieces, so they can each fit in lots of different places. However, there's only one arrangement in which all of the pieces will fit perfectly together. Keep at it!
- Hint 3: The first digit of the password is zero, and the last one is seven. There's a one in there somewhere too. Is it starting to come together now?
- Super Hint: There are actually two ones in the password. There's also a two to the right of the ones. You should know five of the six digits now.
Puzzle 123[edit]
- Name: Cat's-Eye View
- Trigger: Talk to Fisheye
- Location: Surveillance Floor
- Chapter: 13
- Picarats: 50
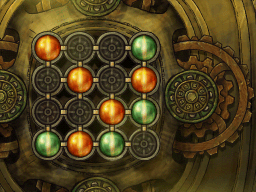
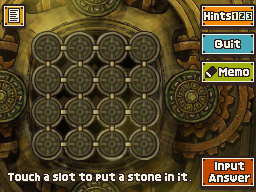
Description: Place cat's-eye stones in the round spots below. The only rule is that no four stones can form a square or rectangle either horizontally or vertically. Tap the icon in the upper-left corner to view examples of how to arrange your stones. There are 16 spots in this puzzle. What is the maximum number of stones you can place while following the above rule? Submit the number as your answer.
- Hint 1: At first, just try placing stones while following the rule until you can't place any more. If you repeat this process over and over, the answer should start to reveal itself.
- Hint 2: It's probably obvious, but the answer isn't 16. What about 15 and 14? Nope. You can cross those off your list too.
- Hint 3: The answer is a multiple of three.
- Super Hint: The answer is not a two-digit number. You're so close now. You can do it!
Puzzle 124[edit]
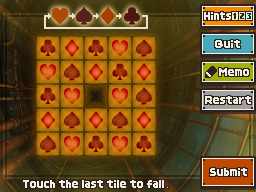
- Name: The Final Tiles
- Trigger: Talk to Clive
- Location: Surveillance Room
- Chapter: 13
- Picarats: 70
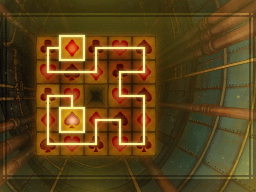
Description: The floor below is made up of 24 tiles. It's specially designed so that the tiles will fall away one at a time until they're all gone. Once the first tile falls, neighboring tiles (not diagonal) will fall way one by one in the following order of suits: hearts, spades, diamonds, and clubs. The first tile set to fall, however, is not necessarily a heart. If you can find the last tile set to fall, you can stop this floor from disappearing! Tap the last tile and then touch Submit.
- Hint 1: First, try picking a random tile at the start and see how far you can go. You have to find a path that will allow all of the tiles to fall away.
- Hint 2: Pick any tile as a starting point, and follow the order of suits to see where you end up. If your progress is stopped before you clear all of the tiles, you'll need to either start over at a different tile or try going in another direction.
- Hint 3: The first tile set to fall is a diamond. The last tile set to fall is a spade.
- Super Hint: One of the two spade tiles in the second column over from the left is the last panel set to fall.
Puzzle 125[edit]
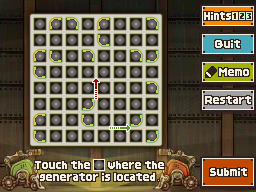
- Name: Connect the Bots
- Trigger: Check the surveillance screens
- Location: Surveillance Room
- Chapter: 13
- Picarats: 50
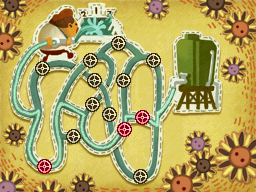
Description: This is a map of the floor housing the generator room. The location of two camera-equipped security bots are identified by the red and green arrows. To prevent its detection by Professor Layton, Clive has ensured that the patrol routes followed by these security bots do not pass by the generator room. The bots will always turn at the rounded yellow corners. Which room do the bots avoid? That's the generator room!
- Hint 1: There are some intersections with rounded corners that face each other, but the bots will always turn at the corner closest to them.
- Hint 2: There are only two security bots, but together they are able to monitor nearly all of the rooms. Their paths may cross, but if they ever overlap, you're doing something wrong.
- Hint 3: Each bot's route completes a loop. Once you've identified both of their routes, you just need to find the one room that neither bot passes.
- Super Hint: If you break up the map into four quadrants, the generator room is the lower-right one.
