| Map Name | Initial Coordinates |
|---|---|
| jail5 | (96 -503 46) : 90° (facing west) |
Level objective[edit]

The objective for this level is to locate the Pyramid Key, then return with it to the Security Complex.
Strategy[edit]
Like the Torture Chambers, this is an easy level for this stage in the game with a simple, in-and-out mission. You will benefit from a powerful, accurate, long-range weapon, specifically the HyperBlaster, but you can get one here if you don't have it yet. A new Strogg type is introduced, the Mutant, and you will have to learn how to deal with him effectively. He is fast moving and can jump, but he has no ranged attack. The level contains adequate ammunition and health (including two Adrenalines) and there are two Combat Armor items, so you can afford to drop 100 armor points and get it all back. Most enemies are encountered in the normal way, but look out for several waves of Flyers. There is one point where you're likely to be taken completely by surprise, so save the game more often than you normally would and don't play with a cup of coffee in your hand. You can complete this level without fully exploring or killing all the enemies. In fact, you may have trouble actually finding all the enemies (the Walkthrough attempts to help with that).
Walkthrough[edit]
Advance along the only available path, dealing with Strogg as you meet them, until you come to an open-air courtyard. All the level secrets are clustered around this point, so if you need help finding them either take a look at the Secrets section now or, since you will be coming back this way, make a note to do this later. There are a number of ways forward from this point, each is considered separately in the sub-sections below.
Let's Just Get the Pyramid Key[edit]

Go up the ramp straight ahead of you, across the courtyard and carefully into the building on the other side. After disposing of some Guards, you should be able to hear some galumphing sounds, which are characteristic of the Mutant Strogg. This enemy has no ranged attack, but it's tough, fast, can leap large distances and inflicts serious damage with melee attacks. Equip a weapon that does a lot of damage fast, such as the Chain Gun or HyperBlaster. Advance slowly and as soon as the Mutant appears open fire, running back to avoid its leap. Repeat this tactic until you have flushed them all out. You won't meet many Mutants in the game, but remember their sound so that you won't be caught flat-footed when you do.
Enter the building, go down some steps and take the first left down more steps. In the large room below go out of the doorway on the left and continue along a walkway until you can see the end. Only Guards will oppose you. You'll want to know where the Mutant's galumphing sound is coming from, so look down below; he can't hurt you from down there. The walkway ends at a second courtyard. This is where the accurate, long-range weapon will come in handy. Pick off the Enforcers first and then the Tank. There is excellent cover for right-handed shooters and the Tank will not leave his post so there's plenty of time to see and dodge his return fire.

Press the button that the Tank was guarding and be ready for three flyers to come over the top of the building. Inside, you will have to deal with a large number of Guards. Take the Pyramid Key and your field computer will update your secondary objective to "Pyramid key acquired. Return to security complex". Now simply retrace your steps all the way to where you entered the level. When you leave the courtyard another wave of Flyers will come over the building. If you want to make all the enemy kills, wait for them and use the cover available at the end of the walkway. If you leave them behind now and come back for them later it can be difficult to find them all. If you don't care about kills, just move quickly and they won't catch you. There will also be flyers in the first courtyard. Again, take them out if you wish or just move quickly across to the door and continue to the exit. If you pass by the Flyers on the way out, you will have about 37 of the 56 possible kills. To get down to the lower level at the exit without fall damage crouch and/or drop first to the lintel over one of the prison cell doorways.
I Wish I Had a HyperBlaster[edit]

Go up the ramp straight ahead of you but turn to the left at the top instead of crossing to the building. Drop down from the upper level onto a walkway at the edge of a lake. Turn around and you'll see an opening to an area underneath where you just were. Inside there's your HyperBlaster, just sitting in the middle of an open area of floor. With different color panels to the side. Does this seem suspicious, or what? To figure this out yourself, save the game and skip the rest of this paragraph. Need help? OK, equip the Super Shotgun and walk past the HyperBlaster, staying well to the left on one of the darker floor panels. Look to the left in the hallway beyond and let loose a mighty blast into the hapless Light Guards gathered there. You can easily kill three with one shot, but there's a fourth hiding further along. Now that these guys are out of the way, turn your attention back to the HyperBlaster. Strange as this may seem, the trick is to just walk up and take it, but don't take a step further until you see what happens. The dark panels fall away and the floor just ahead and behind explodes, leaving you standing on a pillar over a spike pit. OK, fine; just turn around and jump back to where you shot the guards. If you want to explore the pit and collect a little ammo, there's a ladder to the right. Otherwise, turn left to the lift platform.
Step on the lift platform to go up. This is the only way back to the main part of the level. To avoid repeating the whole how-to-fight-a-Mutant thing again here, refer to the first paragraph of Let's Just Get the Pyramid Key. You'll meet the Guards after the Mutants and the door through which they'll come is to the left at the top of the lift platform. Otherwise, the same advice applies. Find your way out to the courtyard, turn around and pick up the quest for the Pyramid Key at that point. If you don't go for all the kills, this way you will get back to the exit with about 41 of the 56 possible kills, the extra four being the Light Guards.
Cleaning Up[edit]
So, where are the other 15 Strogg? 6 of them are the two waves of three Flyers each that we just ran away from above. To kill them, pause and look back as you leave the second courtyard (they come over the building where you found the Pyramid Key) and also pause when you get back to the first courtyard (they come over the high wall to the far right). Refer to the Secrets section to find out where you will encounter three more Strogg. Also, recall that we ignored a Mutant underneath the walkway. You can shoot him from safety up above or go down into the watery area where he is running about. Steps in the second courtyard provide easy access. So, that leaves five. If you haven't stumbled upon them yet, you have remarkable self-control. I guess I'm going to have to tell you.

Go back to the first courtyard. See the Combat Armor? What could be the harm in taking that, eh? OK, then, try it, but save the game first. So, there's one of the missing Strogg. To avoid getting beaten up, equip the Chain Gun or HyperBlaster and come straight up the ramp to take the armor. As soon as the wall explodes, open fire and back up in the now well-practiced maneuver for dealing with Mutants. The last four enemies are a final wave of Flyers that will now come over the lower wall above the lake. Sometimes one or two of them can be rather shy, hiding just on the other side of the wall, so you may need to be patient (if you didn't just grab the Combat Armor earlier in the level, you obviously are patient!).
So, what else? A thorough exploration is worthwhile as there are good things hidden behind pillars (Combat Armor) and in other obscure places (a Power Shield under the walkway and a MegaHealth at the bottom of the lake). Also, shoot anything that will explode as these also occasionally hide useful things (an Adrenaline in the dark gray crate). Walk around ledges where ammunition may be found (for example above the doorway to the first courtyard there are three boxes of bullets and above the exit door are StimPacks).
Secrets[edit]
This level has three (3) secrets, all quite close together near the start of the level:
- You will come to a sunken area containing explosive barrels and crates. There is a crack in the rear wall. Either stand clear and shoot the barrels or just shoot the wall to break it open. Enter the low alcove thus revealed to receive the message "You have found a secret area" and collect a Backpack of ammunition. Unless you are short of ammunition, consider collecting the Backpack on your way out of the level.
- As soon as you enter the first open-air courtyard area, there is an upward ramp on your left. At the bottom of the ramp, to the right, a stone projects slightly from the wall. Press it back to lower the ramp. Behind the ramp, at the other end, is an Adrenaline. Consider collecting this on your way out of the level in case you lose health in the fighting.
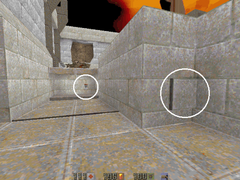
- The first open-air courtyard area has a lower level. Drop down and make your way along the walkway to the left and to a doorway where you will met some Strogg. Through the doorway you will find two broken doors. You can't break then down any more, so just crouch and crawl under the right-hand door. Shoot away some projecting rock and move further inside to receive the message "You have found a secret area". Explore all the way inside to find a Grenade Launcher and a MedKit.
- Gallery : Secrets in the Guard House level.
-
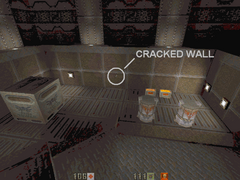
Break down the wall in this sunken area.
-
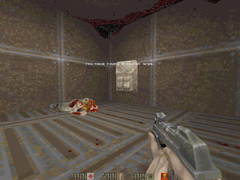
The Backpack contains lots of ammunition.
-
Press the projecting stone to lower the ramp.
-

Crouch and crawl through the right-hand door.
-
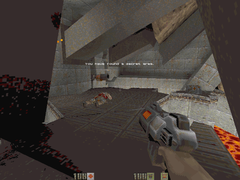
Explore the secret area to find a Grenade Launcher.


