Starting the Base Area unit, you have only the standard issue Blaster. It has a slow rate of fire and doesn't inflict much damage with each shot, but it is self-recharging and does not require ammunition. Use it to take down lightly armed guards, break things and to trigger shootable buttons while you gather additional weapons throughout the mission. If you need to conserve ammunition and have cover from return fire, the Blaster can, given enough hits, take down any enemy you will encounter on Stroggos.
In this level, you will find a Shotgun and some Grenades (but not the Grenade Launcher). Later in the unit, you will find a Machine Gun and a Super Shotgun.
The objective of the Base Area unit is to establish a communication link to the command ship. From the Outer Base, find your way to the Installation. Once there, locate the entrance to the Comm Center and activate the communications station. Return to the Installation and take the exit to the next unit.
A typical definition for the word "strategy" is "A plan of action or policy designed to achieve a major or overall aim". A "plan of action" isn't a detailed list of steps. It may set out goals that, if reached, will result in the major aim being achieved, but it doesn't specify every detail on the way to the goals. A "policy" is a general approach to a problem.
The Strategy section of the Quake II level pages attempts to give the player general advice about reaching the goals of the level, without giving away the details that are fun to discover as you play. If you need more detail, for example if you can't find something or are just generally getting shot to pieces, then refer to the Walkthrough section. Because Quake II is a game, it's more important to have fun playing than to reach the objectives in some predetermined and highly efficient manner. Therefore, the best strategy for you is the one that maximizes your enjoyment. This makes it very hard to give advice. So, what you'll actually find in the Strategy sections will be warnings about things that happen in the level that might influence your choice of strategy. Examples are ambushes, the appearance of enemies at your back and difficulties navigating around the level.
For the most part, you'll play Quake II using a strategy that matches your personality. At one extreme, you might advance slowly and cautiously, drawing back whenever you encounter enemies and picking them off from cover. You would leave useful items where they are and come back for them later so that you take the maximum health, armor and ammunition into the unknown of the next level. You'll explore the level completely, find all Secrets and kill all enemies. At the other extreme, you might equip the most powerful weapon for which you have ammunition and just charge forward shooting at anything that moves. If you find something, you'll pick it up immediately. If you find yourself at the exit, you'll go through.
This level has two Walkthrough sections. Follow the General Walkthrough if you know what strategy will suit you most (or, just go and play the level). This is the kind of walkthrough that will appear in all the remaining levels. You'll be given a path through the level and information about the enemies you will meet, but not always instructions on how to defeat them. You'll read about the controls you need to operate and what their effect is, but not all the items you will find nor whether you should pick them up. Follow the Detailed Walkthrough if you want help discovering what strategy suits you. In this, you will read a blow-by-blow account of one way through the level. You will be told exactly what enemies you face and given different ways to fight them, including stealth, guns-blazing and tricks like using exploding barrels. You will be told to leave items behind when your need for them later is likely to be greater than your need for them now and given a detailed rationale for this decision. Enough now. It's time to start!
From your starting position, next to your landing pod, shoot the barrels nearby to break the glass in the window. Go through, drop down and go to the right where you will find a ladder down to an area below the floor. Either take the adrenaline there or come back for it later when you need to restore some health. Crouch and go through the tunnel to the left of the adrenaline and at the other end head out into the low under-floor area until you can see a row of five dim lights on the wall. Head towards the right-most one. Near it, there is a crack in the ceiling. Stand back and shoot it to break through. Also shoot the exploding barrels up there. Stick your head up into the room above and look between the red crates. After killing the Guard, jump up and take the Shotgun. To the right is ammo for the Shotgun. There is another guard hiding in the shadow of a pillar here, a third on the ledge above and a fourth outside through a hole in the wall, but you don't need to engage with any of these unless you want to score all the enemy kills.
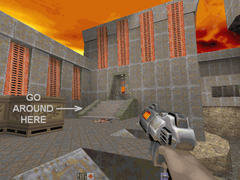
Now that you have the shotgun, retrace your steps. A guard may have appeared in the starting room, but he may also be somewhere else. Go around to the right of the broken pillar and down a short ramp. There is a hole in the building wall low on your left. That guard may be in the shadows in there, but, again, he could be somewhere else. You'll see Jacket Armor a short distance off on the other side of a tunnel. Either take it now or come back for it later so that you can start the next level with good armor. Past the hole, there's only one way to go until you come to an open area with a doorway to the outside on your right. Kill the Guards as you go and keep to the left otherwise more Guards will come in from the outside to stir up trouble. Go along the corridor and deal with the Guard that runs out from around the corner. When you turn the corner, you will see a door. In the room beyond the door are five Enforcers and a Guard; two Guards if the one that could be in any number of places happens to be in there too.
Also in the room beyond the door is the elevator to the exit and the next level. Just go up the stairs and around to reach it. But, it's pretty obvious that you've not completely explored the level so only leave if you're not interested in finding all the goodies and killing all the enemies. If you don't want to backtrack and are just ready to move on, at least take a look at Secrets, below.
A guard hides in a corner outside the building.
To explore the areas you've missed, go back first to that open part with the doorway that leads outside. You'll have to fight the Guards outside, perhaps by exploding the barrels while they are nearby, and also watch out for a Guard hiding behind the crates just inside the doorway on the left. In the courtyard outside, go down one of the ramps into the water and follow it through the opening on your right (but see Secrets, below, first). The water becomes deep enough to swim. On the right you will see the underfloor area where you broke through to get the Shotgun (for the last time, see Secrets, below, before leaving the water). Go back to where you found the Shotgun and complete any unfinished business there. Use the steps and the fallen beam to get to the upper level and then the other fallen beam to go to the outdoor area through the hole in the building wall. Turn to the right and walk between the building and the cliff wall, watching out for a Guard hiding in the shadows (if you haven't already killed him). Collect the Jacket Armor, if you have not already done so, and make your way back to the elevator room and thence to the next level.
This walkthrough is intended for relative newcomers to first person shooters and is too detailed for players with much experience. The idea is to introduce some of the subtleties of the genre, and of Quake II in particular, as well as walking through the first level step-by-step, killing all the enemies. All other level walkthroughs have much less detail. A general walkthrough appears above.
From your starting position, next to your landing pod, go around to the right of the broken pillar and down a short ramp. There is a hole in the building wall low on your left. Take a look in the small outdoor area beyond (there's nobody there, right?), but don't go into the tunnel to get the Armor; we'll be coming back for it when we need it more.
Go through a broken door and look around the right turn in the corridor. A Shotgun Guard is patrolling there and will attack when he sees you. Try to hit him first, but don't stand still because he will return fire quickly. Withdraw through the corridor and up the ramp to make him follow you and shoot repeatedly until he goes down. At hard difficulty, it will take three hits from your Blaster. Keep moving from side to side and keep a distance to make it harder for him to hit you. When you hit him, he will flinch, so take advantage of this to press the attack. Until you find the Shotgun, this is how you will deal with these enemies. Practice moving from side to side (strafing) while using the mouse to keep your weapon aimed at your target.
Advance again and look out into the room in which the Shotgun Guard was patrolling. A Light Guard will approach from your left. These guys are poor marksmen and only take two Blaster hits to down, but again try to keep strafing in case he gets lucky. Go to the corner and you will see a corridor on the far side of the room. Another Light Guard is patrolling there. Once again, stay back, strafe out to the left, aim and take a shot. If you hit him, another shot will finish him. If you miss, strafe to the right and use the corner for cover. Try again, but if he gets close retreat and make him follow you. Once this guy goes down, advance further towards the distant corridor. The room opens out to the right. Do you think there might be an enemy around the corner there? In Quake II, it is best to assume that there is. And, you're right! It's a Shotgun Guard. Backpedal and strafe, trying to get in the three shots that will kill him. If he flinches, press the attack with another immediate shot. If he ducks, aim lower. OK, you get the picture.
Now, the corridor actually leads to the room with our goal, the elevator, in it. But, there are some nasty enemies in there too, so we're not going that way until we find a more powerful weapon. (If you weren't following this walkthrough, you'd have gone that way and you'd be dead by now!) Instead, staying far to the left, where you know it's safe, and crouching, to keep out of sight, move along the wall and look to the right where the room opens out. You'll see a doorway leading to an outdoor area. Still in a crouch, advance along the line in the floor that leads directly through the doorway until you can see the tops of two wooden crates on the far side of the courtyard out there. Aim your blaster slightly to the left of the crates. Now, stand up, quickly adjust your aim for the pale gray barrel and fire. The barrel, and two others standing close by, will explode. With a bit of luck, there will be one or two fountains of Strogg blood and gore. If the enemies out there happened not to be close to the barrels, or if they spotted you creeping about, they will run to the attack. As always, move side-to-side as you fire. They are only Light Guards.
Before you go out to the courtyard, note the crates to the left. Is there room for a Strogg to hide behind them? Yes, but it turns out that there isn't anyone there (make a note of that for later on). Is there anyone outside who has not yet joined the battle? No. Step out and look around. If you've taken any hits, first pick up only enough of the white First Aid packs from inside to get your health above 90. If you take another, some of its ten health points will be wasted. Remember this when you're deciding whether or not to pick up an item. Whatever it contains above your maximum will be wasted. There is a channel below the courtyard on the left containing what might be water.
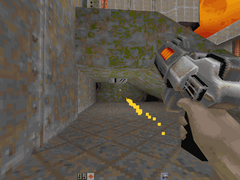
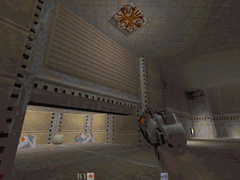
Shoot the crack in the ceiling with the Blaster.
Take one of the ramps down to it, constantly being on the lookout for an attack from an enemy that you have not yet seen, step quickly in and pull back at once. Nothing happened. So, it is water or something equally harmless. Go back into the water and through the opening on your right. Follow it around some turns into what seems to be a flooded basement. The water becomes deeper and you'll have to swim instead of wading. Look slightly upwards or press the "jump" key to keep your head above water. Go to the left and look for some narrow slots that lead into a large but really low area, which will turn out to be under the floor of the building above. Scramble out of the water at one of them and crouch to walk inside. Go towards the far left corner. There are dim lights along the left-hand wall. Stop short of the last one and look at the ceiling adjacent to it. There is a crack. Shoot this with your Blaster, but don't stand too close. It will break away with an explosion revealing a hole into the room above. Go closer until you can see an explosive barrel and shoot it. Again, don't be too close. We need the barrels up there gone because we don't want to have them explode around us when we engage the Shotgun Guard in the room above. You're in a tight spot and you'll probably take some damage here, but go right into the corner and look into the room at 45 degrees from the walls. The Guard is walking too and fro, so when he sees you and attacks is a matter of luck. Maybe he has his back to you. Stand up and fire three shots with the Blaster; make them all count and he's down.
The Shotgun (right) and two boxes of shells (left).
Jump out of the hole in the floor and walk between the red crates to find a Shotgun. Yay! Note that you have ten shells. Unlike the Blaster, the Shotgun uses up ammunition, one shell per shot. Turn to the right and you will see two yellow-topped boxes of shells. Take them; now you have 30. From where you picked up the second box of shells, look along the wall behind the pillar. What do you know! There's a Guard back there looking out into the room, oblivious to your presence. With your back to the crates, aim carefully and let him have one shell, watching for the pattern of red spatter indicating that every pellet hit. He's down, and he was one of the tougher Shotgun Guards, too. There's another one on the level just above. Slip out towards the middle of the room, moving to the left and then turning to walk backwards, until you see him. If he sees you, he will start to run about and shoot, so you must keep moving too to avoid his fire. Your first shot with the Shotgun may take him out, but you'll probably see gray dots as well as the red ones indicating pellets that missed. If too many missed, he'll need another shell. You could also duck behind cover, switch to the Blaster and finish him off with that, but the Shotgun's a new toy so let's use it.
Go up the steps and jump or use the fallen beam to get to the upper level (you're constantly on the lookout for Strogg, aren't you? Good). Take a look around; there's a broken elevator but no enemies. Use the other fallen beam to go to the outdoor area through the hole in the building wall. Turn to the right and note where the building gets much closer to the cliff wall. Either go forwards to that point and deal with whatever happens by yourself ... or read the next sentence first. There's a Light Guard hiding right against the building in the corner. If you want to use the Shotgun again, he won't stand a chance, but there's another shell gone. If you're braver, try two shots with the Blaster. Don't go through the narrow gap (or, if you do, don't take the Armor yet), instead go back to the broken elevator room, climbing up the fallen beam. If you've lost any health, there are First Aid packs tucked into the corners of this room and the room below. Now we're off to use our Shotgun to clear the way to the elevator.
Go back down to the lower level (you can just drop down without taking fall damage), and through the hole to the underfloor area. Crouching, go out from the corner and curve gradually to the left. Look for another of those dim lights to your left and head for it. If you can't find it, go back to the middle one of the row of five lights and stand with your back to it. Head straight across the space, using the lines on the floor for guidance, until you bump into the far wall. Now look to the left and there it is. At the light, take the tunnel on the right and you come out in another, taller and better lit, under-floor room. There's an Adrenaline here, but don't take it yet. It's often best not to just take items when you see them, but remember where they are and come back for them when they will be of most use. Instead, go around to the other side of the ladder and climb up. Go past the stacked crates and you will see a broken window above two crates placed side-by-side. Shoot the window to break out the glass. Use the Blaster to conserve shells, but switch back to the Shotgun immediately.
Now, you're about to encounter something about Quake II that it's best to remember as the levels get more difficult. On the other side of the window is the room you started in. You left it empty of Strogg, but it may not be so now. When you picked up the Shotgun, two enemies just appeared in the level from nowhere. A Light Guard appeared in a fixed place and we will find him later, but also a Shotgun Guard appeared and he could be in any one of a number of places. One of these places is the starting room, so be ready to kill him as soon as you see him. If he's over by your landing pod, you may be able to trick him into shooting at you in the lower room and hitting the exploding barrels and killing himself in the process. Jump first onto the smaller crate, then onto the larger one and climb through the window. Now you're back where you started, but you have a more powerful weapon than the Blaster!
As before, go around the broken pillar and down the ramp. Approach the hole on your left carefully, looking into the dim area just inside and on the left. The Shotgun Guard might be in there! If he is, shoot at him and strafe left for cover. If he needs another shot, strafe right and shoot while you're moving. Or, strafe right, shoot and immediately strafe left again. If you took damage from his fire, don't worry, there are First Aid packs around (you surely haven't used them all up). At this point, if you find you're getting shot up a lot, you should probably collect the Jacket Armor that's on the other side of the tunnel. As you approach, you'll get the helpful message "Crouch here". However, as a general rule, things don't get easier from one level to the next, so if you take as much Armor (and Health and ammunition) to the next level as possible, you'll have the best chance of making it through. Save the game and try the rest of this level without the Armor.
A guard has appeared behind the crates!
Take the same path as before until the corridor to the elevator room is in sight. If you've already met the Shotgun Guard then just go, otherwise move cautiously as he could be somewhere along your path or in the corridor up ahead. Remember the crates to the left of the doorway to the courtyard? It looked like a great place for an enemy to hide, but when you looked earlier on there was nothing there. Well, guess what, this is where the Light Guard has appeared! Throughout the game, maybe one tenth of the enemies that you meet are not just standing there waiting for you. Many appear in semi-plausible ways such as rising on elevators from under the floor, dropping through hatches in the ceiling or coming out of alcoves behind hidden panels in the walls. A few just appear out of nowhere, as the two Guards did here. As well as re-introducing enemies to areas that you had previously cleared of danger, occasionally Strogg appear in this way right behind you as you advance. This strategy guide will warn you in a general way that this can happen in the level's Strategy section and will tell you exactly where it happens in the Walkthrough. So, you can get just as much help as you want. After dispatching the Guard, search the courtyard for a box of shells. You should now have about thirty unless you've been really wasteful.
At this point, your field computer shows that you have 11 or 12 out of 19 enemy kills. The remaining seven or eight Strogg stand between you and your goal. Next up are some Guards, so equip either the Blaster or Shotgun. Move into the corridor and as you near the left turn at the end a Shotgun Guard will rush you. If your aim is good, the Shotgun takes him out in one. If you picked the Blaster, remember to backpedal and strafe, but the spread of his Shotgun fire is probably going to give you some damage. So, make the first shot count then hit him with two more when he flinches. Note that even when he's down, he'll try to get off a last shot towards wherever you were when you killed him. So, either don't be there (move somewhere else, for example past him) or use another shot to put him out of his misery (but that might be a shell you'll need later). Take the left and go up to the door. In Quake II, whenever you open a door and you're not sure of what's on the other side, pull back and strafe from side-to-side. That way, if there's an enemy there, he'll have difficulty hitting you. In this case, there's another Shotgun Guard.
The Shotgun Guard in the elevator room.
If you're lucky, he'll be facing away and you can get the first shot in. Otherwise, make him chase after you as you pull back in a curve around the corner and fire at leisure. If the extra Shotgun Guard has not shown up yet, you'll have two of them at this point, but the strategy is the same. Maybe it would be best to have the Shotgun equipped.
OK, so that's five left. These are going to be Enforcers, who are much tougher than Guards. Plan on three Shotgun blasts at close range for these guys. If you run short of shells, two from the Shotgun and some Blaster fire can work, but you're probably not going to have the time to change weapons. The Enforcers are spread about in there, so if you just sail in you'll be in an open space with limited cover and enemies all around you. Even so, if all this backing off and hiding around corners doesn't feel like your natural style, this is a good time to see if charging in and shooting everything that moves is more to your liking. Save the game. Try first without the Armor but go back for it if you have to. There's a Medkit, worth 25 points of health, just inside the door on the left that you can pick up if you get into trouble. Don't worry about losing all your health, just stay alive until you've killed all five Enforcers. Before you leave, you'll be going back for the Adrenaline that we left behind exactly for this purpose. That will restore all your health and increase your maximum by one point to 101. There are also three boxes of shells in there, so you won't run out of ammunition unless you're a really bad shot. All set? Off you go then. Good luck.
Not so sure? Let's see if we can pick them off one by one then. Go up to the door so that it opens and take a look inside. You probably won't see anyone. They could be standing waiting for you or they could be patrolling, just like the Guards we've already seen. If you've got a lot of patience, wait until one of them sees you and engage with him first. If you don't want to wait, you'll need to flush them out. To do this, figure out where you think an enemy could hide, run in and check that place out and then run back out again. Always run back out, even if you're wrong and there was nobody there. This is to keep you moving and hard to hit because an enemy might have spotted you from somewhere else. Only go in again to look in another spot when you're sure that all is still calm. If you're good at aiming quickly, you can get in your first shot at anyone you find when you first make contact, but don't stand there like a dunce reloading for the next shot; even if the enemy you've just shot doesn't recover himself you risk being attacked by another one.
Exploding an enforcer in the elevator room.
There are two Enforcers patrolling the upper level. One walks along the wall to the left and when he sees you will either come to the edge of the platform in front of the elevator or to the edge above you and to the left. Use the doorway for cover and don't worry about taking a little damage. The other walks along the back wall and when he sees you will come down the stairs to the right. You may have to dance out to the right a bit to attract his attention. There's a chance here for a bit of fun, so let the door close to protect you and open it again when you think he's reached the bottom of the stairs. Shoot the barrels there and he's disposed of for a Blaster shot. The remaining three are on the lower level around to the left. Go and show your face to them and they will come after you. Retreat as far as necessary to avoid most of their fire and take them out one by one.
Now the level is clear of enemies. It's time to go back for all the good stuff you saw earlier (and also look for the secrets). The Adrenaline at the bottom of the ladder will restore you to full heath and give you an extra maximum health point as well, permanently! The Stim Packs will increase your health even beyond this, so try to collect them after you have the Adrenaline, otherwise their effect will be wasted. Of course, there's the Jacket Armor in the tunnel near the starting point and Armor Shards in various places. If you didn't waste Shotgun shots, you should be leaving this level with 101 to 119 Health points, 25 to 35 Armor points, 10 Grenades and 50 or more Shells.
The courtyard above the water channel is connected to the building by a short flight of steps. Go around the left-hand side of the steps, as you face the building, and look under them. It's dark in there, so fire your Blaster a couple of times. You will see a secret Silencer. Crouch to go in and take it.
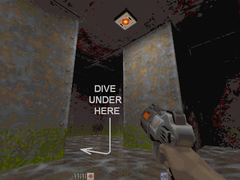
In the water under the building, where it gets to swimming depth, go to the opposite end from where you entered from the courtyard, passing the low, under-floor area on your right. Look to your left and notice that the water continues under the wall. Swim underwater and come up on the other side to find a hidden room with Grenades and Armor Shards. You will get the message "You have found a secret area".
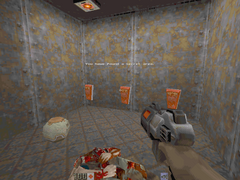
When you finally reach the room containing the exit to the Installation, walk around to the rear of the elevator on the bottom floor. Look for a glowing, pulsating button on the ceiling (see image at right). Shoot it and a wall panel rises to reveal two Medkits and some Grenades. Crouch to go in and collect them.
Secrets in the Outer Base.
Steps connect the courtyard to the building.
Shoot your blaster to see a Silencer under the steps.
Dive under the wall and come up on the other side.