| Map Name | Initial Coordinates |
|---|---|
| mine1 | (-983 396 -129) : -90° (facing east) |
Level objective[edit]
In this level you are still making your way through the mines towards the Factory. You will first need to activate ventilation systems to eliminate the toxic conditions in the lower mines. Then you will need to find and take the exit to the Borehole level.
Strategy[edit]
What stands out in this level is the difficulty of some of the combat situations. You may want to save the game more frequently than usual because until you understand what you're getting into you can end up taking a lot of damage. This applies whether you rush out with guns blazing or try to stay behind cover because cover is not always available or you are obliged to leave it to get a shot in. If saving the game and reloading after you've taken a look at what lies ahead seems like cheating, then the best strategy will be proceeding with great caution and carrying a flexible weapon, such as the HyperBlaster. There is adequate ammunition around, although obviously you'll run out if you use the same weapon all the time.

There are no new Strogg, just Guards, Gunners, Gladiators, Mutants and Icarus. However, they often group at a point where you arrive suddenly, forming an ambush. Some, especially the Gladiators, choose to stand their ground and cannot be enticed into chasing you, limiting your combat options. If you failed to find the secret Rocket Launcher in the Mine Entrance, don't overlook it here, sitting in plain sight. There is not much armor in this level, just a Flak Jacket near the start and a Combat Suit about half way through.
Walkthrough[edit]
On entering the upper mines, you find yourself in a circular cavern with health and armor nearby. A large ventilation shaft drops from the roof and there is a passage to your left. Equip the Machinegun and take a few steps, killing two Guards as they emerge from the passage. A short distance inside, your field computer updates your secondary objective to "Toxic conditions found in lower mines. Activate ventilation systems".
The Elevator Ambush[edit]
Continue along the passage to the point where it turns to the right. Around this corner, in the passage and in the cavern beyond, there are five Shotgun Guards. How you approach them depends on how much damage you are prepared to take. You can run forward with the Super Shotgun and try to dodge their fire, but unless you know where the Guards are they are going to hit you several times. Holding back and sniping is hardly better as the first look at each Guard that you're likely to get is when he shoots at you. If you save the game and reload when you know the enemy's location you can pop Grenades ahead of you and fare somewhat better.
The cavern in which most of the Guards were clustered contains a rock crushing machine with an elevator nearby. Up a slope to the right you will find a Rocket Launcher. As you take it, watch out for two Icarus appearing in the high vertical shaft above you. To get back up onto the walkway, you'll need to wriggle underneath and come up on the elevator side. On the way you will pick up some Rockets and Bullets. Now you need to take the elevator up.

The problem here is that there will be a number of Strogg to greet you at the top, in fact five Shotgun Guards, a Gunner and an Icarus (at hard difficulty). You will suddenly be exposed to fire from many of them at the same time and getting them in your sights and taking them out before they do you considerable damage is challenging. If you don't want to take much damage, you'll have to save the game, figure out where to stand in the elevator and practice the order in which you engage the Strogg. As a starting point, try equipping the Chain Gun and pressing up against the right-hand side of the elevator (as you look back out). When you near the top, begin firing towards the left-hand side of the elevator opening to take out two Guards coming from that side and swing slightly right to get a third standing further away. The platform may go back down, but you're standing on a narrow ledge. Hold the trigger down. Now focus on the Gunner, who will come from the right, and the Icarus, who will come up from below. This leaves two Guards, both to the right, one at middle distance and one far away up some steps. Run out, keep moving and swing the Chain Gun in their direction. You will lose about 30 armor points and use up almost all your bullets. If you want to collect the Adrenaline and Machinegun in the pit, plan on loosing at least 6 health points and 10 armor points crouching and dropping back down to continue. Save the game in case you fall in the rock crushing machine. If you did not take the Jacket Armor in the starting room, go back for it now.
The Ventilation Systems Control Room[edit]
From the ambush, follow the only available route, engaging a Gladiator, two Gunners and maybe a Guard or two. On your right you will see two Gunners on the far side of a deep vertical shaft, which turns out to be above where you picked up the Rocket Launcher. You can leave the Gunners until later or kill them now, for example by launching Grenades across the gap. If at any time you want to get back to the start of the level without fall damage, slide down the curving rock face here. Continue on your way, facing more Guards and two Mutants, until you come to an opening to a large outdoor area. There will be Icarus to fight here, with a second wave appearing after you have dispatched the first two. Dominating this area is a large pit, lined with metal, in the middle of which is a ventilation fan. This is what you're trying to turn on, because below it is the way to the lower mines. You can go down there now, using the steps down the metal rim and the passage that you can see opposite, but you will find bars at the level exit. If you approach them, you will take poison damage and receive the message "Access denied. Toxic conditions present". An alternative way down is to drop onto the corner to collect the MegaHealth and from there onto the stationary fan blades. Shoot up the two Guards and the Mutant below, avoiding a tricky face-to-face encounter later, then crouch and drop through the blades, trying to land in the water and avoid fall damage. Call down the elevator, take it up, kill the Gunner and come back out into the open area to continue.

Whatever you decide to do about the lower levels, and ignoring them for now is probably best, go to the cave entrance on the right with white lights to each side. The cave slopes down to a grid that leads over some lava to a right turn where there will be another Gunner to dispatch. Stop just past the right turn and save the game. Note the opening to a tunnel on the right, just before the Combat Armor. Skip the rest of this paragraph if you want to figure out this next bit of combat yourself. To take a peek into the tunnel, face the right-hand wall, strafe left until you get a glimpse and immediately strafe right to cover again. The tunnel slopes gently upward and the most significant thing is that there is a Gladiator in the cavern at the top. There are other Strogg too, but it's the Gladiator that will cause the trouble. For the first time, the Rocket Launcher is indispensable. Strafe completely across the tunnel opening until you bump the wall, then immediately strafe back. The Gladiator will fire his Rail Gun, but, hopefully, miss because you are moving. As you strafe, get him in the cross-hairs and give him a Rocket. You may be able to get off a Rocket when you strafe out to the left and another as you come back to the right. Be careful not to hit the passage wall or you'll blow up yourself instead of him. After four hits he'll go down. It's quite likely that all the other Strogg in the cavern are also dead from the Rocket splash (or in-fighting), but equip the Chain Gun when you go up to make sure.
From the cavern at the top of the tunnel, a short passage leads up to another cavern. Again, turn sideways, strafe out and back to cover again. There are three Guards out there, easily picked off with a Shotgun. The way now lies along a wide, high hallway with four massive arches and an opening at the other end. There are nozzles at about chest height in between the arches and a Rocket Launcher half way along. Does this look like another ambush? Skip the rest of this paragraph to find out for yourself. Yes, of course it's another ambush. As you take your first step into the hallway, the nozzles begin emitting bursts of flame and a Gladiator appears through the distant opening and takes up a fixed position. Pull back and to the left to take cover. Once again, a good tactic is to strafe out, this time to the right, until a Rail Gun shot whistles past on your left, then strafe back to the left to return to cover. Aim while you're moving and fire a Rocket when the Gladiator is in your cross-hairs. Alternatively, assuming you are playing right-handed, edge out from cover until you can see half of the Gladiator but not his Rail Gun. Then use any accurate long-range weapon, even the Blaster.

To pass the fireballs without damage, move forward along the right edge of the hallway just until you are precisely opposite the first nozzle on the left side. Wait until the nozzles on the right emit fireballs and immediately run until you are past the last of the arches. Ignore the Rocket Launcher for now. The room at the far end of the hallway looks empty, but there are hiding places so keep back from the entrance. What do you do to flush Strogg out from hiding? That's right. Put the first Grenade just to the left of the pillar so that it falls around the back. Hit the Gunner that emerges with a second Grenade. Now put another around the corner to the right so that it bounces off of the ramp and disappears out of sight. Another Gunner emerges for you to finish off. Now it is possible to enter the room and step on the floor button, which will turn off the fireballs so that you can go back for the Rocket Launcher. However, it's not going to be that easy. Try it if you like. A more cautious approach is to equip the Chain Gun and go up to the button carefully. If Strogg appear from the ramp to the right, deal with them. Don't retreat into the fireballs and don't step on the button. If you get to the button before being attacked, turn and run back down the hallway, dodging from side to side. A Mutant appears at the other end so gun him down and turn right to take cover. Now peek out to see if you were followed. If not, you have another Gladiator and two more Gunners to clear away in the area at the top of the ramp.
A turn to the right now reveals a large cavern. Your Blaster quickly dispatches the two Light Guards on high walls. Move out cautiously with, for example, the Super Shotgun, to find a Shotgun Guard on the steps that lead down ahead of you and two more Light Guards off to the sides. A narrow bridge leads over another ventilation fan. Below the fan is the cavern into which you came when you first entered the level, but this is not a good way to get there. Before crossing the bridge, check out the area to the right as you entered the cavern. You may find one or two Gunners around the corner, depending on whether you killed them soon after the elevator ambush. It's best to have these guys out of the way. You will see the deep vertical shaft above where you picked up the Rocket Launcher, now from the other side. The floor button does not operate yet and you'll get the message "Bridge access denied" if you step on it. Head back to the main cavern, but first see Secrets, below, especially if you can carry some more Bullets.

It's now time to cross the narrow bridge over the fan. Given that you'll not be able to dodge from side-to-side as you retreat, what Strogg would you least like to come charging out of the tunnel on the other side? Expect to take at least one Rail Gun hit here. You can try advancing to just before the tunnel begins and popping a Grenade so that it bounces around the bend to the left. This may delay the Gladiator enough for you to get back over the bridge to cover. Through the tunnel we're finally in the ventilation systems control room. Press the wall button to hear a computer voice announce "Ventilation systems active". Maybe your field computer is speaking (that would explain the use of English) as it updates your secondary objective to "Ventilation systems active. Lower levels accessible". Refer to Secrets, below, before you leave this room.
Exit to the Lower Levels[edit]
The really difficult combat is now over, but high up in the cavern outside the control room you will discover that three Icarus have appeared. You can use the tunnel for cover or run across, up the steps and back to the room on the other side where there is more space to manuever. After shooting them down, note that the fan is rotating. You need to get back to the outdoor area with the other ventilation fan. To do this, either retrace your steps or stand on the floor button where the Gunners were, which will now deploy a bridge over the deep vertical shaft. Either way, you will meet two more Icarus. At the fan, use the steps and metal ledges in the pit to make your way to the opening that will take you to the lower levels. Inside, kill the Guard if you have not already done so. When you take the elevator down, equip a powerful mid-range weapon, such as the HyperBlaster and be ready for the two Guards and the Mutant at the bottom (unless you have already killed them of course). Stand well back and open fire immediately you see your targets. The exit is now not barred and you can take it to the next level. You can backtrack to most of the level looking for supplies that you missed, but getting down to the very start is difficult unless you are prepared to take fall damage.
Secrets[edit]
This level has two (2) secrets:
- When you reach the ventilation systems control room, look to the left of the wall button for a cabinet that periodically emits sparks. Shoot it; it will take ten Blaster shots. The cabinet will explode and you will receive the message "You have found a secret". Where the cabinet stood there will be a Quad Damage.
- At the floor button that extends the bridge to an earlier part of the level, face the bridge and look to your right. In the corner is a dark wall panel that slides up when shot. It does not stand out in any way, so just fire your Blaster into the corner and move the aim point around until you hit it. In the alcove behind the panel are two boxes of Bullets and a MedKit. You will receive the message "You have found a secret" when you enter the alcove to take them.
- Gallery : Secrets in the Upper Mines.
-
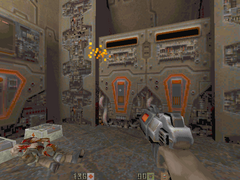
The sparking cabinet in the ventilation control room.
-
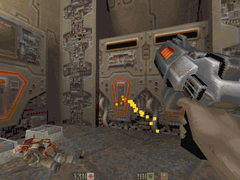
Shoot the sparking cabinet (it takes ten Blaster shots).
-
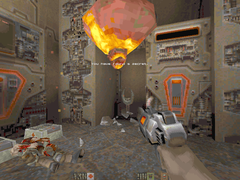
The cabinet explodes, revealing a Quad Damage.
-
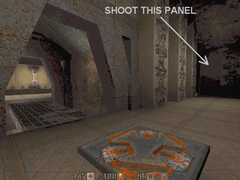
The secret panel near the floor button for the bridge.
-
Shoot the secret panel and it will slide up.


