| Map Name | Initial Coordinates |
|---|---|
| city3 | (-205 -1215 -881) : -180° (facing south) |
Level objective[edit]
The main objective for this level is first to find the Data Communications Laser CD and take it back to the Lower Palace to reprogram the Data Spinner, then to bring back the Data Spinner and use it to "Neutralize the Strogg Leader's Communication System" and finally to go through the newly opened doorways to the Inner Chamber. A secondary objective is to locate the Security Pass, take it to the Force Field Control Room, turn off the Yellow Force Fields and explore the areas thus made accessible. This objective is optional; you can complete the level and the unit and proceed to the Inner Chamber and the Final Showdown without doing any of this. Whether the game was designed this way or the direct path through was unintended but never found during development and play testing is a mystery.
Strategy[edit]
As in the Lower Palace, there are situations in this level where Strogg show up where previously there appeared to be none. If you're not going to follow the walkthrough, be constantly looking over your shoulder and ready to duck behind cover.
The main issue with this level, however, is that it is confusing, mostly because only a small part needs to be explored to get to the next unit. As you move through, you come across yellow force fields and a reference to a security pass that have nothing to do with the main objective. It's hard not to think that they do, somehow, tie in with shutting down the communication system, and it's frustrating when you can't figure out how this is. So, for peace of mind, let go of the idea that the level makes sense. Just do a bunch of stuff and you'll eventually make it out. Also, it turns out that shutting down the communication system is the same thing as turning off some force fields that are blocking the archways to the exit. Don't get hung up on "communications". As if this all wasn't enough, archways blocked by the yellow force fields are ringed with very pale yellow lights that look white and the contraption that looks exactly like the one that turned off the red force fields in the Lower Palace, but with yellow lights instead of red, does not turn off the yellow force fields but rather opens a door (without a force field) that is ringed with yellow lights. Confused yet? No? Go play the level, then.
Walkthrough[edit]

Part 1 - Finding the Data Communications Laser CD[edit]
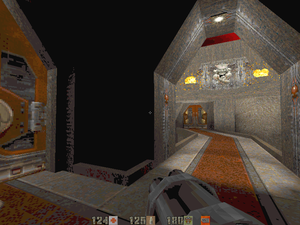
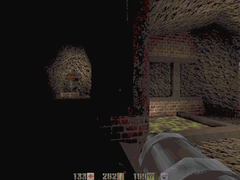
Enter the level from the Lower Palace via the elevator. You will arrive in a room with two doorways opposite you, each guarded by a force field. The Guards in this room will succumb to a couple of grenades or any other fast attack (you have no cover). Follow the red carpet to the left-hand doorway and use the button on the wall to turn off the force field. Through the door is an elevator. Press the button, quickly step on, ride to the top and quickly step off. The red carpet reappears and takes you through a door to a room that turns your path through 180 degrees. There are two Iron Maidens in here. Take them out with rockets or some other weapon, using the blue crystal pillar for cover. Just outside the second door in this room are Guards, another Iron Maiden, and, around the corner, a Gunner. Duck back into the room and retreat to find cover.
Beyond the door, the red carpet goes straight and through a door behind which there is another Tank and a Technician. We will be taking the hallway to the right. Either try not to open the door or, what the hell, take the enemies down now. On the other side of the door is a high walkway over a tall room with red, black and white hanging flags. If you plan to explore the entire level, you can peek over the edge and see if there are any Strogg down there to shoot at. Doing this will. of course, change the game later, but generally to your advantage. (See also Secrets, below.) So, anyway, back to the hallway and leave the red carpet behind. At the end of the first straight section, dogleg to the left, passing a door on the right, and fight an Iron Maiden and two Gunners.

(Behind the door, there is an opening outlined in white lights and blocked by a force field. If you approach it, you will get the message "Security pass required to deactivate yellow force fields." See below for information about the Security Pass optional side-quest. You can get to the next unit without going through here). After the Iron Maiden and Gunners, go through a door and a left turn brings you to the Data Communication Laser. Go around it to take the Data CD. A pillar will rise, blocking entrance to a room beyond. You will lower this pillar again by bringing the reprogrammed Data Spinner to this point. Now backtrack all the way to the Lower Palace.
If you first want to take a peek through the ornate door to the side of the Communication Laser, you will find an opening outlined in pale blue lights and blocked by a force field. If you approach it, you will get the message "This force field is activated by the communication laser". When you bring back and use the reprogrammed the Data Spinner to shut down the laser, this is the main way to go to get to the next unit. A little exploration will uncover the other, similar opening, which can be used instead.

Part 2 - Neutralizing the Strogg Leader's Communication System[edit]
Return to this level after reprogramming the Data Spinner and follow exactly the same path as before to the Communication Laser. Again, go around it and stand on the spot where you found the Data CD. The pillar that rose to block your path when you took the Data CD will lower to let you through. In the room behind the pillar, approach the computer console which will accept the Data Spinner and give you the message "Warning. Communication laser shut down". In effect, what this means is that the force fields in the doorways that lead to the unit exit have been turned off. You can now proceed to the Inner Chamber (however, note that most of this level has not been explored, so see also Part 3 below.) From the room in which you shut down the laser, go out, walk to the right around the now non-functional laser and take the first door, picking up the red carpet again. Follow the hallway through an archway surrounded by pale blue lights. This was blocked by a force field before you shut down the laser. Around the corner to the right you will meet a tank.

Take him out using the corner for cover. (Another archway surrounded by pale blue lights is on your left. Through this is a door leading to the high walkway over the large room with hanging flags. You will fight, or have fought, a swarm of Strogg in that room if you shut down the Yellow Force Fields. Through the door there may or may not be a Tank and a Technician, depending on how things have gone up to now. You can pass by the door and miss nothing but the enemy kills and a secret).
Follow the hallway over a lava pit, turn right and you will see an Iron Maiden. She will come after you; take her down. At the end of the hallway there is a computer console on the wall and a lava-flooded room to the left. In the room are Technicians, so dispose of them. Operate the console and a ramp will lower. Go up the ramp and press the button to exit the level and the unit. Once again, note that you can get to this point with most of the level unexplored, so exit only when you are are ready. You should be taking with you Armor and ammo suitable for the fight with the Makron.

Part 3 - Finding the Security Pass[edit]
Enter the level from the lower / basement-level entrance from the Lower Palace where there are puddles of shallow water. (You cannot get to the area in which the Security Pass is hidden from the upper entrance until you turn off the Yellow Force Fields, which can only be done after the Security Pass is obtained and used). You enter at the foot of some stairs and immediately encounter Guards. Some are on a landing over your head and there is also an Iron Maiden up there, so consider sending a grenade or two after them. When you make it to the top of the stairs, go along the corridor just until a Guard appears at the other end and take him down. Turn around and go back to the stairs and down, watching out for a Technician and dealing with him on the way. The Technician came out of an alcove that has just now opened and there is an Adrenaline in there to be collected. Go back up to the corridor and again go along until enemies appear at the far end. There is another Iron Maiden and a Gunner. Either take them out or, for an extra bit of fun, maneuver them into fighting each other in the narrow space and pop off the survivor. Finally, get the to end of the corridor. In front of and below you is an underground area that is best explored later. Above you is a hole through which you will drop from the room in which you will find the Security Pass. If you can see the Technician in there, a few blaster shots may entice him to come down into your chain gun fire. A couple of grenades over the top of the ladder may also make things easier later. To your left is an alcove from which another Iron Maiden will shortly appear. Go to your right.

There are more Guards to fight, some may be in a room with exploding barrels and can be dispatched by shooting the barrels. Going back for the Iron Maiden is easier than falling into her lap when you drop through the hole. You will quickly find an elevator shaft. As you take the elevator up, you will pass a level from which Guards and/or Gunners will take pot-shots at you. It isn't easy to take them out as you rise, but do it if you can. Otherwise, crouch to use the elevator platform as cover. At the top, your progress will appear to be blocked by a force field in an opening outlined by pale yellow lights. This is the Yellow Force Field that you need the Security Pass to turn off. If you explored the hallways in the vicinity of the Communication Laser, you may have come to this barrier from the other side. Tiptoe around the ledge to the other side of the shaft where there is a grille that will slide sideways in two pieces to let you through to a second shaft with ladders. Deal now with the Guards and/or Gunners because you don't want them shooting at you as you climb down—See also Secrets, below.
The easiest way to get onto a ladder without falling (in Quake II, not in real life) is to stand on the opposite side of the shaft and jump across to land on it.

Descend to the next level down, i.e. the bottom of the first ladder. Here you can fight any remaining Guards and Gunners to gain access to a backpack of ammo. Return to the ladders and take the second one down another level. Explore and fight the Strogg, including a Guard in a dead-end hallway to your left that you need to be on the lookout for. You will find a room with a hole in the floor and some electronic equipment against one wall. If your shooting up through the hole was effective, the room may be clear, otherwise expect to fight a Gunner and/or a Technician. In a recess in the equipment, you will find the Security Pass. Jump up and crouch to take it and receive the message "Security pass grants access to force field control chamber". Climb down the ladder in the hole, finally dropping down and finding yourself at the end of the long corridor near where you entered the level. Return along the corridor, down the stairs and through the exit to the Lower Palace. You may be accosted along the way by a Technician if you did not go back for him earlier.
Part 4 - Turning off the Yellow Force Fields[edit]

To turn off the Yellow Force Fields, you need to get into the Force Field Control Chamber, which is accessed from the area below the platform around the Communication Laser. You need the Security Pass to open the door. If you are bringing the Security Pass through the Lower Palace, then you will be arriving in the room at the top of the elevator and facing the two openings with switchable force fields. You have already followed the red carpet through the left-hand opening to reach the Communication Laser and get the Data CD. Unless you have departed from this walkthrough, you have not been through the right-hand opening. This opening leads through a swarm of Strogg to your destination.
There are two ways to proceed. One is to shut off the force field in the right-hand opening and fight your way through. The other is to go again through the left-hand opening, where you will meet no opposition. Arriving on the platform around the Communication Laser, you can conveniently shut down the laser with the Data Spinner, as described above, if you haven't already done this. Then, crouch and drop down to the area below. Finding the door to the Force Field Control Chamber isn't hard and when you approach it you will get the encouraging message "Security pass approved. You may enter force field control". There's nobody in there, so just go around some corners to the console and push the button. However, when you come back out, there's nowhere to go but into the door you would have come out of if you'd taken the other path. So, you'll just end up fighting the same swarm in reverse. Arbitrarily, this walkthrough will take the first choice. If you haven't turned off the Communication Laser yet, you can just do this on your way to the Inner Chamber after completing all the activities in this level.

So, shut off the force field in the right-hand opening, go through and turn to the right to take down a couple of Guards. (See also Secrets, below). Go down the first flight of stairs in the tunnel and look around the corner to your left. Below is a Gunner, obviously expecting you to be coming the other way. Punish him for his error. Go down to his position and briefly look up the stairs that lead out of the tunnel into a large room, then duck back. You will probably have attracted the attention of some guards, so wait for them and deal with them using the tunnel turns for cover. The Iron Maiden may also come after you. There is also another Gunner up there, again facing the wrong way. He won't come down until you attack him. When you come up into the room, look for a Technician above, but don't concentrate only on him because a posse of Guards will emerge from the hallway to the right (five, at hard difficulty). You could again use the tunnel for cover, but the Guards may gather above the exit rather than following you down, making them more difficult to pick off. The room is decorated with four red, black and white hanging flags. You may have seen this room before, from the walkway above your head, depending on how adventurous you were on the way to collect the Data CD. If you picked off some of the Strogg already, particularly the Technician, then obviously they won't be here to greet you now and others may be in places different from those described above.

Your way now lies through the hallway from which the Guards emerged. You will encounter any that did not come out to meet you. (See also Secrets, below). The hallway is guarded by a gun trap (automatic blasters), but it can be turned off by shooting a glowing button. At the other end, a long flight of stairs leads up to the area around and below the Communication Laser. The door to the Force Field Control Chamber is around to the left. Go up to it and, since you now have the Security Pass, receive the message "Security pass approved. You may enter force field control". The door opens, so go in, thread your way around the corners to the control console and push the button. You will then get the message "Yellow force fields deactivated". Come back out and retrace your steps to the level entrance room. You can follow the red carpet through the left-hand opening, up to the Communication Laser and shut it down as described in Part 2, above. But, since you've gone to the trouble of turning off the yellow force fields, you really should refer also to Part 5, below.
Part 5 - Completing the Exploration[edit]

The major piece of exploration yet to be completed is the underground / mine section. When you come in at the lower / basement-level entrance, take the stairs up and walk to the end of the long corridor, it is ahead of you and below. Once the Yellow Force Field is off, you can also get to it from the neighborhood of the Communication Laser by finding the pair of deep shafts and climbing down the ladders. An elevator will take you back up when you are done. In fact, it's not worth exploring this area until you've turned off the Yellow Force Field, so if you do go down and don't get very far, come back again after you've done that.
Look cautiously over the edge. On the right is a small elevator that will bring you back up. On the left are two levels of mine shaft braces. You can use the corner braces to drop down in three stages rather than risking damage from a long fall. However, there are a couple of Guards down there. Maybe you can see them scampering about. Either pick them off from up here or go down and blow them away. At the bottom, advance towards the doorway surrounded by pale yellow lights. This would be blocked by the Yellow Force Field if you had neglected to turn it off. Before going in, wait for an explosion above your head which reveals a Technician that would have been behind you if you had advanced in too much haste. (See also Secrets, below.) Take the Technician down, then deal with the Guards and Gunners in the passage behind the doorway and to the right. Press the wall button and a section of floor will withdraw to expose steps down into a small underground room with a pool of toxic waste. Enter, watching out for another Technician.

Save the game. The situation in the room is this : a hatch under the toxic waste leads to a room behind the rock wall, but it will close if you just dive in. You will also be in a world of hurt unless you've equipped Invulnerability or an Environment Suit. Exploration becomes inseparable from Secrets at this point, so try for a while to figure out how to deal with it and look at the section below if you're stumped. When you're done in there, you'll come back out an easy way. Retrace your steps to the small elevator and go up. Going along the long corridor will take you to the Lower Palace (or to goodies you've not yet collected) so you probably want to go around the twisty passage and take the high elevator up to the general area of the Communication Laser. From there, you can make your way to the next level.
Before you go, consider that things are likely to get tough when you meet the Makron, so if you've left any useful stuff lying around, now would be the time to collect it. You can go all the way back to the Outer Courts if you have the patience. If you plan a fair fight with the Makron, the most important thing to have is full Armor and a fair level of ammo for your more powerful weapons. If you're going to be a sissy, then just save up one or more Invulnerability and one or more Quad Damage and don't be completely out of ammo.
Secrets[edit]
This level has seven (7) secrets:

- The main / high-level entrance to the Upper Palace brings you into a room facing two doorways blocked by switchable force fields. The red carpet goes to the left-hand one. If and when you decide to go through the right-hand one, when it is safe to do so stop just inside the doorway. Look up and you will see a recessed block in the ceiling. Shoot it and the wall ahead of you will open revealing some ammo and an Adrenaline.
- On the path between the main entrance and the area around, but below, the Communication Laser, you will come to a corridor guarded by a gun trap (automatic blasters). At one end is a room with a grating in the floor through which you can see some secret goodies. At the other end, there is a gap in between the walkway and the wall. Below there is lava. You need to jump down into the gap and run under the walkway to get to the goodies. An elevator will bring you back up through the grating. You will lose considerable armor and health in the lava (unless you use up an Invulnerability), so don't do this when you are almost dead.
- During the quest for the Security Pass, you will find yourself at the top of a shaft with ladders going down. Inspect the wall to the left of the grating that you came through from the elevator. Shoot the recessed section and it will open to reveal an alcove with goodies inside, both to the left and to the right. If the wall closes, shoot it again to get out.
The gap near the walkway over the flag room. - The red carpet crosses over the tall room with red, back and white flags on a walkway. Above one end, vents emit periodic explosions. The other end takes a turn to the right in a dark area. On the inside of the turn, in deep shadow, there is a gap between the walkway and the wall. Drop down into it to collect this secret. You will have to drop down again to get out, but before you do look carefully through the hole at all angles until you've figured out where you will land. Crouch before dropping to reduce damage from the fall.
- In the underground / mine section, when an explosion in the ceiling reveals a Technician, after you've dealt with him look up into the hole he dropped out of. Shoot the glowing button there and a soon-to-be-useful item will fall into your waiting hands.
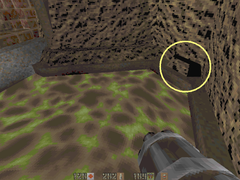
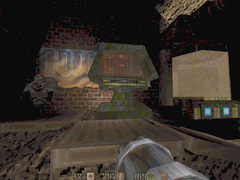
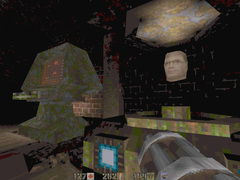
- In the underground / mine section, finding your way into the room behind the bricks counts as a secret. Look carefully at the edge of the toxic waste pool and find a small odd-shaped thing that turns out to be a switch. Press it to hold a hatch under the toxic waste open. Dive in quickly and swim through the hatch and up to solid ground on the other side. You will take substantial damage unless you have equipped an Environment Suit or an Invulnerability. In the room, as well as interesting decor, there is a computer console and a liquid-filled container. Activate the console (this requires the Red Key from the Outer Courts) and the liquid will drain. Shoot the container and take the head / Adrenaline inside[1]. Turn through 180 degrees and shoot the wall to get back out through another secret area, see below.
- In the underground / mine section, shoot the earth wall behind the bricks. An alcove will be revealed containing Body Armor. Either collect the Armor and the secret before going into the room behind the wall, or on your way back out. If you don't shoot the wall before going into the secret room, just shoot the wall behind the armor to get out.

- Gallery : In the Underground / Mine section of the Upper Palace
-
Press this switch.
-

Wall paintings.
-
Computer console.
-
The Adrenaline head.
-
The easy way out.


- ↑ It has been suggested that this is the head of one of the co-founders of id Software, either John Romero or John Carmack, depending on the source. John Carmack was a programmer on the development team of Quake II. John Romero had been forced to resign as a result of conflict with John Carmack prior to the Quake II project. John Romero generally affected long, dark hair and since the head has short sandy-colored hair this suggests that it is John Carmack.